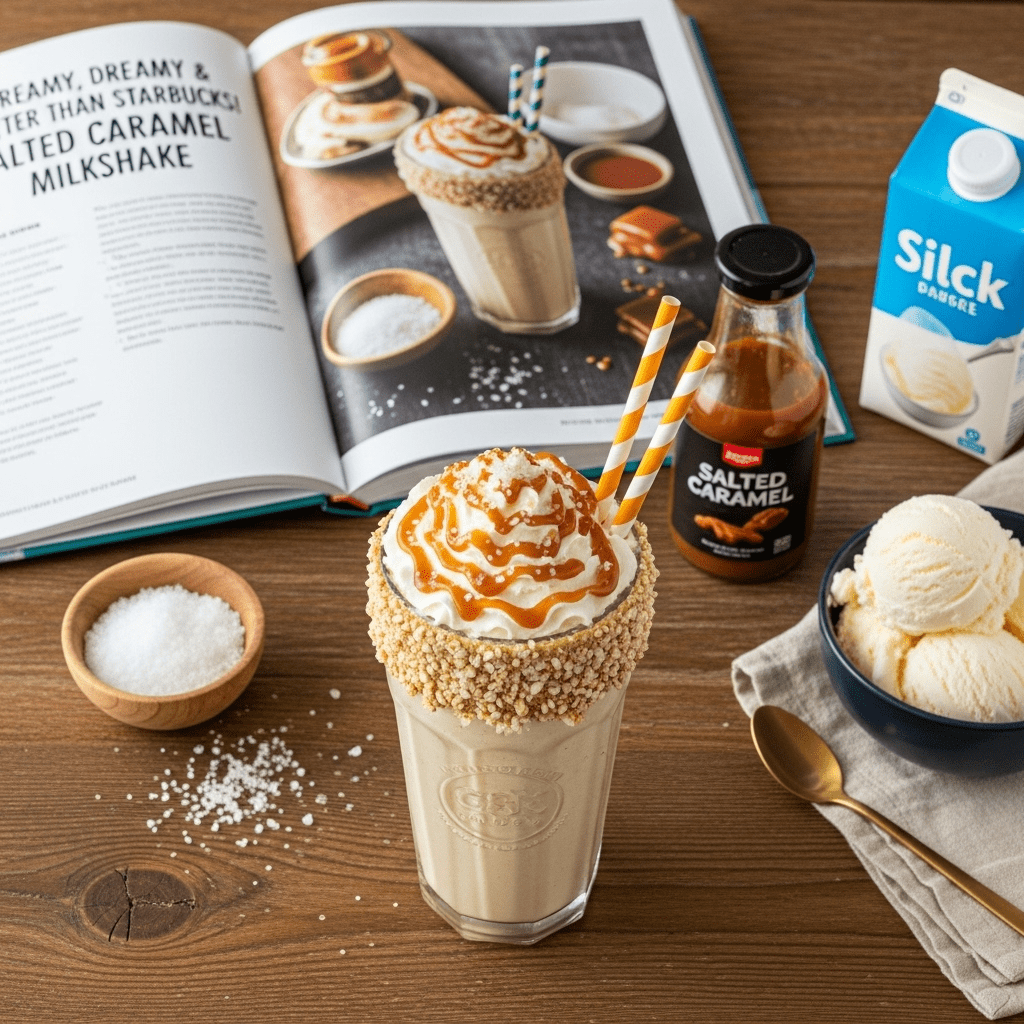
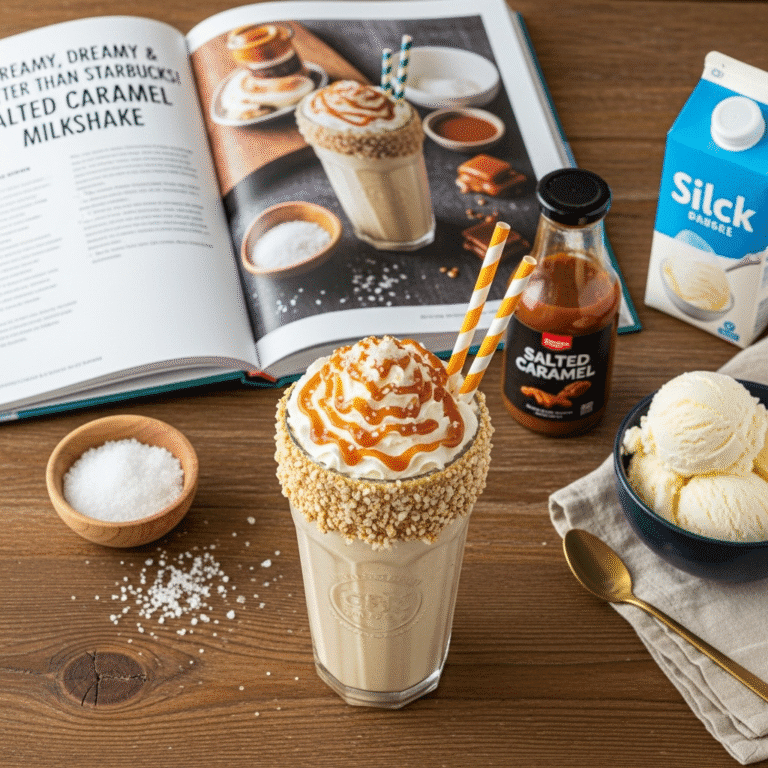
Salted Caramel Milkshake Recipe: Creamy, Dreamy & Better Than Starbucks!
There’s something absolutely magical about a salted caramel milkshake that makes you feel like you’re treating yourself to something special—even on an ordinary Tuesday afternoon. This indulgent, creamy salted caramel milkshake combines the rich sweetness of homemade caramel sauce with a subtle hint of sea salt, all blended with premium vanilla ice cream and topped with a cloud of whipped cream. It’s the ultimate dessert drink that tastes like it came from a fancy ice cream parlor, but you can make it right in your own kitchen in just 10 minutes!
Whether you’re craving a sweet pick-me-up after a long day, planning a special birthday celebration, hosting a summer backyard party, or just want to impress your kids (or yourself!) with a restaurant-quality treat, this salted caramel milkshake recipe delivers every single time. The combination of sweet and salty flavors creates an addictive taste sensation that keeps you coming back for more. Serve this luxurious shake on hot summer evenings, as an after-dinner dessert, during movie nights, or whenever you need a little liquid happiness in a glass.
This easy salted caramel milkshake is incredibly versatile too—you can make it thicker or thinner depending on your preference, adjust the saltiness to your taste, and customize it with different toppings and mix-ins. It’s the perfect canvas for creativity while still being foolproof enough for beginner cooks to nail on their first try.
History / Background
The milkshake as we know it today has come a long way from its humble beginnings. The term “milkshake” first appeared in the late 1800s, but back then it referred to an alcoholic whiskey drink—quite different from the family-friendly treat we enjoy today! It wasn’t until the early 1900s, with the invention of the electric blender, that milkshakes evolved into the thick, creamy, ice cream-based beverages we love.
The real milkshake revolution happened in 1922 when a Walgreens employee named Ivar “Pop” Coulson added two scoops of ice cream to a malted milk drink, creating the first modern milkshake. Throughout the 1950s and 60s, milkshakes became an iconic part of American diner culture, served at soda fountains across the country alongside burgers and fries.
Salted caramel itself has a fascinating history rooted in Brittany, France, where the combination of caramel and sea salt was popularized in the 1970s by French chocolatier Henri Le Roux. He created salted caramel candies called “caramels au beurre salé” (salted butter caramels) using the region’s famous fleur de sel sea salt. This flavor combination remained relatively regional until the 2000s, when salted caramel exploded onto the international culinary scene.
The 2010s saw salted caramel become one of the most popular flavor trends in America, appearing in everything from coffee drinks and ice cream to cupcakes and cocktails. The genius of salted caramel lies in the way salt enhances and balances sweetness, preventing caramel from tasting cloying while adding depth and complexity to the flavor profile.
Today, the salted caramel milkshake represents the perfect marriage of classic American diner culture and sophisticated French pastry tradition—comfort food elevated with a gourmet twist. Coffee chains and ice cream shops charge premium prices for this flavor combination, but you can easily recreate (and even surpass!) their versions at home with simple ingredients and a good blender.
Why You’ll Love This Recipe
This homemade salted caramel milkshake is about to become your new favorite dessert for so many reasons. Beyond just tasting absolutely incredible, this recipe offers practical benefits that make it a winner for busy home cooks and dessert lovers alike.
First and foremost, the flavor is extraordinary—think rich, buttery caramel with sweet cream notes, all balanced by that sophisticated hint of salt that makes each sip interesting rather than one-dimensional. The texture is perfectly thick and creamy without being so dense that you need a spoon, and the temperature is ideal for refreshment without being teeth-achingly cold.
Here’s why this recipe deserves a permanent spot in your dessert rotation:
- Lightning-fast preparation – Ready in just 10 minutes from start to finish, making it perfect for impromptu dessert cravings or last-minute entertaining
- Minimal ingredients – Requires only 5 basic ingredients that you might already have in your kitchen (ice cream, milk, caramel sauce, salt, and vanilla)
- No fancy equipment needed – Just a standard blender is all you need to achieve professional-quality results
- Customizable sweetness – Easily adjust the caramel and salt levels to match your personal taste preferences
- Budget-friendly indulgence – Costs a fraction of what you’d pay at a restaurant or coffee shop while tasting just as good (or better!)
- Kid-approved treat – Children absolutely love helping make milkshakes and will be thrilled with the delicious results
- Make-ahead friendly caramel – The homemade salted caramel sauce can be prepared days in advance and stored in the refrigerator
- Impressive presentation – Looks stunning when garnished properly, making it perfect for special occasions and Instagram-worthy photos
- Endlessly adaptable – Serve as-is, or transform it with additions like espresso, chocolate chips, pretzels, or bourbon for adults
This recipe strikes that perfect balance between being simple enough for weeknight ease yet special enough to serve to guests. Whether you’re treating yourself after a tough day or creating a memorable dessert experience for loved ones, this salted caramel milkshake delivers maximum impact with minimal effort.
Ingredient Notes
The beauty of a great salted caramel milkshake recipe lies in using quality ingredients that work together harmoniously. Let’s break down each component and why it matters for achieving that perfect balance of flavors and textures.
Vanilla Ice Cream – The foundation of your milkshake, so quality matters here! Use a premium vanilla ice cream with a high butterfat content (at least 14%) for the richest, creamiest results. Full-fat ice cream creates that luxurious, thick consistency that makes milkshakes irresistible. French vanilla works beautifully too, adding extra richness with its egg custard base. In a pinch, vanilla bean ice cream adds gorgeous visual specks and enhanced vanilla flavor. Avoid low-fat or “light” ice cream, which will produce a thin, icy shake. For dietary needs, substitute with high-quality vanilla coconut milk ice cream or cashew-based ice cream.
Whole Milk – Helps achieve the perfect drinkable consistency without making the shake too thick or too thin. Whole milk (3.25% fat) is ideal because its fat content complements the ice cream while adding just enough liquid to make the shake blend smoothly. You can substitute with half-and-half for an extra-indulgent, thicker shake, or use 2% milk if you prefer something slightly lighter. Non-dairy alternatives like whole oat milk or cashew milk work well for dairy-free versions, though avoid low-fat alternatives which produce a watery result.
Salted Caramel Sauce – The star ingredient that gives this shake its signature flavor! Homemade salted caramel sauce is absolutely divine and gives you complete control over the salt level and sweetness. However, quality store-bought salted caramel sauce works perfectly well when you’re short on time—look for brands with natural ingredients and avoid anything with high fructose corn syrup for the best flavor. Popular quality brands include Trader Joe’s Fleur de Sel Caramel Sauce or Stonewall Kitchen Sea Salt Caramel Sauce. You’ll use some blended into the shake and reserve extra for drizzling.
Sea Salt or Flaky Salt – This ingredient is non-negotiable for authentic salted caramel flavor! Fine sea salt works for mixing into the shake, while flaky finishing salts like Maldon or fleur de sel are perfect for sprinkling on top. The salt doesn’t just add saltiness—it enhances all the other flavors, makes the caramel taste richer and more complex, and prevents the shake from being cloyingly sweet. Start with a small amount (1/4 teaspoon) and adjust to taste. Avoid using regular table salt, which can taste harsh and chemical-like.
Vanilla Extract – While optional since you’re using vanilla ice cream, an extra splash of pure vanilla extract (about 1/2 teaspoon) deepens the overall flavor profile and adds aromatic complexity. Always choose pure vanilla extract over imitation for the best results.
Optional Additions: Heavy whipped cream for topping, extra caramel sauce for drizzling, caramel candies or toffee bits for garnish, and crushed pretzels for added salty crunch.
Equipment Needed
Making a perfect easy salted caramel milkshake doesn’t require any specialized equipment—just a few basic kitchen tools that most home cooks already own. Here’s everything you’ll need:
- High-powered blender – The most important tool! A good blender (like a Vitamix, Ninja, or KitchenAid) ensures your shake blends smoothly without ice cream chunks. Standard countertop blenders work fine; you don’t need commercial-grade equipment.
- Measuring cups and spoons – For accurately measuring ingredients to achieve consistent results every time
- Ice cream scoop – Makes it easier to portion ice cream and prevents it from melting on your counter while you measure
- Tall drinking glasses – Classic milkshake glasses or pint glasses (16 oz capacity) work beautifully and showcase your gorgeous creation
- Spoon or milkshake straw – Extra-wide reusable straws are perfect for thick shakes, or provide a long spoon for sipping and eating
- Rubber spatula – Helps you scrape every bit of delicious shake from the blender into your glass
- Small saucepan (if making homemade caramel) – For cooking the caramel sauce from scratch
- Whisk (if making homemade caramel) – Essential for stirring the caramel as it cooks
- Squeeze bottle (optional) – Makes drizzling decorative caramel designs inside the glass and on top much easier
Salted Caramel Milkshake Recipe
An ultra-creamy, restaurant-quality salted caramel milkshake made with vanilla ice cream, homemade or store-bought salted caramel sauce, and a perfect balance of sweet and salty flavors. Ready in just 10 minutes!
- Total Time: 5 minutes
- Yield: 2 servings 1x
Ingredients
For the Milkshake:
- 4 cups (about 1 pint) premium vanilla ice cream, slightly softened
- ½ cup whole milk (adjust for desired thickness)
- ⅓ cup salted caramel sauce, plus more for drizzling
- ¼ teaspoon fine sea salt
- ½ teaspoon pure vanilla extract
- Ice cubes (optional, for a thicker shake)
For Topping (Optional):
- Whipped cream
- Extra salted caramel sauce for drizzling
- Flaky sea salt (like Maldon)
- Caramel candies or toffee bits
- Crushed pretzels
For Homemade Salted Caramel Sauce (Optional):
- 1 cup granulated sugar
- 6 tablespoons unsalted butter, cut into pieces
- ½ cup heavy cream, room temperature
- 1 teaspoon sea salt
Instructions
If Making Homemade Salted Caramel Sauce:
- Cook the sugar: In a medium saucepan over medium heat, pour the granulated sugar in an even layer. Heat without stirring until the sugar begins to melt around the edges, about 4-5 minutes. Once it starts melting, gently whisk to encourage even melting and prevent burning. Continue cooking and whisking until all sugar is melted and the caramel turns a deep amber color, about 8-10 minutes total.
- Add the butter: Carefully add the butter pieces (mixture will bubble vigorously). Whisk until butter is completely melted and incorporated, about 1 minute.
- Add cream and salt: Remove from heat and slowly pour in the heavy cream while whisking constantly (it will bubble up dramatically). Whisk until smooth. Add the sea salt and whisk to combine. Let cool to room temperature, then transfer to a jar. This makes about 1½ cups of sauce, which you can store refrigerated for up to 2 weeks.
For the Milkshake:
- Prepare your glasses: If desired, drizzle salted caramel sauce inside two tall glasses in a decorative pattern, creating swirls along the inside. Place glasses in the freezer while you make the shake.
- Blend the shake: Add the vanilla ice cream, whole milk, ⅓ cup salted caramel sauce, sea salt, and vanilla extract to a high-powered blender. If you want an extra-thick shake, add 3-4 ice cubes as well.
- Achieve perfect consistency: Blend on low speed initially to break up the ice cream, then increase to medium-high speed. Blend for 30-45 seconds until completely smooth and creamy. The shake should be thick enough to coat a spoon but still pourable. If too thick, add 1-2 tablespoons more milk and pulse briefly. If too thin, add another scoop of ice cream and blend again.
- Taste and adjust: Sample your shake and adjust the salt level if desired. Remember, you can always add more salt but can’t take it away!
- Serve immediately: Pour the milkshake into your prepared chilled glasses. The shake should be thick and hold its shape slightly when poured.
- Add toppings: Top generously with whipped cream, drizzle with additional salted caramel sauce, and finish with a pinch of flaky sea salt. For extra decadence, add caramel candies, toffee bits, or crushed pretzels on top.
- Serve right away: Serve immediately with extra-wide straws or long spoons. Milkshakes are best enjoyed fresh and will begin to melt and separate if left sitting too long.
Notes
- Ice cream temperature: Let your ice cream sit at room temperature for 5-10 minutes before blending for easier mixing and smoother results.
- Consistency control: The milk-to-ice cream ratio determines thickness. Start with less milk (⅓ cup) for a thicker shake; add more gradually as needed.
- Salt balance: Start with less salt than you think—you can always add more, but the flavors will intensify as the shake sits.
- Make it boozy: Adults can add 2 ounces of bourbon, rum, or Irish cream liqueur for a grown-up version.
- Dairy-free version: Use coconut milk ice cream and oat milk, plus dairy-free caramel sauce for a vegan-friendly treat.
- Storage note: Milkshakes don’t store well and should be consumed immediately for best texture and flavor.
- Prep Time: 5 minutes
- Cook Time: 0 minutes
Nutrition
- Serving Size: 1 milkshake (half of recipe)
- Calories: 645
- Sugar: 78g
- Sodium: 485mg
- Fat: 32g
- Saturated Fat: 20g
- Unsaturated Fat: 10g
- Trans Fat: 0g
- Carbohydrates: 08g
- Fiber: 0g
- Protein: 8g
- Cholesterol: 95mg
Tips & Variations
Flavor Variations:
Transform your basic salted caramel shake recipe into exciting new flavor combinations with these creative twists:
- Salted Caramel Chocolate Milkshake: Add 3 tablespoons chocolate syrup or 2 tablespoons cocoa powder for a mocha-inspired treat
- Salted Caramel Pretzel Shake: Blend in ½ cup crushed pretzels for salty crunch throughout, or just use as a garnish
- Salted Caramel Espresso Shake: Add 2 shots of cooled espresso or 2 tablespoons instant espresso powder for a coffee shop-style creation
- Salted Caramel Banana Shake: Blend in one frozen banana for natural sweetness and extra creaminess
- Salted Caramel Peanut Butter Shake: Add 3 tablespoons creamy peanut butter for a Reese’s-inspired flavor combination
- Bourbon Salted Caramel Shake: Spike it with 2 ounces of good bourbon for an adults-only dessert cocktail
Texture Variations:
- Extra Thick Shake: Use only ¼ cup milk and add 4-5 ice cubes, blend until you achieve a spoon-thick consistency
- Thin & Sippable: Increase milk to ¾ cup for a more drinkable version that works better with regular straws
- Chunky Style: Pulse in caramel candy pieces, toffee bits, or chocolate chips at the end for texture contrast
- Smooth & Silky: Strain your homemade caramel sauce before using to remove any crystallized sugar bits
Dietary Modifications:
- Dairy-Free: Use coconut milk ice cream, oat milk, and ensure your caramel sauce is dairy-free
- Lower Sugar: Use no-sugar-added ice cream and sugar-free caramel syrup (though flavor won’t be as rich)
- Protein-Packed: Add a scoop of vanilla protein powder for a post-workout treat
- Keto-Friendly: Use keto ice cream and sugar-free caramel sauce with almond milk
Pro Chef Tips
Temperature Management:
Professional ice cream shops keep their serving freezers at exactly 6-10°F, slightly warmer than home freezers, for optimal scoopability. Let your ice cream sit at room temperature for 5-10 minutes before blending—this prevents your blender motor from straining and creates a smoother, more evenly blended shake without ice chunks. Conversely, chill your serving glasses in the freezer for at least 15 minutes before serving to keep the shake cold longer.
Caramel Technique:
When making homemade caramel, use a light-colored saucepan so you can accurately judge the color of the caramel as it cooks. Dark pans make it difficult to see when the caramel reaches that perfect amber stage, increasing the risk of burning. Never walk away from cooking caramel—it goes from perfect to burnt in seconds. The sugar should reach 350°F for ideal flavor development without bitterness.
Blending Strategy:
Professional milkshake makers know the secret is in the blending technique. Start your blender on the lowest speed for 10-15 seconds to break up the ice cream initially, then increase gradually to medium-high. This prevents ice cream from flying up the sides of the blender where it won’t get incorporated. Blend for the minimum time needed—over-blending introduces too much air, making the shake foamy rather than creamy. The ideal shake should be blended for 30-45 seconds maximum.
Salt Placement:
For maximum flavor impact, add salt at two points: blend fine sea salt into the shake itself for overall flavor enhancement, then finish with flaky salt on top just before serving. The flaky salt crystals provide textural interest and intense bursts of flavor with each sip. This layering technique is what separates amateur from professional-quality salted caramel creations.
Caramel Drizzle Artistry:
Warm your caramel sauce slightly (10 seconds in the microwave) before drizzling it inside glasses or on top—it flows more smoothly and creates more dramatic patterns. Professional baristas use squeeze bottles to create Instagram-worthy designs. Hold the bottle at a 45-degree angle and squeeze with consistent pressure while rotating the glass for even coverage.
Flavor Balancing:
The key to an exceptional salted caramel milkshake is achieving perfect sweet-salty equilibrium. Professional pastry chefs taste and adjust throughout the process. After blending, taste your shake before serving and ask yourself: Can I taste both the caramel sweetness AND the salt distinctly? If it tastes flat or one-dimensional, it needs more salt. If you can only taste salt, add more caramel. The flavors should dance together, neither overwhelming the other.
Common Mistakes to Avoid
Using Ice Cream That’s Too Frozen:
The number one mistake home cooks make is trying to blend rock-hard ice cream straight from the freezer. This strains your blender motor, creates an unevenly mixed shake with ice crystals, and can even damage less powerful blenders. Solution: Always let ice cream soften at room temperature for 5-10 minutes before blending. It should be soft enough to scoop easily but not melted.
Adding Too Much Liquid:
Overzealous with the milk, anxious cooks often pour too much liquid, resulting in a thin, watery shake that tastes more like flavored milk than a proper milkshake. Remember: You can always add more liquid, but you can’t take it away. Start with less milk than the recipe calls for (about ⅓ cup), blend, then add more gradually if needed. The shake should be thick enough to coat a spoon but still pourable.
Using Low-Quality Caramel Sauce:
Not all caramel sauces are created equal! Cheap, artificial-tasting caramel syrup from the grocery store will make your milkshake taste artificial and one-dimensional. Look for caramel sauce with real cream and butter in the ingredients, or make your own for the absolute best flavor. The caramel is the star of this show—don’t cut corners here.
Over-Blending:
Excited makers often blend their shake for too long (2+ minutes), thinking more blending equals better results. Actually, over-blending incorporates too much air, making the shake foamy and causing it to melt faster. It can also make the shake warm. Blend only until smooth and combined, about 30-45 seconds maximum. Your shake should be thick and creamy, not frothy.
Skipping the Salt:
Some cooks worry about making their shake too salty and leave out the salt entirely, but salt is absolutely essential to the “salted caramel” flavor profile. Without it, you just have a regular caramel shake. The salt enhances the caramel flavor, adds complexity, and prevents cloy ing sweetness. Start small (¼ teaspoon blended in) and adjust to taste—you’ll be surprised how much the salt improves the overall flavor without making it taste salty.
Not Chilling the Glasses:
Serving your perfect milkshake in a room-temperature glass causes it to melt immediately around the edges, making it watery and ruining the presentation. Always chill your serving glasses in the freezer for at least 15-20 minutes before serving. This professional touch keeps your shake at optimal temperature and consistency much longer.
Using Regular Table Salt:
Regular iodized table salt tastes harsh and chemical-like in desserts. Always use sea salt or kosher salt, which have a cleaner, purer flavor that enhances rather than overpowers. For garnishing, use flaky finishing salts like Maldon or fleur de sel for the best texture and taste.
Storage & Meal Prep
Immediate Consumption Recommended:
The harsh truth about milkshakes is that they’re truly best consumed immediately after blending. The texture, temperature, and flavor are all at their peak right when the shake comes out of the blender. However, if you absolutely must store your salted caramel milkshake, here’s how to do it with minimal quality loss.
Short-Term Storage (Same Day):
If you need to store your milkshake for a few hours, pour it into an airtight container, press plastic wrap directly onto the surface to prevent ice crystals from forming, and seal with a lid. Store in the coldest part of your freezer (back, bottom shelf). The shake will become quite solid and will need to be transferred to the refrigerator for 15-20 minutes before serving, then stirred vigorously or re-blended briefly. Texture won’t be quite as creamy as fresh, but it’s acceptable.
Caramel Sauce Storage:
The homemade salted caramel sauce (the real star!) stores beautifully and is the perfect make-ahead component. Transfer cooled caramel to a clean glass jar with a tight-fitting lid and refrigerate for up to 2 weeks, or freeze for up to 3 months. The caramel will thicken considerably when cold—before using, let it sit at room temperature for 30 minutes or microwave in 10-second intervals, stirring between each, until it reaches drizzling consistency. This is your secret weapon for quick milkshake assembly anytime a craving strikes!
Ice Cream Storage:
Keep your ice cream properly stored in the main freezer compartment (not the door, where temperature fluctuates) with a piece of plastic wrap pressed directly on the surface before sealing the container. This prevents ice crystals from forming and maintains optimal texture. Quality ice cream, stored properly, will stay fresh for 1-2 months.
Reheating/Re-Serving:
“Reheating” isn’t quite the right term for milkshakes, but here’s how to revive a stored shake: Move it from freezer to refrigerator 20-30 minutes before serving. Once slightly softened, transfer to a blender and pulse 3-4 times to restore smooth consistency. You may need to add a splash of milk (1-2 tablespoons) to achieve the right texture. Don’t over-blend, as this will make it too thin. Pour into a chilled glass and serve immediately.
Make-Ahead & Freezer Notes
Strategic Pre-Preparation:
While you can’t make the actual salted caramel milkshake days in advance and expect great results, you can absolutely prep components ahead of time for lightning-fast assembly when the craving hits.
Make-Ahead Caramel Sauce (Up to 2 Weeks):
This is your best make-ahead strategy! Prepare a batch of homemade salted caramel sauce on a weekend and store it refrigerated in a mason jar. When you want a milkshake, simply warm the amount you need to drizzling consistency and proceed with the recipe. Having homemade caramel ready to go means you’re always just 5 minutes away from an incredible milkshake. Label your jar with the date made so you remember when it expires.
Portioned Ice Cream (Up to 1 Month):
For even faster prep, portion your ice cream into milkshake-sized amounts. Scoop 4 scoops (about 2 cups) into individual containers or freezer bags, label them “Milkshake Portion,” and freeze. When you’re ready to make a shake, grab a pre-portioned container and let it soften briefly—no measuring required!
Freezing Assembled Milkshakes (Not Recommended):
While technically possible, freezing complete milkshakes is not ideal. The texture changes significantly—you’ll lose that creamy, smooth consistency and end up with something more like frozen ice cream that needs complete re-blending. If you must freeze an assembled shake, pour it into freezer-safe containers, leaving 1 inch of headspace for expansion. It will keep for up to 1 month but will require significant re-blending and likely additional milk to restore proper consistency.
Best Method for Quick Access:
The absolute best make-ahead strategy is the “component prep” method: Make and refrigerate caramel sauce, pre-portion ice cream, and keep a carton of whole milk on hand. With these three items ready, you can assemble a fresh, perfect salted caramel milkshake in under 5 minutes anytime. This approach gives you convenience without sacrificing quality.
Freezer-to-Table Strategy:
If entertaining, you can prepare milkshakes up to 30 minutes before serving by storing them in the main freezer compartment in chilled serving glasses covered tightly with plastic wrap. They’ll firm up slightly but won’t completely solidify. Give them a quick stir just before serving. This works for dinner parties where you want dessert ready but can’t step away during the meal.
Serving Suggestions
A salted caramel milkshake is substantial enough to serve as dessert all on its own, but pairing it with complementary treats creates an unforgettable dessert experience. Here are my favorite serving suggestions:
Classic Diner-Style Pairings:
- Warm chocolate chip cookies – The temperature contrast between warm cookies and cold shake is absolutely divine
- Brownies or blondies – Rich, fudgy brownies with a cold milkshake on the side is dessert perfection
- Warm apple pie or apple crisp – The caramel flavor profile complements apple desserts beautifully
- French fries – Yes, really! The classic diner move of dipping salty fries into a sweet milkshake is surprisingly addictive
Elevated Dessert Board:
- Arrange your milkshake alongside small portions of salted caramel cheesecake bites, chocolate truffles, and fresh berries
- Add shortbread cookies or biscotti for dipping
- Include pretzel rods for a salty-sweet crunch
Party & Celebration Service:
- Create a milkshake bar with this salted caramel version alongside chocolate and strawberry shakes
- Set out bowls of toppings: crushed cookies, candy pieces, sprinkles, chocolate chips, and various sauces for guests to customize
- Provide extra-wide straws in fun colors and patterns
Coffee Shop-Inspired Pairing:
- Serve with a slice of banana bread or pumpkin bread
- Pair with cinnamon rolls or sticky buns for an indulgent breakfast dessert
- Accompany with biscotti or almond cookies for a sophisticated touch
Movie Night at Home:
- Serve alongside buttered popcorn (trust me, the sweet-salty combo is perfect)
- Offer with classic movie snacks like nachos or pretzels
- Pair with pizza for the ultimate Friday night indulgence
Kids’ Party Serving:
- Serve in small cups with colorful straws for a birthday party treat
- Pair with cupcakes or cake for a complete celebration dessert
- Offer alongside ice cream sandwiches for a frozen dessert buffet
Seasonal Variations:
- Summer: Serve with fresh peach cobbler or berry shortcake
- Fall: Pair with pumpkin cookies or apple cider donuts
- Winter: Accompany with peppermint bark or gingerbread cookies
- Spring: Serve with lemon bars or strawberry shortcake
FAQs Section
Q: Can I make this salted caramel milkshake without a blender?
A: While a blender produces the smoothest, creamiest results, you can make a basic version using a large bowl and a sturdy whisk or hand mixer. Let your ice cream soften until nearly melted, then whisk vigorously with the milk, caramel, and salt until combined. The texture won’t be quite as smooth as blended, but it will still taste delicious. A stick blender (immersion blender) also works reasonably well for making individual-sized milkshakes.
Q: How can I make my milkshake thicker without adding more ice cream?
A: There are several strategies for achieving an extra-thick shake without changing the flavor balance. First, reduce the amount of milk—start with just ¼ cup instead of ½ cup. Second, add 3-4 ice cubes to the blender, which creates thickness without diluting flavor. Third, make sure your ice cream is very cold and hasn’t softened too much. Finally, freeze your blender container for 15 minutes before use, which helps keep everything cold during blending. Some people also add a tablespoon of malted milk powder, which thickens the shake while adding a pleasant malty flavor.
Q: Why does my milkshake separate or get icy?
A: Separation happens when the shake is over-blended, introducing too much air, or when low-quality, low-fat ice cream is used. Ice crystals form when the ice cream has been stored improperly or has experienced temperature fluctuations (freezer burn). To prevent both issues: use premium, high-fat ice cream; blend for only 30-45 seconds; serve immediately; and ensure your ice cream hasn’t refrozen after partial melting. If your shake does separate, simply give it a quick 5-second pulse in the blender to re-combine.
Q: Can I make this dairy-free or vegan?
A: Absolutely! For a dairy-free salted caramel milkshake, substitute regular ice cream with high-quality coconut milk, cashew, or oat milk-based ice cream (brands like So Delicious, Oatly, or Ben & Jerry’s non-dairy work wonderfully). Replace the whole milk with oat milk, which has a natural creaminess that mimics dairy better than other alternatives. Make sure your caramel sauce is also dairy-free—you can make homemade version using coconut cream instead of dairy cream, or purchase brands like Cocos Organic or Foxy’s Pure Indulgence that are naturally vegan. The flavor and texture will be slightly different but still absolutely delicious!