Peanut Butter Honey Toast Recipe: Sweet, Simple, and Absolutely Delicious
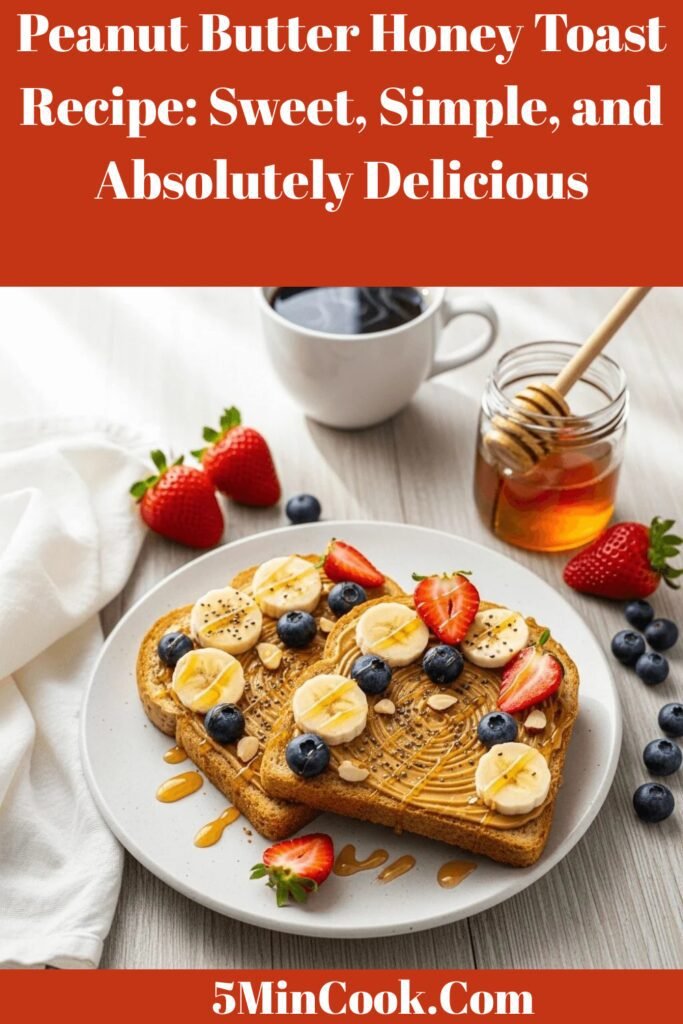
Peanut Butter Honey Toast is the ultimate comfort food that combines simplicity with incredible satisfaction! This classic sweet toast recipe features perfectly toasted bread slathered with creamy (or crunchy!) peanut butter, drizzled with golden honey, and optionally topped with fresh fruit, nuts, or a sprinkle of cinnamon. It’s the kind of recipe that doesn’t really need a recipe—yet somehow, when you get all the details just right, it transforms from a basic snack into something truly special that hits all the right notes. This sweet and savory combination is perfect for busy weekday breakfasts when you need something quick and nourishing, leisurely weekend brunches when you want something cozy and comforting, after-school snacks that kids and adults alike devour, post-workout fuel that provides protein and natural energy, or even a late-night treat when sweet cravings strike. The beauty of peanut butter honey toast lies in its versatility and accessibility—you probably have all the ingredients in your pantry right now, it takes less than 5 minutes to make, and it’s endlessly customizable to suit your taste preferences and dietary needs. Whether you’re making it for yourself, preparing breakfast for your kids, or looking for a simple recipe to teach young cooks, this peanut butter honey toast delivers every single time!
History / Background
While peanut butter honey toast might not have the centuries-old history of European pastries or ancient cultural significance, it represents an important piece of American food culture and the evolution of quick, accessible comfort food. The story really begins with peanut butter itself, which has a fascinating American origin.
Peanut butter as we know it was popularized in the United States in the late 1800s and early 1900s. While various cultures had been grinding peanuts into paste for centuries, the smooth, shelf-stable peanut butter we know today was developed through the work of several innovators. Dr. John Harvey Kellogg (yes, the cereal guy!) patented a process for making peanut butter in 1895, originally creating it as a protein-rich food for patients at his sanitarium who couldn’t chew solid food. Around the same time, other inventors were perfecting the process, and by the early 1900s, peanut butter began appearing at fairs and in stores.
The combination of peanut butter and honey specifically has roots in natural food movements and the idea of using whole, recognizable ingredients. Honey, one of humanity’s oldest sweeteners, paired naturally with the relatively new invention of peanut butter to create a combination that was both nutritious and delicious. Unlike jelly or jam, honey was seen as a more “natural” sweetener, making this combination popular among health-conscious eaters even in the early 20th century.
Peanut butter toast became a staple of American breakfast tables particularly during the mid-20th century as pre-sliced bread became widely available and toasters became common household appliances. The rise of convenience culture in the 1950s and 60s made simple, quick meals like peanut butter toast increasingly popular, especially for busy families and working parents who needed to get breakfast on the table fast.
The peanut butter and honey combination gained particular popularity in the 1970s during the natural foods movement, when people began moving away from processed foods and seeking more wholesome alternatives. Honey represented a return to natural sweetness, and the PB&H combination became a healthier alternative to peanut butter and jelly (which typically contained refined sugar).
Today, peanut butter honey toast has evolved beyond its simple origins and become a canvas for creativity. Social media platforms, especially Pinterest and Instagram, have transformed this humble breakfast into an art form with beautiful toppings, thoughtful presentation, and countless variations. What started as a quick, practical meal has become both a nostalgic comfort food and a modern “toast trend” that fits perfectly into contemporary food culture’s focus on simple, wholesome, photogenic meals.
Why You’ll Love This Recipe
This peanut butter honey toast recipe might seem almost too simple to write about, but that’s exactly why it’s so brilliant! Sometimes the best recipes are the ones that don’t require a culinary degree or an hour in the kitchen. This is pure, uncomplicated deliciousness that delivers satisfaction way beyond what you’d expect from such a basic combination of ingredients.
What makes this particular approach to peanut butter honey toast special is that we’re not just throwing ingredients together—we’re being intentional about every step to maximize flavor, texture, and enjoyment. From achieving the perfect toast level to warming the peanut butter for easier spreading, drizzling (not dumping) the honey for even distribution, and adding thoughtful toppings that elevate the experience, these small details transform simple toast into something you’ll actually crave and look forward to making.
Here’s why this easy peanut butter honey toast will become your new favorite quick meal:
- Ready in 5 Minutes – Literally one of the fastest breakfasts or snacks you can make
- Only 3 Core Ingredients – Bread, peanut butter, honey—that’s it!
- Naturally Energizing – Provides protein, healthy fats, and natural sugars for sustained energy
- Kid-Approved – Children absolutely love this sweet and satisfying combination
- Budget-Friendly – Costs less than $1 per serving with pantry staples
- Endlessly Customizable – Add fruits, nuts, seeds, spices, or chocolate chips
- No Cooking Skills Required – Perfect for beginners, kids, or anyone learning to cook
- Satisfying & Filling – Keeps you full for hours despite being so simple
- Perfect Anytime – Great for breakfast, snack, post-workout, or late-night treat
- Naturally Sweet – Satisfies sweet cravings with real, wholesome ingredients
- One Tool Needed – Just a toaster (or toaster oven, or skillet)
- Meal Prep Friendly – Components can be prepped for grab-and-go mornings
Ingredient Notes
The beauty of this recipe is its simplicity, but let’s talk about how to choose the best ingredients and when you might want to substitute!
Bread: Your foundation! Choose your favorite bread—whole wheat for extra fiber and nutrients, sourdough for tangy flavor and better digestibility, white bread for classic soft texture, multigrain for heartiness and crunch, or gluten-free bread if needed. Thickness matters—thicker slices (about ½ inch) provide better texture and can hold more toppings without getting soggy. Tip: Day-old bread actually toasts better than super-fresh bread!
Peanut Butter: The star of the show! Natural peanut butter (just peanuts and salt) offers pure peanut flavor and avoids added oils and sugars, though it requires stirring and refrigeration. Regular creamy peanut butter spreads easily and provides consistent texture. Crunchy peanut butter adds delightful texture with peanut pieces throughout. Substitution: Any nut or seed butter works—try almond butter, cashew butter, sunflower seed butter (great for nut-free), or even tahini for a different twist!
Honey: Nature’s liquid gold! Raw honey offers maximum nutrition and complex flavor with subtle floral notes. Regular honey is more affordable and milder in flavor. Look for local honey if possible—it supports beekeepers in your area and may help with seasonal allergies! Substitution: Maple syrup provides similar sweetness with its own distinct flavor, agave nectar is thinner and sweeter, or date syrup offers rich caramel notes.
Optional Toppings: This is where you can get creative and customize to your preferences:
- Fresh Fruit: Sliced bananas (classic combo!), strawberries, blueberries, raspberries, apple slices, or pear slices
- Dried Fruit: Raisins, cranberries, chopped dates, or figs
- Nuts & Seeds: Chopped almonds, walnuts, pecans, hemp seeds, chia seeds, or flax seeds
- Spices: Cinnamon, nutmeg, or cardamom
- Extras: Chocolate chips, coconut flakes, granola, or a sprinkle of sea salt
Equipment Needed
You barely need any equipment for this simple recipe, which is part of its charm!
- Toaster, toaster oven, or skillet (for toasting the bread)
- Butter knife or offset spatula (for spreading peanut butter)
- Spoon (for drizzling honey)
- Plate (for serving)
- Small microwave-safe bowl (optional, for warming peanut butter)
- Cutting board and knife (if adding fresh fruit toppings)
That’s it! No fancy equipment, no special tools—just the basics you already have in your kitchen.
Print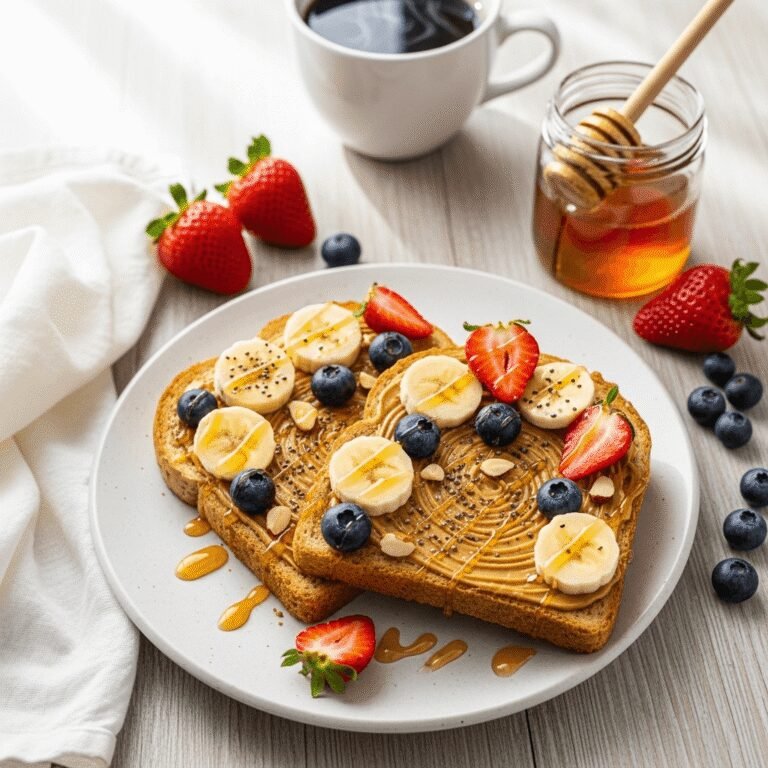
Peanut Butter Honey Toast Recipe
Quick and delicious peanut butter honey toast with perfectly toasted bread, creamy peanut butter, sweet honey drizzle, and optional toppings. A simple yet satisfying breakfast or snack that’s ready in just 5 minutes!
- Total Time: 5 minutes
- Yield: 1 serving (easily multiplied) 1x
Ingredients
Basic Recipe:
- 2 slices bread of your choice (whole wheat, sourdough, white, multigrain, or gluten-free)
- 2-3 tablespoons peanut butter (creamy or crunchy)
- 1-2 tablespoons honey (adjust to taste)
- Optional: pinch of cinnamon
Optional Toppings (choose your favorites):
- ½ banana, sliced
- ¼ cup fresh berries (strawberries, blueberries, or raspberries)
- 1 tablespoon chopped nuts (almonds, walnuts, or pecans)
- 1 teaspoon chia seeds or hemp seeds
- 1 tablespoon chocolate chips
- 1 tablespoon granola
- Pinch of sea salt
Instructions
- Toast the Bread: Place bread slices in your toaster and toast to your preferred level of doneness. For this recipe, medium-golden toast works perfectly—crispy enough to hold toppings but not so dark that it’s crunchy throughout. If using a toaster oven, toast at 375°F for 3-4 minutes, watching carefully.
- Warm the Peanut Butter (Optional): For easier spreading, especially if using natural peanut butter straight from the fridge, place peanut butter in a small microwave-safe bowl and microwave for 10-15 seconds. It should be slightly softened but not hot or melted. This step makes spreading much easier and prevents tearing the toast.
- Spread the Peanut Butter: While toast is still warm, generously spread peanut butter over each slice, covering all the way to the edges. Use about 1-1½ tablespoons per slice, or more if you love peanut butter! The warmth of the toast will help the peanut butter spread smoothly and melt slightly into the surface.
- Drizzle the Honey: Using a spoon, drizzle honey over the peanut butter in a back-and-forth motion to ensure even coverage. Start with 1-2 teaspoons per slice and add more to taste. You want the honey to pool slightly in some areas while coating the entire surface. Tip: Warming honey for 5-10 seconds in the microwave makes it easier to drizzle!
- Add Optional Toppings: If using any toppings, add them now while the toast is still warm. Arrange banana slices in overlapping rows, scatter berries artfully, sprinkle with seeds or nuts, or add a pinch of cinnamon. Press toppings gently into the peanut butter so they stick.
- Serve Immediately: Enjoy your peanut butter honey toast right away while it’s warm and the peanut butter is still soft and creamy. The contrast between warm toast and cool fruit (if using) is absolutely delicious!
Notes
- Bread Choice: Thicker slices hold toppings better without getting soggy.
- Natural Peanut Butter: If using natural PB that separates, stir well before measuring and consider warming it for easier spreading.
- Honey Measurement: Adjust honey to your sweetness preference—some people prefer a light drizzle, others love it generously coated!
- Make it Vegan: Use vegan bread and substitute maple syrup for honey, or ensure your honey is ethically sourced.
- Kid-Friendly: Let children help spread toppings and arrange fruit for a fun cooking activity.
- Prep Time: 2 minutes
- Cook Time: 3 minutes
- Category: Breakfast
- Method: Toasting
- Cuisine: American
- Diet: Vegetarian
Nutrition
- Serving Size: 2 slices of toast with peanut butter and honey (no additional toppings)
- Calories: 380
- Sugar: 18g
- Sodium: 320mg
- Fat: 18g
- Saturated Fat: 3g
- Unsaturated Fat: 14g
- Trans Fat: 0g
- Carbohydrates: 45g
- Fiber: 5g
- Protein: 12g
- Cholesterol: 0mg
Peanut Butter Honey Toast Recipe: Sweet, Simple, and Absolutely Delicious
Introduction of Recipe
Peanut Butter Honey Toast is the ultimate comfort food that combines simplicity with incredible satisfaction! This classic sweet toast recipe features perfectly toasted bread slathered with creamy (or crunchy!) peanut butter, drizzled with golden honey, and optionally topped with fresh fruit, nuts, or a sprinkle of cinnamon. It’s the kind of recipe that doesn’t really need a recipe—yet somehow, when you get all the details just right, it transforms from a basic snack into something truly special that hits all the right notes. This sweet and savory combination is perfect for busy weekday breakfasts when you need something quick and nourishing, leisurely weekend brunches when you want something cozy and comforting, after-school snacks that kids and adults alike devour, post-workout fuel that provides protein and natural energy, or even a late-night treat when sweet cravings strike. The beauty of peanut butter honey toast lies in its versatility and accessibility—you probably have all the ingredients in your pantry right now, it takes less than 5 minutes to make, and it’s endlessly customizable to suit your taste preferences and dietary needs. Whether you’re making it for yourself, preparing breakfast for your kids, or looking for a simple recipe to teach young cooks, this peanut butter honey toast delivers every single time!
History / Background
While peanut butter honey toast might not have the centuries-old history of European pastries or ancient cultural significance, it represents an important piece of American food culture and the evolution of quick, accessible comfort food. The story really begins with peanut butter itself, which has a fascinating American origin.
Peanut butter as we know it was popularized in the United States in the late 1800s and early 1900s. While various cultures had been grinding peanuts into paste for centuries, the smooth, shelf-stable peanut butter we know today was developed through the work of several innovators. Dr. John Harvey Kellogg (yes, the cereal guy!) patented a process for making peanut butter in 1895, originally creating it as a protein-rich food for patients at his sanitarium who couldn’t chew solid food. Around the same time, other inventors were perfecting the process, and by the early 1900s, peanut butter began appearing at fairs and in stores.
The combination of peanut butter and honey specifically has roots in natural food movements and the idea of using whole, recognizable ingredients. Honey, one of humanity’s oldest sweeteners, paired naturally with the relatively new invention of peanut butter to create a combination that was both nutritious and delicious. Unlike jelly or jam, honey was seen as a more “natural” sweetener, making this combination popular among health-conscious eaters even in the early 20th century.
Peanut butter toast became a staple of American breakfast tables particularly during the mid-20th century as pre-sliced bread became widely available and toasters became common household appliances. The rise of convenience culture in the 1950s and 60s made simple, quick meals like peanut butter toast increasingly popular, especially for busy families and working parents who needed to get breakfast on the table fast.
The peanut butter and honey combination gained particular popularity in the 1970s during the natural foods movement, when people began moving away from processed foods and seeking more wholesome alternatives. Honey represented a return to natural sweetness, and the PB&H combination became a healthier alternative to peanut butter and jelly (which typically contained refined sugar).
Today, peanut butter honey toast has evolved beyond its simple origins and become a canvas for creativity. Social media platforms, especially Pinterest and Instagram, have transformed this humble breakfast into an art form with beautiful toppings, thoughtful presentation, and countless variations. What started as a quick, practical meal has become both a nostalgic comfort food and a modern “toast trend” that fits perfectly into contemporary food culture’s focus on simple, wholesome, photogenic meals.
Why You’ll Love This Recipe
This peanut butter honey toast recipe might seem almost too simple to write about, but that’s exactly why it’s so brilliant! Sometimes the best recipes are the ones that don’t require a culinary degree or an hour in the kitchen. This is pure, uncomplicated deliciousness that delivers satisfaction way beyond what you’d expect from such a basic combination of ingredients.
What makes this particular approach to peanut butter honey toast special is that we’re not just throwing ingredients together—we’re being intentional about every step to maximize flavor, texture, and enjoyment. From achieving the perfect toast level to warming the peanut butter for easier spreading, drizzling (not dumping) the honey for even distribution, and adding thoughtful toppings that elevate the experience, these small details transform simple toast into something you’ll actually crave and look forward to making.
Here’s why this easy peanut butter honey toast will become your new favorite quick meal:
- Ready in 5 Minutes – Literally one of the fastest breakfasts or snacks you can make
- Only 3 Core Ingredients – Bread, peanut butter, honey—that’s it!
- Naturally Energizing – Provides protein, healthy fats, and natural sugars for sustained energy
- Kid-Approved – Children absolutely love this sweet and satisfying combination
- Budget-Friendly – Costs less than $1 per serving with pantry staples
- Endlessly Customizable – Add fruits, nuts, seeds, spices, or chocolate chips
- No Cooking Skills Required – Perfect for beginners, kids, or anyone learning to cook
- Satisfying & Filling – Keeps you full for hours despite being so simple
- Perfect Anytime – Great for breakfast, snack, post-workout, or late-night treat
- Naturally Sweet – Satisfies sweet cravings with real, wholesome ingredients
- One Tool Needed – Just a toaster (or toaster oven, or skillet)
- Meal Prep Friendly – Components can be prepped for grab-and-go mornings
Ingredient Notes
The beauty of this recipe is its simplicity, but let’s talk about how to choose the best ingredients and when you might want to substitute!
Bread: Your foundation! Choose your favorite bread—whole wheat for extra fiber and nutrients, sourdough for tangy flavor and better digestibility, white bread for classic soft texture, multigrain for heartiness and crunch, or gluten-free bread if needed. Thickness matters—thicker slices (about ½ inch) provide better texture and can hold more toppings without getting soggy. Tip: Day-old bread actually toasts better than super-fresh bread!
Peanut Butter: The star of the show! Natural peanut butter (just peanuts and salt) offers pure peanut flavor and avoids added oils and sugars, though it requires stirring and refrigeration. Regular creamy peanut butter spreads easily and provides consistent texture. Crunchy peanut butter adds delightful texture with peanut pieces throughout. Substitution: Any nut or seed butter works—try almond butter, cashew butter, sunflower seed butter (great for nut-free), or even tahini for a different twist!
Honey: Nature’s liquid gold! Raw honey offers maximum nutrition and complex flavor with subtle floral notes. Regular honey is more affordable and milder in flavor. Look for local honey if possible—it supports beekeepers in your area and may help with seasonal allergies! Substitution: Maple syrup provides similar sweetness with its own distinct flavor, agave nectar is thinner and sweeter, or date syrup offers rich caramel notes.
Optional Toppings: This is where you can get creative and customize to your preferences:
- Fresh Fruit: Sliced bananas (classic combo!), strawberries, blueberries, raspberries, apple slices, or pear slices
- Dried Fruit: Raisins, cranberries, chopped dates, or figs
- Nuts & Seeds: Chopped almonds, walnuts, pecans, hemp seeds, chia seeds, or flax seeds
- Spices: Cinnamon, nutmeg, or cardamom
- Extras: Chocolate chips, coconut flakes, granola, or a sprinkle of sea salt
Equipment Needed
You barely need any equipment for this simple recipe, which is part of its charm!
- Toaster, toaster oven, or skillet (for toasting the bread)
- Butter knife or offset spatula (for spreading peanut butter)
- Spoon (for drizzling honey)
- Plate (for serving)
- Small microwave-safe bowl (optional, for warming peanut butter)
- Cutting board and knife (if adding fresh fruit toppings)
That’s it! No fancy equipment, no special tools—just the basics you already have in your kitchen.
📋 Recipe Card
Prep Time: 2 minutes
Cook Time: 3 minutes
Total Time: 5 minutes
Yield: 1 serving (easily multiplied)
Category: Breakfast, Snack
Method: Toasting
Cuisine: American
Diet: Vegetarian, Can be made Vegan, Gluten-Free option
Description: Quick and delicious peanut butter honey toast with perfectly toasted bread, creamy peanut butter, sweet honey drizzle, and optional toppings. A simple yet satisfying breakfast or snack that’s ready in just 5 minutes!
Ingredients
Basic Recipe:
- 2 slices bread of your choice (whole wheat, sourdough, white, multigrain, or gluten-free)
- 2-3 tablespoons peanut butter (creamy or crunchy)
- 1-2 tablespoons honey (adjust to taste)
- Optional: pinch of cinnamon
Optional Toppings (choose your favorites):
- ½ banana, sliced
- ¼ cup fresh berries (strawberries, blueberries, or raspberries)
- 1 tablespoon chopped nuts (almonds, walnuts, or pecans)
- 1 teaspoon chia seeds or hemp seeds
- 1 tablespoon chocolate chips
- 1 tablespoon granola
- Pinch of sea salt
Instructions
- Toast the Bread: Place bread slices in your toaster and toast to your preferred level of doneness. For this recipe, medium-golden toast works perfectly—crispy enough to hold toppings but not so dark that it’s crunchy throughout. If using a toaster oven, toast at 375°F for 3-4 minutes, watching carefully.
- Warm the Peanut Butter (Optional): For easier spreading, especially if using natural peanut butter straight from the fridge, place peanut butter in a small microwave-safe bowl and microwave for 10-15 seconds. It should be slightly softened but not hot or melted. This step makes spreading much easier and prevents tearing the toast.
- Spread the Peanut Butter: While toast is still warm, generously spread peanut butter over each slice, covering all the way to the edges. Use about 1-1½ tablespoons per slice, or more if you love peanut butter! The warmth of the toast will help the peanut butter spread smoothly and melt slightly into the surface.
- Drizzle the Honey: Using a spoon, drizzle honey over the peanut butter in a back-and-forth motion to ensure even coverage. Start with 1-2 teaspoons per slice and add more to taste. You want the honey to pool slightly in some areas while coating the entire surface. Tip: Warming honey for 5-10 seconds in the microwave makes it easier to drizzle!
- Add Optional Toppings: If using any toppings, add them now while the toast is still warm. Arrange banana slices in overlapping rows, scatter berries artfully, sprinkle with seeds or nuts, or add a pinch of cinnamon. Press toppings gently into the peanut butter so they stick.
- Serve Immediately: Enjoy your peanut butter honey toast right away while it’s warm and the peanut butter is still soft and creamy. The contrast between warm toast and cool fruit (if using) is absolutely delicious!
Notes
- Bread Choice: Thicker slices hold toppings better without getting soggy.
- Natural Peanut Butter: If using natural PB that separates, stir well before measuring and consider warming it for easier spreading.
- Honey Measurement: Adjust honey to your sweetness preference—some people prefer a light drizzle, others love it generously coated!
- Make it Vegan: Use vegan bread and substitute maple syrup for honey, or ensure your honey is ethically sourced.
- Kid-Friendly: Let children help spread toppings and arrange fruit for a fun cooking activity.
Nutrition Facts
Serving Size: 2 slices of toast with peanut butter and honey (no additional toppings)
Calories: 380
Sugar: 18g
Sodium: 320mg
Fat: 18g
Saturated Fat: 3g
Unsaturated Fat: 14g
Trans Fat: 0g
Carbohydrates: 45g
Fiber: 5g
Protein: 12g
Cholesterol: 0mg
Nutritional information is approximate and will vary based on specific bread, peanut butter, and amount of honey used. Add 50-100 calories for fruit and nut toppings.
Tips & Variations
Banana Peanut Butter Toast: The classic! Top with sliced bananas arranged in rows, then drizzle with extra honey and sprinkle with cinnamon. Add a few chocolate chips for an extra treat.
Berry Bliss Toast: Spread peanut butter, drizzle honey, then top with mixed fresh berries (strawberries, blueberries, raspberries). Add a sprinkle of chia seeds for omega-3s and a beautiful look.
Elvis Toast: Inspired by Elvis Presley’s famous sandwich! Use peanut butter, honey, sliced bananas, and crispy bacon crumbles. Sweet and savory perfection.
Apple Cinnamon Toast: Top with thinly sliced apples, a drizzle of honey, and a generous sprinkle of cinnamon. Add chopped walnuts for crunch.
Chocolate Peanut Butter Toast: Mix a teaspoon of cocoa powder into your peanut butter before spreading, or simply sprinkle chocolate chips on top of the honey. Kids go crazy for this version!
Protein-Packed Toast: Use sprouted grain bread, add a second layer of peanut butter, then top with hemp seeds, chia seeds, and sliced almonds for maximum protein and healthy fats.
Coconut Tropical Toast: Spread peanut butter (or almond butter), drizzle with honey, then top with banana slices, shredded coconut, and a few macadamia nuts. Close your eyes and pretend you’re on vacation!
Savory-Sweet Toast: Skip the honey and instead drizzle with a tiny bit of soy sauce or sprinkle with everything bagel seasoning for a savory twist on PB toast.
Greek Yogurt Addition: Add a layer of Greek yogurt between the peanut butter and honey for extra protein and tangy flavor.
Pro Chef Tips
Toast Level Matters: Don’t under-toast or over-toast! You want a golden-brown surface that’s crispy enough to hold heavy toppings without getting soggy but not so dark it tastes burnt or becomes too crunchy. The perfect toast has a crispy exterior but maintains slight softness in the center.
Spread While Hot: Always spread peanut butter on bread immediately after it comes out of the toaster. The heat softens the peanut butter slightly, making it much easier to spread smoothly without tearing the bread. This also helps the peanut butter partially melt into the surface for better flavor integration.
Edge-to-Edge Coverage: Spread your peanut butter all the way to the edges of the bread. This creates a “barrier” that prevents honey from making the bread soggy, and ensures every bite has peanut butter flavor. Nobody wants a dry corner bite!
Control Your Honey: Don’t just pour honey from the bottle—it comes out too fast and pools unevenly. Instead, transfer honey to a spoon and drizzle it slowly in a zigzag or spiral pattern for even distribution. You want some areas with more honey and some with less for flavor variation in each bite.
Layer Strategically: If using multiple toppings, think about the order. Peanut butter goes first (it acts as “glue”), then honey, then sturdier toppings like nuts, then delicate toppings like berries on top. This prevents things from sliding off and creates visual appeal.
Temperature Contrast: If adding fresh fruit, keep it cool! The contrast between warm toast and cool fruit is part of what makes this so delicious. Don’t heat fruit or let it sit at room temperature too long.
Finishing Touch: A light sprinkle of flaky sea salt on top of the honey might sound strange, but it’s a game-changer! The salt enhances the sweetness and adds sophistication. Try it once and you’ll never go back.
Common Mistakes to Avoid
Over-Toasting the Bread: The most common error! Bread that’s too dark becomes hard and crunchy throughout, making it difficult to bite through and unpleasant to eat. It should be golden-brown and crispy on the surface but not uniformly hard. Remember, you’re making toast, not croutons!
Using Cold, Hard Peanut Butter: Spreading cold, natural peanut butter (especially) on toast often results in torn bread and frustration. Take 15 seconds to warm it slightly—either in the microwave or by letting it sit at room temperature while the bread toasts. This simple step makes spreading effortless.
Drowning in Honey: More is not better with honey! Too much makes the toast soggy, overwhelmingly sweet, and messy to eat. Start with less than you think you need—you can always add more. About 1-2 teaspoons per slice is usually perfect.
Skipping the Cinnamon: If you’re not adding any other toppings, don’t skip the cinnamon! Just a light sprinkle adds warmth and complexity that takes this from good to great. It’s a tiny addition that makes a big difference.
Making It Too Far Ahead: This is meant to be eaten immediately! Toast gets soggy as it sits, especially under honey. If you’re making multiple servings, toast and prepare one or two at a time. The whole process takes only 3-4 minutes anyway, so there’s no reason to batch-prepare.
Storage & Meal Prep
Immediate Consumption Best: Peanut butter honey toast is really meant to be eaten immediately after making it. The warm toast, soft peanut butter, and fresh toppings are at their best right away. That said, life happens, and sometimes you need to prep ahead!
Components Storage: The smart way to meal prep this is to store components separately:
- Bread: Keep in an airtight bag or container at room temperature for 3-5 days, or freeze for up to 3 months
- Peanut Butter: Store according to package directions (natural PB in fridge, regular PB in pantry)
- Honey: Keep at room temperature in a sealed container indefinitely
- Fresh Fruit: Wash and slice fruits the night before, store in airtight containers in the fridge
Prep-Ahead Strategy: For busy mornings, pre-portion peanut butter into small containers (2 tablespoons each), slice fruits and store in containers, and keep bread by the toaster. Assembly takes 30 seconds!
School Lunch Version: If packing for lunch, send components separately: bread in one container, peanut butter in another, honey in a small squeeze bottle, and fruit separate. Let kids assemble at lunchtime for fresh taste without sogginess.
Leftover Toast: If you somehow have leftover prepared toast (rare, but it happens!), it’s best eaten within 1-2 hours. You can refresh it slightly by re-toasting for 1 minute, but it won’t be quite the same as fresh.
Make-Ahead & Freezer Notes
Pre-Made Toast Portions: You can’t really freeze assembled peanut butter honey toast (it gets soggy and weird when thawed), but you CAN prep components for quick assembly:
Freeze the Bread: Pre-slice bread and freeze slices in a freezer bag with parchment between slices. Pop frozen bread directly in the toaster—it toasts perfectly from frozen and tastes completely fresh! This is especially useful for preventing bread from going stale.
Portion Peanut Butter: If you have multiple family members making their own breakfast, portion peanut butter into small containers or ice cube trays (about 2 tablespoons per portion). Freeze and pop one out as needed, microwave for 15-20 seconds, and it’s ready to spread.
Honey Never Freezes: Honey is naturally antimicrobial and never goes bad, so there’s no need to freeze it. It may crystallize over time, but gentle warming restores liquid consistency.
Prep Station Setup: Create a “toast station” in your kitchen with everything within reach: bread, toaster, peanut butter with a dedicated spreading knife, honey with a drizzle spoon, and containers of toppings. This makes morning assembly lightning-fast!
Grab-and-Go Packets: Make DIY peanut butter packets by spooning 2 tablespoons into small reusable silicone pouches. Store in the fridge and grab one when needed—perfect for taking to work or having while traveling!
Serving Suggestions
Complete Breakfast: Pair your peanut butter honey toast with scrambled eggs or a veggie omelet for a balanced breakfast with protein, healthy fats, and carbs.
Smoothie Partner: Serve alongside a fresh fruit smoothie or green smoothie for a quick, nutritious breakfast duo.
Yogurt Parfait: Enjoy with a bowl of Greek yogurt topped with granola and berries for extra protein and probiotics.
Coffee Pairing: This toast is absolutely perfect with a cup of hot coffee, especially a latte or cappuccino. The sweet, nutty flavors complement coffee beautifully.
Hot Tea: Pair with black tea, chai tea, or herbal tea for a cozy breakfast or afternoon snack.
Fresh Juice: Serve with freshly squeezed orange juice or a green juice for a vitamin-packed morning.
Breakfast Platter: Make it part of a larger breakfast spread with fresh fruit salad, bacon or sausage, and home fries for weekend brunch.
Snack Pairing: For an afternoon snack, serve with carrot sticks, apple slices, or celery sticks for a balanced combination of sweet and fresh.
Post-Workout: This is an excellent post-workout snack! Pair with a protein shake for optimal recovery with the combination of quick-digesting carbs and healthy fats.
FAQs Section
Q: Is peanut butter honey toast healthy?
A: Yes, it can be a healthy option! It provides protein from peanut butter, natural sweetness from honey, and whole grains if you choose whole wheat bread. It’s energizing and satisfying without being overly processed. For the healthiest version, use whole grain bread, natural peanut butter, and moderate honey. Add fresh fruit and seeds for extra nutrients!
Q: How many calories are in peanut butter honey toast?
A: A basic peanut butter honey toast (2 slices with 2-3 tablespoons peanut butter and 1-2 tablespoons honey) contains approximately 380-450 calories. Adding fruit, nuts, or seeds will increase this by 50-100 calories. It’s a filling, nutrient-dense breakfast that keeps you satisfied for hours.
Q: Can I make this recipe vegan?
A: Absolutely! Simply substitute maple syrup or agave nectar for honey, and ensure your bread doesn’t contain milk or eggs (most standard bread is vegan, but check labels). Use any nut or seed butter you prefer—they’re all naturally vegan.
Q: What’s the best bread to use for peanut butter honey toast?
A: It really depends on your preference! Whole wheat provides the most fiber and nutrients, sourdough offers tangy flavor and easier digestibility, white bread gives you soft, classic texture, and multigrain adds heartiness. For the best texture, choose bread that’s about ½-inch thick when sliced.
Q: Can kids make this recipe themselves?
A: Yes! This is an excellent recipe for teaching children basic cooking skills. Kids as young as 6-7 can make this with supervision (an adult should operate the toaster initially until they’re confident). It teaches knife skills for spreading, measuring, and creativity with toppings. Just supervise the toaster use and hot bread handling.
Q: How do I prevent my toast from getting soggy?
A: The key is to spread peanut butter edge-to-edge to create a barrier, use moderate (not excessive) honey, and eat it immediately after making it. Don’t let prepared toast sit for more than 10-15 minutes. If you must wait, keep the honey on the side and drizzle just before eating.
Q: What’s a good nut-free alternative to peanut butter?
A: Sunflower seed butter (also called sunbutter) is the most popular nut-free alternative and tastes great with honey! Other options include soy nut butter or tahini (sesame seed paste, which has a more distinctive flavor). Wow butter is another nut-free option that mimics peanut butter flavor closely.
Q: Can I use this recipe for meal prep?
A: Sort of! You can’t really prep assembled toast ahead, but you can absolutely prep components: freeze bread slices, portion out peanut butter, prep fruit, and keep everything organized so you can assemble quickly each morning. The actual assembly takes less than 5 minutes, so “meal prep” is really just ingredient organization for this recipe.
Conclusion
And there you have it—everything you could possibly want to know about making the perfect peanut butter honey toast! While this might be one of the simplest recipes you’ll ever make, it’s proof that sometimes the most basic combinations create the most satisfying results. There’s something deeply comforting about warm, crispy toast spread with creamy peanut butter and drizzled with golden honey—it’s simple, nostalgic, nourishing, and absolutely delicious.
The beauty of this recipe is that it’s different every time you make it based on your mood, the toppings you choose, and how you customize it to your preferences. Some days you’ll want it simple and classic, other days you’ll pile it high with bananas and berries, and sometimes you’ll get creative with unexpected toppings. That’s the joy of having a versatile, foolproof recipe in your back pocket!
Whether you’re making this for a quick weekday breakfast, teaching your kids to cook, looking for post-workout fuel, or satisfying a late-night sweet tooth, peanut butter honey toast delivers every single time. It’s budget-friendly, endlessly customizable, ready in 5 minutes, and uses ingredients you probably always have on hand.
Now it’s your turn to make your own perfect peanut butter honey toast! I’d love to hear what your favorite variation is—are you a banana person? Do you load it up with berries? Are you brave enough to try the Elvis version with bacon? Share your favorite toppings and creative variations in the comments below! Your ideas might inspire other readers to try something new.
Don’t forget to save this recipe to your Pinterest boards—pin it to “Easy Breakfast Ideas,” “Quick Snacks,” “Kid-Friendly Recipes,” or “5-Minute Meals” so you can find it whenever you need breakfast inspiration. Snap a photo of your beautiful creation and tag me on social media—I absolutely love seeing your versions! And if you know someone who needs more simple, delicious breakfast ideas in their life, share this recipe with them.
Now go toast that bread and create your own perfect peanut butter honey toast masterpiece! Happy eating! 🍯🥜🍞✨