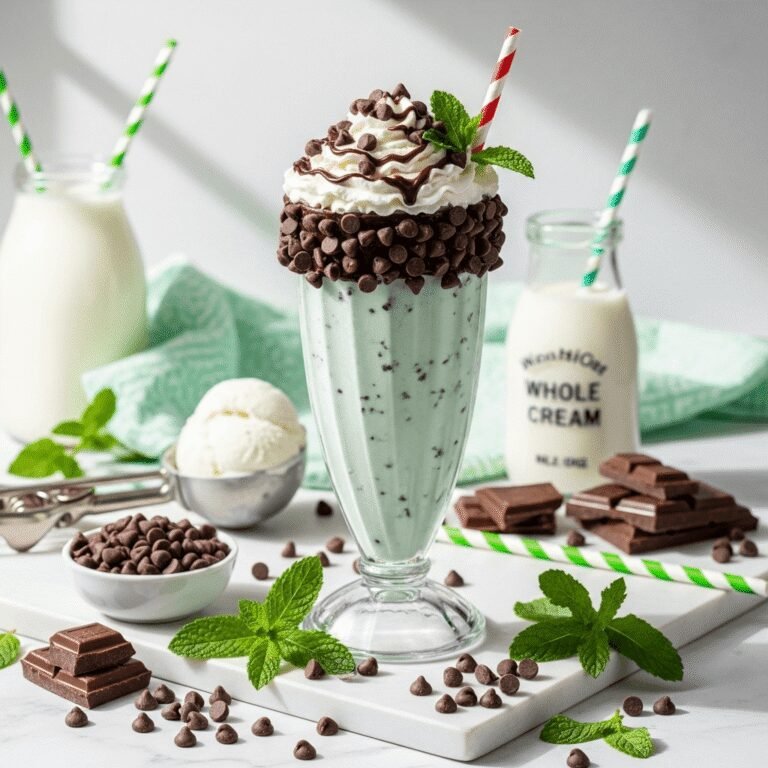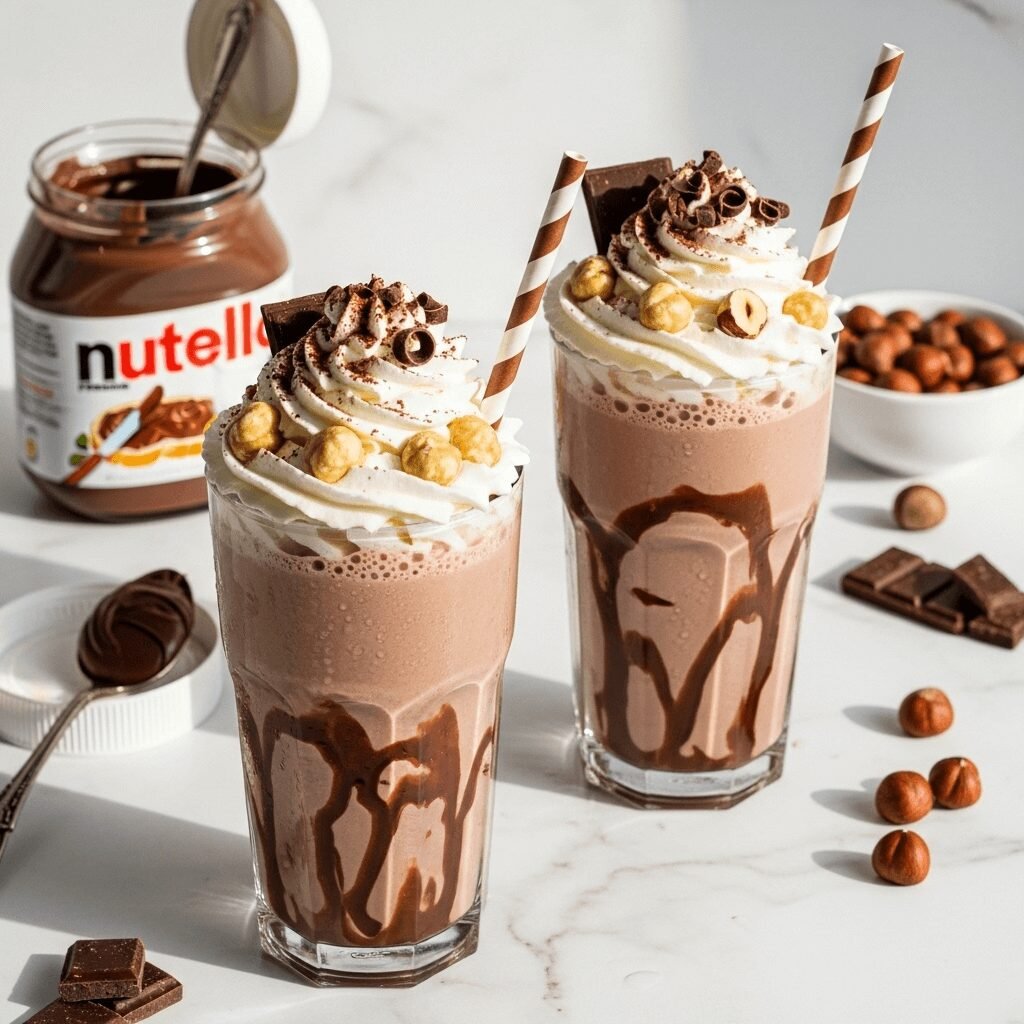
Easy Nutella Milkshake Recipe (Ready in 5 Minutes!)

If you’re a Nutella lover, prepare yourself for pure bliss in a glass! This creamy Nutella milkshake combines everyone’s favorite chocolate hazelnut spread with rich vanilla ice cream and cold milk to create the ultimate indulgent treat. It’s essentially a liquid version of heaven that takes just five minutes to make and requires only three basic ingredients that you probably already have in your kitchen.
This homemade Nutella milkshake recipe is perfect for so many occasions. Serve it as a special dessert after family dinners, whip it up for an afternoon treat when the kids get home from school, or make it as a fun weekend breakfast indulgence (we won’t tell!). It’s also fantastic for birthday parties, summer gatherings, or any time you’re craving something sweet, creamy, and utterly delicious. The rich hazelnut chocolate flavor combined with that thick, velvety texture makes this shake irresistible to kids and adults alike.
What makes this chocolate hazelnut milkshake truly special is how it captures that distinctive Nutella flavor we all know and love while transforming it into a sippable dessert. Unlike plain chocolate milkshakes, the hazelnut notes add sophistication and depth that elevates this from a simple shake to something really extraordinary. Plus, it’s endlessly customizable—you can adjust the thickness, sweetness, and even add fun toppings to make it your own signature creation. Whether you’re team thick-and-spoonable or prefer a thinner sippable shake, this recipe gives you complete control.
History / Background
To understand the Nutella milkshake, we first need to appreciate the fascinating history of Nutella itself. This beloved chocolate hazelnut spread was born out of necessity during World War II in the Piedmont region of Italy. Cocoa was in extremely short supply due to rationing, so Pietro Ferrero, a pastry maker in the town of Alba, had a brilliant idea: stretch the limited cocoa by blending it with abundant local hazelnuts. In 1946, he created a solid block called “Giandujot” (named after a local carnival character), which evolved into a creamy spread called “Supercrema” in 1951.
In 1964, Pietro’s son Michele perfected the recipe and renamed it “Nutella”—combining “nut” with the Italian suffix “ella” to make it sound sweet and appealing. The product was revolutionary: a smooth, spreadable chocolate hazelnut cream that could be enjoyed on bread for breakfast, a novel concept that quickly captured Italian hearts. By the 1960s and 1970s, Nutella had expanded throughout Europe, and it arrived in North America in the 1980s.
The Nutella milkshake, as a specific creation, emerged naturally as American soda fountain culture met Italian Nutella culture. While there’s no definitive “inventor” of the Nutella milkshake, it began appearing in creative ice cream shops and diners in the 1990s and early 2000s as Nutella became mainstream in the United States. Innovative dessert shops recognized that Nutella’s creamy texture and intense flavor made it perfect for blending into milkshakes.
The real explosion in popularity came with the rise of food blogging and Pinterest in the 2010s. Home cooks discovered how ridiculously easy it was to make café-quality Nutella milkshakes at home, and the recipe went viral. Today, the Nutella milkshake represents the perfect fusion of Italian culinary innovation and American dessert culture—a simple pleasure that brings joy to millions of people worldwide. It’s proof that sometimes the best recipes are the ones that combine beloved flavors in new, accessible ways.
Why You’ll Love This Recipe
This easy Nutella milkshake recipe is about to become your go-to dessert for countless reasons. First and foremost, it’s almost embarrassingly simple—if you can measure ingredients and press a button on a blender, you can make this. Yet despite its simplicity, it tastes absolutely luxurious and impressive, like something you’d pay $8 for at a fancy dessert café.
The beauty of this homemade Nutella shake lies in its perfect balance. You get that distinctive Nutella flavor—rich chocolate with subtle hazelnut undertones—combined with the creamy sweetness of vanilla ice cream. The result is decadent without being overwhelmingly sweet, and the texture is absolutely dreamy. It’s thick enough to feel indulgent but still easy to sip through a straw (though you might want to lick it off a spoon instead!).
Here’s why this Nutella milkshake recipe is absolutely irresistible:
- Lightning-fast preparation – From craving to drinking takes literally 5 minutes or less
- Only 3 essential ingredients – Nutella, vanilla ice cream, and milk—that’s it!
- Kid-approved and family-friendly – Even picky eaters devour this treat
- No special skills required – Perfect for beginner cooks and kids learning to use the kitchen
- Customizable thickness – Easily adjust to your perfect consistency preference
- Budget-friendly indulgence – Costs a fraction of coffee shop milkshakes
- Impressive presentation – Looks fancy with minimal effort
- Universally loved flavor – Hard to find anyone who doesn’t love Nutella
- Great for parties – Easily doubled, tripled, or made in batches
- Naturally vegetarian – Suitable for most dietary preferences
- No cooking required – Perfect for hot days when you don’t want to turn on the oven
- Nostalgic comfort food – Brings back childhood memories while feeling grown-up
The foolproof nature of this recipe makes it perfect for involving kids in the kitchen. They can help measure ingredients, press the blender buttons (with supervision), and create their own delicious treat. It’s also endlessly adaptable—want it thicker? Add more ice cream. Prefer stronger Nutella flavor? Add an extra spoonful. Need it dairy-free? Simple substitutions work beautifully. This recipe gives you a solid foundation that you can customize to create your perfect Nutella milkshake every single time.
Ingredient Notes
Let’s break down each component of this delicious Nutella milkshake and understand why each ingredient matters. Knowing your ingredients helps you make smart choices and achieve consistently perfect results.
Nutella: The star of the show! You’ll need 3-4 tablespoons (about ¼ cup) of this beloved chocolate hazelnut spread. Nutella provides all the distinctive flavor that makes this milkshake special—the perfect blend of chocolate and roasted hazelnuts with just the right amount of sweetness. The creamy texture of Nutella also helps emulsify your shake, making it extra smooth. For best results, use Nutella at room temperature rather than cold from the pantry—it blends much more easily. If you can’t find or don’t want to use Nutella specifically, other chocolate hazelnut spreads work perfectly (like store brands, Justin’s, or Nocciolata). You could also substitute with Biscoff spread for a different but equally delicious flavor, or use regular chocolate syrup if you’re not concerned about the hazelnut element, though you’ll lose that signature taste.
Vanilla Ice Cream: This creates the thick, creamy base that makes a milkshake a milkshake rather than just a blended drink. You’ll need 2-3 large scoops, which equals approximately 1½ to 2 cups. High-quality vanilla ice cream makes a significant difference—premium or super-premium brands contain more butterfat and less air, creating a richer, creamier shake. The vanilla flavor beautifully complements the chocolate hazelnut without competing with it. For substitutions, chocolate ice cream works wonderfully if you want an extra-chocolatey version, hazelnut ice cream doubles down on the nut flavor (amazing if you can find it!), or use vanilla frozen yogurt for a tangier, slightly lighter version. For dairy-free needs, coconut milk ice cream, oat milk ice cream, or almond milk ice cream all create delicious results—just note that the flavor will be slightly different.
Milk: This adjusts your shake from thick and spoonable to smooth and sippable. You’ll need ½ to ¾ cup depending on your preferred consistency. Whole milk creates the richest, creamiest result with the most luxurious mouthfeel, but 2% milk works great and is what most people have readily available. Even 1% or skim milk works, though the shake will be slightly less rich. For substitutions, any milk alternative is fine—almond milk adds subtle nutty notes that complement Nutella beautifully, oat milk creates exceptional creaminess and is my personal favorite for milkshakes, cashew milk is rich and neutral, and coconut milk adds tropical undertones. Just remember that non-dairy milks typically create slightly thinner consistency, so you might want to use a bit less or add an extra scoop of ice cream.
Optional Add-ins (for extra flavor): While not necessary, these can enhance your shake: a ½ teaspoon of vanilla extract adds depth and rounds out flavors, a tablespoon of chocolate syrup intensifies the chocolate notes, a pinch of salt (seriously, just a few granules) makes everything taste better and brighter, or a tablespoon of hazelnut liqueur like Frangelico for an adults-only boozy version.
Optional Toppings: Whipped cream (homemade or store-bought), chocolate shavings or chips, crushed hazelnuts for textural contrast, a drizzle of extra Nutella or chocolate syrup, or even a whole Ferrero Rocher chocolate for ultimate indulgence.
Equipment Needed
The wonderful thing about making Nutella milkshakes is that you need virtually no special equipment. Here’s everything you’ll use:
Blender: Your essential tool—this is the only appliance required. A standard countertop blender works perfectly for this recipe. You don’t need an expensive high-powered blender like a Vitamix, though they do create exceptionally smooth results. Even a basic $30 blender handles this recipe beautifully since you’re blending relatively soft ingredients. If your blender has variable speeds, you’ll have better control, but it’s not mandatory. An immersion blender technically works but makes it harder to achieve uniform consistency—stick with a regular blender if you have one.
Measuring Cups: You’ll need both liquid measuring cups for the milk and dry measuring cups for scooping ice cream. Accurate measurements ensure you get consistent results every time you make this recipe.
Measuring Spoons: For measuring the Nutella precisely. Tablespoons specifically will be your friend here.
Ice Cream Scoop: Makes portioning ice cream clean, easy, and consistent. A quality scoop with a release mechanism is incredibly useful. If you don’t have one, a large sturdy spoon works just fine.
Rubber Spatula: Helpful for scraping Nutella from the jar and getting every last drop of milkshake out of your blender. Nothing’s worse than wasting deliciousness!
Tall Glasses: For serving your masterpiece. Classic milkshake glasses (12-16 ounce capacity) are ideal and show off that beautiful brown color. Any tall glass works great—mason jars are trendy and fun, too.
Thick Straws: Wide-diameter straws work best for thick milkshakes. Paper, reusable metal, or sturdy plastic straws all work—just make sure they’re wide enough to handle a thick shake. Boba straws (the extra-wide ones) are perfect.
Butter Knife or Small Spatula (Optional): If your Nutella is cold or firm, a knife helps you scoop it from the jar cleanly.
That’s the complete list! No fancy gadgets, no specialized equipment—just basic kitchen tools you probably already own.
Print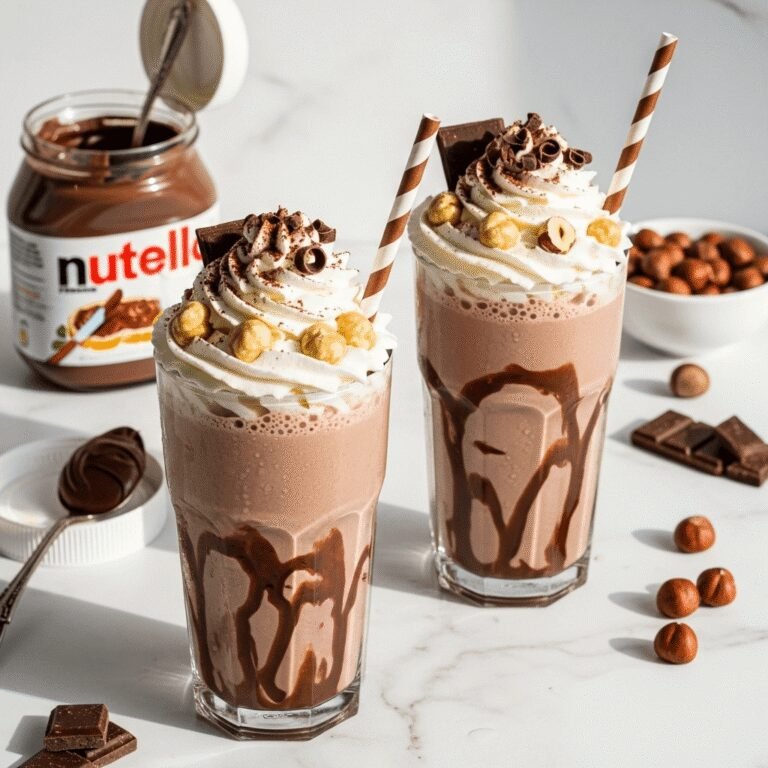
Nutella Milkshake Recipe
This easy homemade Nutella milkshake is pure chocolate hazelnut heaven! Made with just three simple ingredients—Nutella, vanilla ice cream, and milk—this thick and creamy shake is ready in 5 minutes and tastes better than anything from an ice cream shop. Perfect for Nutella lovers of all ages!
- Total Time: 5 minutes Cook Time: 0 minutes
- Yield: 2 servings 1x
Ingredients
- 3-4 tablespoons Nutella (about ¼ cup), at room temperature
- 2-3 large scoops vanilla ice cream (about 1½ to 2 cups)
- ½ to ¾ cup whole milk (or milk of choice)
- ½ teaspoon vanilla extract (optional, for enhanced flavor)
- Whipped cream, for topping (optional)
- Chocolate shavings or mini chocolate chips, for garnish (optional)
- Crushed hazelnuts, for garnish (optional)
- Extra Nutella, for drizzling (optional)
Instructions
- Prepare your ingredients: Take your vanilla ice cream out of the freezer and let it sit at room temperature for about 5 minutes to soften slightly. This makes blending easier and smoother without overworking your blender. If your Nutella is cold or firm, let it warm to room temperature as well—it blends much more easily when it’s soft and spreadable.
- Add Nutella to blender: Scoop 3-4 tablespoons of Nutella into your blender. Use a rubber spatula to scrape it all in—don’t leave any behind! The Nutella will stick to the spatula, but that’s fine; it’ll come off during blending.
- Add ice cream: Add your 2-3 scoops of vanilla ice cream on top of the Nutella. Starting with 2 scoops will give you a thinner, more sippable shake, while 3 scoops creates a super thick, almost spoonable consistency.
- Add milk: Pour in ½ cup of milk to start. You can always add more to thin it out, but you can’t remove milk once it’s in. Starting with less gives you better control over the final consistency.
- Add vanilla (optional): If using vanilla extract for extra depth of flavor, add it now.
- Blend on low first: Start your blender on the lowest speed setting and blend for about 10-15 seconds. This helps break up the ice cream and get everything moving without splattering. You’ll see the ingredients start to combine but still look chunky and uneven.
- Increase speed and blend until smooth: Increase to medium-high speed and blend for 30-45 seconds until the mixture is completely smooth, uniformly brown, and creamy with no chunks of ice cream or streaks of Nutella remaining. Stop and scrape down the sides with a spatula if needed, then blend for another 10 seconds.
- Check consistency: Stop the blender and check the thickness. If your milkshake is too thick to pour or drink comfortably through a straw, add 2-3 tablespoons more milk and blend for another 10-15 seconds. If it’s too thin for your liking, add another small scoop of ice cream and blend briefly.
- Taste and adjust: Give it a quick taste. Want more Nutella flavor? Add another tablespoon and blend for 10 seconds. Need more sweetness? Add a small scoop of ice cream. Prefer it less sweet? Add a splash more milk to dilute slightly.
- Prepare glasses (optional but recommended): For an extra-fancy presentation, drizzle Nutella around the inside of your serving glasses before pouring in the shake. Use a spoon to create decorative swirls on the glass sides.
- Serve immediately: Pour your Nutella milkshake into tall glasses. Top with generous swirls of whipped cream if desired. Garnish with chocolate shavings, a sprinkle of crushed hazelnuts, or a drizzle of extra Nutella for that café-worthy finish. Insert thick straws and enjoy right away while it’s perfectly cold and creamy!
Notes
- Nutella amount is flexible: Start with 3 tablespoons for subtle hazelnut flavor, or use 4-5 tablespoons if you want intense Nutella taste. You really can’t add too much!
- Consistency control: The ice cream-to-milk ratio determines thickness. More ice cream = thicker shake. More milk = thinner, easier to drink. Adjust to your personal preference.
- Room temperature Nutella is key: Cold Nutella doesn’t blend smoothly and creates lumps. Leave your Nutella jar out on the counter for better results.
- Don’t over-blend: Blend just until smooth. Over-blending generates heat that melts ice cream and creates thin, watery shakes.
- Make it boozy: Adults can add 1-2 ounces of Frangelico (hazelnut liqueur), Baileys Irish Cream, or vanilla vodka for a dessert cocktail.
- Serving size: This recipe makes two generous servings or one very large indulgent shake for someone with a serious sweet tooth!
- Prep Time: 5 minutes Cook Time: 0 minutes
- Cook Time: 0 minutes Cook Time: 0 minutes
Nutrition
- Serving Size: 1 milkshake (approximately 12-14 oz)
- Calories: 425
- Sugar: 48g
- Sodium: 90mg
- Fat: 19g
- Saturated Fat: 10g
- Unsaturated Fat: 8g
- Trans Fat: 0g
- Carbohydrates: 56g
- Fiber: 2g
- Protein: 8g
- Cholesterol: 50mg
Tips & Variations
The beauty of this Nutella milkshake is its incredible versatility. Here are delicious ways to customize it and create exciting new flavor combinations:
Chocolate Overload Nutella Shake: Use chocolate ice cream instead of vanilla for an intensely chocolatey experience. The chocolate-on-chocolate combination is divine for serious chocolate lovers. Add a tablespoon of chocolate syrup for even more cocoa richness.
Banana Nutella Milkshake: Add half a ripe banana to the blender along with your other ingredients. Banana and Nutella is a classic combination that adds natural sweetness, creaminess, and potassium. The banana makes the shake thicker and more filling, perfect for a breakfast treat.
Nutella Coffee Shake: Add 2-3 tablespoons of cold brewed coffee or a shot of cold espresso to create a caffeinated version. The coffee enhances the chocolate notes and adds sophistication. This is essentially a drinkable Nutella latte—absolutely heavenly.
Peanut Butter Nutella Shake: Add 1-2 tablespoons of creamy peanut butter for a peanut-hazelnut chocolate combination. The two nut butters complement each other beautifully and create extra richness. This is like drinking a liquid Reese’s with hazelnut flair.
Strawberry Nutella Milkshake: Add ½ cup of fresh or frozen strawberries to the blender. Strawberry and Nutella is an underrated but incredible pairing. The bright fruit balances the rich chocolate-hazelnut perfectly.
Cookies and Cream Nutella Shake: Crumble 2-3 Oreo cookies into the blender before mixing, or use cookies and cream ice cream. The cookie chunks add delightful texture and extra sweetness that kids especially love.
Mint Nutella Shake: Add ¼ teaspoon of peppermint extract or 2 tablespoons of crème de menthe (adults only). Mint and chocolate-hazelnut create a refreshing, sophisticated combination perfect for after-dinner desserts.
Boozy Adult Nutella Shake: Add 1-2 ounces of Frangelico (hazelnut liqueur), Baileys Irish Cream, Kahlúa (coffee liqueur), or Godiva chocolate liqueur. This transforms the shake into an elegant dessert cocktail.
Protein Nutella Shake: Add a scoop (20-30g) of chocolate or vanilla protein powder to boost nutrition and make it more filling. This works great as a post-workout treat or substantial breakfast option. You may need to add slightly more milk.
Lighter Version: Use low-fat vanilla frozen yogurt instead of ice cream, skim milk, and only 2 tablespoons of Nutella. While not as indulgent, it significantly reduces calories while maintaining great flavor.
Extra Thick Milkshake: Use only ¼ cup of milk and 3 full scoops of ice cream. This creates an ultra-thick, spoonable shake that’s almost like soft-serve ice cream consistency.
Nutella S’mores Shake: Add 1-2 tablespoons of marshmallow fluff and crumble in a graham cracker. Top with toasted mini marshmallows for s’mores vibes.
Pro Chef Tips
These professional insights will take your Nutella milkshake from delicious to absolutely extraordinary:
Warm the Nutella very slightly: If your Nutella is firm, microwave it for just 5-10 seconds to make it barely warm and pourable. This creates the smoothest blend and prevents any chunks or streaks. Don’t overheat—you just want it softened, not hot.
Freeze your serving glasses: Place your glasses in the freezer for 15-20 minutes before making your shake. This keeps everything colder longer and prevents rapid melting. Professional ice cream shops and diners always serve frozen treats in chilled glasses.
Add a pinch of salt: Just a tiny pinch of fine sea salt (barely ⅛ teaspoon) enhances all the flavors, reduces any cloying sweetness, and makes the chocolate-hazelnut notes more pronounced. This is a pastry chef secret that works magic in chocolate desserts.
Layer the blender strategically: Put liquids (milk) in first if you have a less powerful blender, as this helps the blades move more easily. For powerful blenders, put Nutella at the bottom so it gets hit by the blades first and distributes evenly.
Use the pulse function initially: Pulse 5-6 times to break up the ice cream before continuous blending. This prevents the motor from straining and ensures even blending without overworking your blender.
Coat the glass with Nutella: Before pouring your shake, use a spoon to spread Nutella around the inside of your glass in decorative swirls. As you pour the shake, it creates beautiful streaks and intensifies the Nutella flavor with every sip. This is how fancy dessert shops create Instagram-worthy presentations.
Add texture with mix-ins: For extra interest, pulse in some chopped hazelnuts, chocolate chips, or crushed cookies at the very end—just 2-3 pulses so they’re mixed in but still chunky. This adds delightful textural contrast.
Don’t skip the vanilla extract: Even though it’s optional, that ½ teaspoon of vanilla makes a noticeable difference. Vanilla enhances chocolate flavors and adds aromatic depth that rounds out the whole shake.
Toast hazelnuts for garnish: If you’re using crushed hazelnuts as a topping, toast them first in a dry skillet for 3-4 minutes. Toasting releases their oils and creates incredible aroma and deeper flavor. Let them cool, then chop roughly.
Use premium ice cream: This is the time to splurge on good quality ice cream. The difference between budget and premium ice cream is massive in milkshakes—premium has more cream, less air, and creates exponentially better texture and flavor.
Common Mistakes to Avoid
Even with such a simple recipe, there are several pitfalls that can compromise your perfect Nutella milkshake. Here’s what to watch out for:
Using cold, firm Nutella: This is the most common mistake. Cold Nutella doesn’t blend smoothly—it creates chunks and streaks that never fully incorporate. Always use room temperature Nutella or warm it slightly. If you forget and use cold Nutella, you’ll see brown streaks throughout your shake instead of uniform color. To fix it, you’d need to blend much longer, which risks melting your ice cream.
Adding too much milk at once: This is how you end up with a thin smoothie instead of a thick, creamy milkshake. Milk dilutes the Nutella flavor and thins the texture quickly. Always start with less milk (½ cup maximum) and add more gradually. Remember: you can always thin a shake, but you can’t un-thin it without adding more ice cream.
Over-blending: More blending doesn’t equal better results. The friction from extended blending generates heat, which melts your ice cream and creates thin, watery consistency. Blend just until smooth and uniform—usually 30-45 seconds total. If your shake is getting thinner as you blend, stop immediately. You’ve gone too far and need to add more ice cream to save it.
Using low-quality ice cream: Budget ice creams have more air, less cream, and less flavor. They also melt faster and create icy textures. The quality of your ice cream directly impacts your shake’s richness and smoothness. Spend an extra dollar or two on premium ice cream—it’s absolutely worth it for the dramatic improvement in taste and texture.
Skipping the taste test: Nutella varies in how sweet and intense it tastes depending on storage temperature and your personal perception. Always taste your shake before serving and adjust. Need more Nutella? Add it. Too thick? Add milk. This five-second step prevents serving something that’s not quite perfect.
Not softening ice cream first: Rock-hard ice cream straight from the freezer is difficult to blend and strains your blender motor. It also doesn’t blend as smoothly. Let it sit at room temperature for 5 minutes—it makes a huge difference in the blending process and final texture.
Forgetting to scrape down sides: Sometimes Nutella or ice cream gets stuck to the sides of the blender and doesn’t mix in. Stop halfway through, scrape down the sides with a spatula, then continue blending. This ensures everything incorporates evenly.
Storage & Meal Prep
While Nutella milkshakes are absolutely best enjoyed fresh and immediately, there are times when you might need to store leftovers or plan ahead. Here’s everything you need to know:
Immediate consumption is ideal: The perfect Nutella milkshake should be consumed within 5-10 minutes of blending. This is when the texture is at its absolute peak—thick, creamy, uniformly smooth, and perfectly cold. The ice cream hasn’t started separating, and the Nutella is evenly distributed throughout.
Short-term storage (up to 2 hours): If you must wait before drinking, pour your milkshake into an airtight container or tightly cover your glass with plastic wrap and place it in the freezer (not the refrigerator—that will make it melt). When you’re ready to enjoy, let it sit at room temperature for 3-5 minutes to soften slightly, then stir vigorously with a spoon before drinking. The texture won’t be quite as perfect as fresh, but it’s still very enjoyable.
Refrigerator storage (not ideal): You can store leftover milkshake in an airtight container in the refrigerator for up to 24 hours, but be prepared for significant texture changes. The shake will completely separate with melted ice cream pooling at the bottom and Nutella rising slightly. It becomes thin and watery. If you do this, you’ll absolutely need to re-blend with a fresh scoop of ice cream to restore anything close to the original texture.
Re-blending separated shakes: If your stored Nutella milkshake has separated or become too thin, add a fresh scoop of vanilla ice cream and blend for 10-15 seconds. This brings back most of the original creamy texture and cold temperature. You can also add 3-4 ice cubes to chill and thicken it, though this dilutes the Nutella flavor somewhat.
Portion control: If you’re making this recipe but know you only want one serving right now, simply halve all the ingredients. It’s much easier to make a fresh shake later than to try storing and reviving leftovers.
Make-Ahead & Freezer Notes
While milkshakes are definitely best fresh, there are some strategies for planning ahead that can work in specific situations:
Pre-measure ingredients: The easiest “make-ahead” approach is to pre-portion your ingredients. Measure out your Nutella into small containers, portion ice cream into individual servings (about 1½ cups each) in freezer bags, and have your milk ready. This way, when a craving hits, you just dump and blend—takes under 2 minutes.
Freezing finished milkshakes: You can freeze blended Nutella milkshakes in freezer-safe containers for up to one month, but they’ll solidify into a firm block. To serve, transfer to the refrigerator for 20-30 minutes to partially thaw, then re-blend with ¼ cup fresh milk to restore drinkable consistency. Honestly, this is more work than just making a fresh shake, but it’s possible if you’ve made too much.
Milkshake popsicles (better option): A much better use for extra milkshake is to pour it into popsicle molds and freeze. Nutella milkshake popsicles are incredible on hot days and actually benefit from being frozen solid. They keep for up to 2 months and taste like frozen Nutella treats. Kids absolutely love these.
Make milkshake mix base: You can create a “milkshake mix” by portioning Nutella and a bit of milk into ice cube trays and freezing. When you want a shake, pop out 3-4 cubes and blend with ice cream and fresh milk. This gives you concentrated Nutella flavor without the hassle of scooping from a jar.
Best approach for entertaining: If you’re having guests and want to serve Nutella milkshakes, have all ingredients ready and glasses chilled, but blend the shakes fresh right before serving. It only takes 5 minutes and ensures everyone gets the best possible texture and temperature. You can even make it a fun activity where guests help blend their own shakes.
Freezer organization: Keep a dedicated section of your freezer with milkshake ingredients—ice cream, pre-portioned Nutella containers, and frozen bananas if you like that variation. This makes impromptu milkshake-making super convenient.
Serving Suggestions
A Nutella milkshake is wonderful on its own, but pairing it thoughtfully can elevate the entire experience. Here are delicious ways to serve this indulgent treat:
Breakfast and brunch pairings: Serve your Nutella milkshake alongside French toast, crepes, waffles, or pancakes for an ultra-indulgent weekend breakfast. The hazelnut chocolate complements maple syrup and buttery breakfast foods beautifully. Add crispy bacon for that sweet-savory contrast that makes breakfast special. Fresh fruit like strawberries or bananas on the side adds freshness.
Dessert accompaniments: Nutella milkshakes pair exceptionally well with: warm brownies (the temperature contrast is divine), chocolate chip cookies perfect for dunking, vanilla or chocolate cake, biscotti (especially hazelnut or chocolate varieties), churros for dipping, or even warm apple pie. The cold shake refreshes your palate between bites of warm dessert.
Afternoon snack pairings: Serve with a slice of banana bread, zucchini bread, coffee cake, or cinnamon rolls for a substantial afternoon treat. Graham crackers, vanilla wafers, or shortbread cookies are lighter options that still complement the Nutella flavor nicely.
Kids’ party treat: Set up a Nutella milkshake bar at birthday parties with various toppings: whipped cream, sprinkles, chocolate chips, crushed cookies, gummy bears, and cherries. Let kids customize their shakes for interactive fun. Serve with pizza (surprisingly great combination!) or chicken nuggets for a party meal kids love.
Movie night: Pair Nutella milkshakes with popcorn (sweet or salty both work), candy, soft pretzels, or nachos for movie watching at home. The sweet shake balances salty snacks perfectly.
After-dinner sophistication: For adults, serve Nutella milkshakes as dessert after Italian dinners alongside espresso or coffee. The hazelnut notes pair beautifully with the end of a pasta or pizza meal. Add a shot of Frangelico to make it boozy and extra special.
Summer barbecue dessert: After grilling burgers, hot dogs, or barbecue, Nutella milkshakes are a refreshing dessert that everyone can enjoy. They’re particularly welcome on hot days when you want something cold and satisfying. Set up a milkshake station and let guests make their own.
Coffee shop at home: Create a full café experience by serving Nutella milkshakes alongside an assortment of pastries, muffins, scones, or biscotti. Brew some coffee or tea as well for those who want a hot beverage option.
FAQs Section
Can I make a Nutella milkshake without ice cream?
Yes, though the texture will be quite different. For an ice cream-free version, use 2 frozen bananas, 1 cup of milk, 3-4 tablespoons of Nutella, and a handful of ice cubes. Blend until smooth. This creates more of a smoothie-shake hybrid that’s lighter and more banana-forward. Another option is to use ½ cup of Greek yogurt, 1 cup milk, Nutella, a frozen banana, and ice—this gives you protein and tang. While these versions are tasty and healthier, they won’t have that classic thick milkshake texture that ice cream provides.
10-15 seconds to soften it slightly. Never microwave with metal foil still on! Alternatively, run hot water over the closed jar for a minute to warm it gently. For easier measuring, some people keep their Nutella jar in a slightly warm spot in the kitchen rather than in a cool pantry—room temperature Nutella is much easier to work with.
Can I make this dairy-free or vegan?
Absolutely! This Nutella milkshake adapts beautifully to dairy-free diets. Use dairy-free vanilla ice cream (coconut, oat, almond, or cashew-based—oat milk ice cream is exceptionally creamy), and your favorite non-dairy milk. The good news is that Nutella itself contains milk powder, but many chocolate-hazelnut spreads are naturally vegan—look for brands like Nocciolata Organic Dairy-Free or Justin’s Chocolate Hazelnut Butter. With the right substitutions, you’ll get a shake that’s just as delicious and creamy as the original. Oat milk ice cream specifically creates remarkable creaminess that closely mimics dairy.
How do I make my Nutella milkshake thicker?
There are several effective methods: use more ice cream and less milk (start with 3 full scoops and only ¼ cup milk), add a frozen banana which thickens without adding liquid, include 3-4 ice cubes while blending, freeze your milkshake for 10-15 minutes after blending, or add a tablespoon of instant vanilla pudding mix which thickens beautifully without changing flavor. Also, make sure you’re not over-blending, as extended blending melts the ice cream and thins everything out. Finally, ensure you’re using premium ice cream rather than budget brands—they have higher fat content and less air, creating naturally thicker shakes.
Can kids drink this, or is Nutella unhealthy?
Nutella milkshakes are definitely treats, not everyday beverages, due to their sugar and calorie content. That said, as an occasional indulgence, they’re fine for kids—no different than having ice cream or cake at a birthday party. Nutella contains hazelnuts which provide some protein and healthy fats, though it’s primarily a sweet spread. If you’re concerned about sugar, you can reduce the Nutella to 2 tablespoons, use low-sugar ice cream alternatives, or add a frozen banana which provides natural sweetness and reduces the need for as much Nutella. Everything in moderation! Many parents serve these as special weekend treats or birthday celebration drinks rather than regular snacks.
Why did my milkshake turn out icy or grainy?
An icy or grainy texture usually indicates one of these issues: you over-blended and the friction melted then re-froze the ice cream creating ice crystals, you added ice cubes which can create graininess if not fully pulverized, your ice cream had been in the freezer too long and developed ice crystals (freezer burn), or you used low-quality ice cream with high water content. To fix grainy texture, add another scoop of fresh premium ice cream and blend for just 10-15 seconds. For prevention, always use fresh, high-quality ice cream, avoid over-blending, and if adding ice, make sure your blender fully crushes it to a snow-like consistency.
How long does a Nutella milkshake last?
Fresh is always best—ideally consume within 10 minutes of making it. If you absolutely must store it, keep it in the freezer (not fridge) in an airtight container for up to 2 hours, then let it soften slightly and stir before drinking. In the refrigerator, it will keep for 24 hours but will completely separate and become thin—you’ll need to re-blend with fresh ice cream. For longer storage, your best option is to pour leftover shake into popsicle molds and freeze for up to 2 months. These become delicious Nutella popsicles that kids and adults love. Bottom line: milkshakes are not meal-prep friendly items; make them fresh when you want them.
Can I add other flavors to my Nutella milkshake?
Definitely! Nutella is wonderfully versatile and pairs with many flavors. Popular additions include: coffee or espresso (2-3 tablespoons cold brew), peanut or almond butter (1-2 tablespoons for nut butter combo), fresh strawberries or raspberries (½ cup for fruity contrast), banana (½ frozen banana for creaminess), mint extract (¼ teaspoon for mint-chocolate vibes), caramel sauce (2 tablespoons drizzled in), marshmallow fluff (for s’mores flavor), or cookies like Oreos or biscotti crumbled in. Each addition changes the profile while keeping that beloved Nutella base. Start with small amounts and adjust to taste—you can always add more but can’t remove flavors once they’re blended in.
Conclusion
And there you have it—the ultimate guide to making the most incredible homemade Nutella milkshake! This simple three-ingredient recipe proves that you don’t need complicated techniques or fancy ingredients to create something truly spectacular. In just five minutes, you can transform basic pantry staples into a thick, creamy, absolutely delicious treat that rivals anything from expensive ice cream shops or dessert cafés.
The beauty of this chocolate hazelnut milkshake is its perfect balance of simplicity and indulgence. Whether you’re making it as a special weekend breakfast, an afternoon pick-me-up, a birthday party treat, or a late-night dessert, this shake delivers pure happiness in every sip. The rich Nutella flavor combined with creamy vanilla ice cream creates magic that appeals to everyone from young children to sophisticated adults.
Don’t forget to experiment with the variations and tips throughout this article! Try the coffee version for a grown-up twist, add a banana for extra creaminess, or create that gorgeous Nutella-swirled glass for an Instagram-worthy presentation. Make it your own and have fun with it. The recipe is forgiving and flexible, so you really can’t go wrong.
Now it’s your turn to grab that jar of Nutella and whip up this amazing shake! I’d absolutely love to hear how yours turns out. Did you try any fun variations? Serve it with something special? What toppings did you use? Drop a comment below and share your Nutella milkshake experience with our community!
And if you loved this recipe as much as I think you will, please save it to your favorite Pinterest board so you can find it again easily. Share it with your Nutella-loving friends and family—trust me, they’ll thank you for introducing them to their new favorite treat. Your kitchen is about to become the most popular spot in the house!
Happy blending, and enjoy every creamy, chocolatey, hazelnut-perfect sip! 🍫🥤