Greek Salad Wrap Recipe: Fresh Mediterranean Lunch in Minutes

If you’re craving a light, refreshing lunch that’s bursting with Mediterranean flavors and takes less than 15 minutes to make, this Greek salad wrap is about to become your new favorite go-to meal! Imagine crisp cucumbers, juicy tomatoes, briny Kalamata olives, creamy feta cheese, and crunchy red onions all wrapped up in a soft tortilla with a tangy homemade tzatziki sauce. These easy Greek wraps combine all the vibrant flavors of a classic Greek salad in a portable, handheld format that’s perfect for busy weekday lunches, picnics, or light summer dinners. Trust me, once you discover how incredibly simple and satisfying these Mediterranean wraps are, you’ll be making them on repeat!
Introduction of Recipe
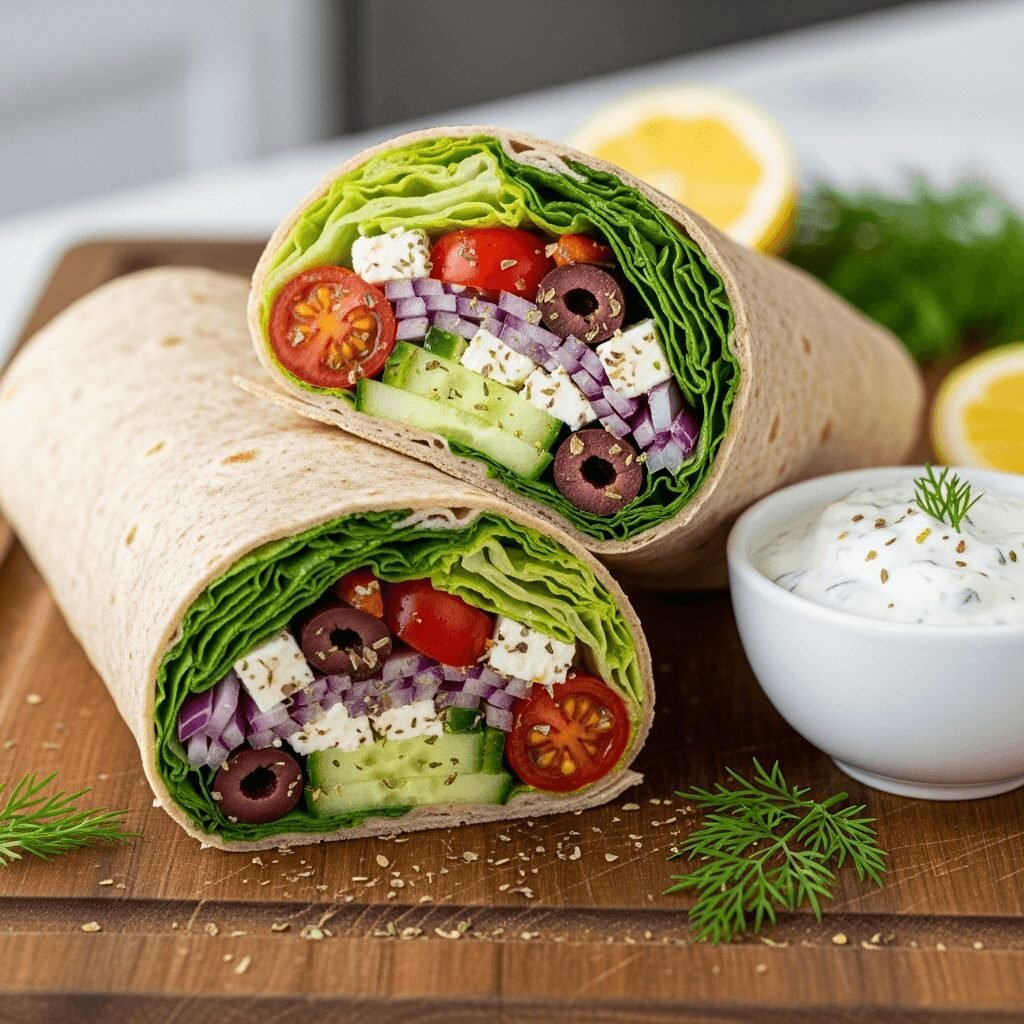
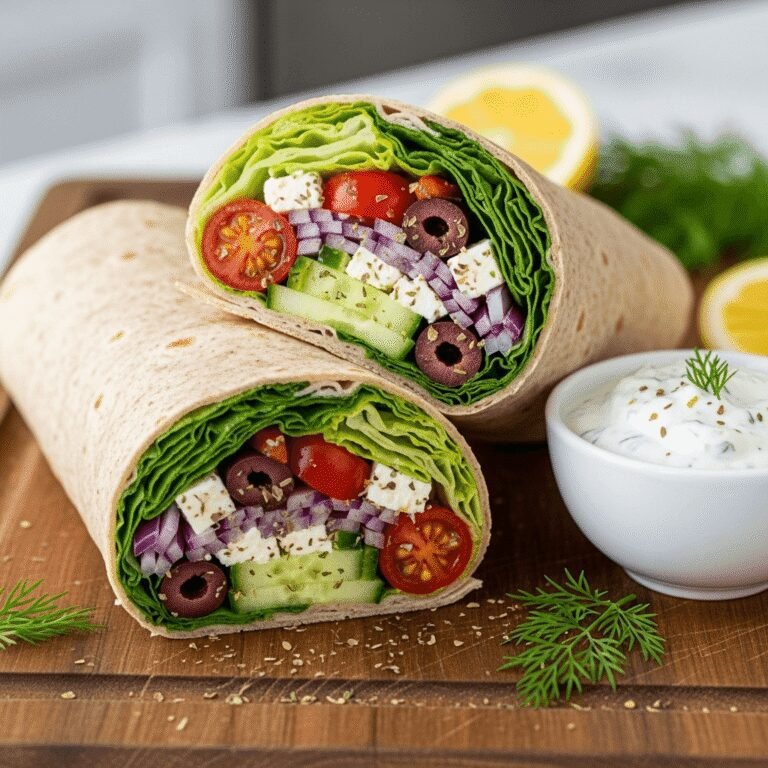
Greek salad wraps are fresh, veggie-packed wraps that take all the beloved ingredients from a traditional Greek salad—cucumbers, tomatoes, red onion, bell peppers, Kalamata olives, and feta cheese—and wrap them in a soft flour tortilla or flatbread with creamy tzatziki sauce and sometimes hummus. This healthy Mediterranean wrap transforms the classic Greek salad into a convenient, portable meal that’s perfect for lunch boxes, quick dinners, or on-the-go eating.
What makes these Greek veggie wraps so incredibly popular is their perfect balance of fresh, crisp vegetables, creamy elements, and bold Mediterranean flavors, all while being naturally vegetarian and easily customizable. The combination of cool, crunchy vegetables with tangy feta and creamy tzatziki creates a texture and flavor experience that’s both satisfying and refreshing—especially during warmer months when you want something light but filling.
Serve these Mediterranean salad wraps for weekday lunches (they’re meal prep champions!), casual summer dinners on the patio, picnic outings, beach trips, office lunches, post-workout meals, or as part of a Mediterranean-themed dinner party spread. They’re ideal for Meatless Mondays, healthy eating goals, busy parents needing quick lunch solutions, or anyone looking to add more vegetables to their diet without sacrificing flavor. These wraps travel beautifully, making them perfect for lunchboxes, road trips, or outdoor gatherings where you need something that won’t wilt or get soggy quickly!
History / Background
The Greek salad wrap is a modern fusion creation that beautifully bridges ancient Mediterranean culinary traditions with contemporary grab-and-go eating culture. To understand this recipe’s origins, we need to explore both the traditional Greek salad (Horiatiki) and the evolution of wrap sandwiches in American cuisine.
Traditional Greek salad, or Horiatiki salata, has been a staple of Greek cuisine for centuries, though its exact origins are debated. What we do know is that the classic combination—tomatoes, cucumbers, onions, olives, feta cheese, and olive oil—represents the fundamental ingredients of Greek peasant food, utilizing fresh produce that grows abundantly throughout Greece. Interestingly, traditional Greek salad doesn’t include lettuce at all; that’s an American adaptation. The authentic version features chunky vegetables, a slab of feta cheese on top, dressed simply with olive oil, oregano, and sometimes a splash of red wine vinegar.
The wrap format, however, is distinctly modern and primarily American in its current form. While flatbreads have been used to hold food for thousands of years across many cultures (think Indian roti, Mexican tortillas, or Middle Eastern pita), the “wrap sandwich” as we know it became popular in California during the 1980s and exploded nationwide in the 1990s. Food trucks, health-conscious restaurants, and chains like Subway helped popularize wraps as a lighter, more portable alternative to traditional sandwiches.
The Greek salad wrap likely emerged in the late 1990s or early 2000s when Mediterranean cuisine was gaining massive popularity in the United States, fueled by research highlighting the health benefits of the Mediterranean diet. Creative home cooks and restaurant chefs began adapting traditional Greek flavors into more portable, accessible formats for American diners. The combination was natural: take beloved Greek salad ingredients and make them easier to eat on-the-go by wrapping them in a tortilla.
What makes this recipe special is how it honors authentic Greek flavors while adapting to modern eating habits. It maintains the integrity of fresh, quality ingredients—a cornerstone of Greek cooking—while creating something practical for busy lifestyles. The addition of tzatziki sauce (a traditional Greek yogurt-based sauce with cucumber, garlic, and dill) and sometimes hummus (technically Lebanese, but widely embraced across Mediterranean cuisine) creates creamy elements that help bind the vegetables together and add richness without heaviness.
Today, Greek salad wraps represent the beautiful evolution of Mediterranean cuisine in America—respectful of tradition while innovative in presentation, healthy without being bland, and proof that convenient food doesn’t have to compromise on flavor or nutrition.
Why You’ll Love This Recipe
These easy Greek wraps are the definition of fresh, flavorful, and fuss-free eating! The combination of crisp vegetables, tangy feta, briny olives, and creamy tzatziki creates an incredibly satisfying meal that somehow feels both light and filling at the same time. Every bite delivers that perfect contrast of textures and that unmistakable Mediterranean flavor profile that’s simultaneously bright, savory, and refreshing.
Here’s why these Mediterranean wraps deserve a spot in your weekly meal rotation:
- Super Quick: Ready in just 10-15 minutes with minimal prep work
- No Cooking Required: Perfect for hot summer days when you don’t want to turn on the stove
- Naturally Vegetarian: Packed with vegetables and satisfying without meat
- Meal Prep Friendly: Components stay fresh for days when stored properly
- Budget-Friendly: Uses affordable, everyday ingredients
- Customizable: Endless variations to suit different tastes and dietary needs
- Kid-Friendly: Even picky eaters love the mild, fresh flavors
- Portable: Perfect for lunchboxes, picnics, or eating on-the-go
- Healthy & Light: Loaded with vegetables, protein from feta, and healthy fats
- No Special Ingredients: Everything available at regular grocery stores
- Satisfying: Filling enough for a complete meal despite being light
- Restaurant-Quality at Home: Tastes like something you’d order at a Mediterranean café
- Diet-Friendly: Easily adapted for various dietary preferences
Ingredient Notes
Understanding your ingredients helps you create the best possible Greek wraps and adapt them to what you have available:
Tortillas or Flatbreads: Large flour tortillas (10-12 inches) work beautifully and are readily available. Spinach or tomato-flavored tortillas add visual appeal and extra flavor. Substitution: Whole wheat tortillas (healthier option), low-carb tortillas, lavash, large pita bread, or even large lettuce leaves for low-carb wraps. Warmed tortillas are more pliable and less likely to crack when rolling.
Cucumbers: Persian or English cucumbers are ideal because they have fewer seeds and thinner skins, requiring no peeling. They provide essential crunch and refreshing coolness. Substitution: Regular cucumbers work fine—just peel them and scoop out the seeds if they’re large and watery. Dice them into small pieces for easier eating.
Tomatoes: Roma or plum tomatoes are preferred because they’re less watery and have fewer seeds, preventing soggy wraps. Cherry or grape tomatoes also work wonderfully when halved. Substitution: Any fresh tomato variety works; just remove excess seeds and juice to prevent sogginess. In winter, sun-dried tomatoes (rehydrated and chopped) add concentrated flavor.
Red Onion: Provides sharp, pungent bite that’s characteristic of Greek salad. Slicing thin or dicing small makes it less overwhelming. Tip: Soak sliced red onion in cold water for 10 minutes to mellow the sharpness while maintaining crunch.
Bell Peppers: Add sweetness, crunch, and color. Red, yellow, or orange peppers are sweeter than green. Substitution: Roasted red peppers (jarred) add smoky depth, or use banana peppers for tang.
Kalamata Olives: These Greek olives are essential for authentic flavor—dark purple-black, almond-shaped, with rich, fruity, wine-like taste. Substitution: Other Mediterranean olives like Castelvetrano (mild and buttery) or black olives work, though Kalamatas are highly recommended for authenticity.
Feta Cheese: This salty, tangy, crumbly Greek cheese is non-negotiable for authentic flavor. Buy block feta packed in brine for best quality and flavor—it’s creamier and more flavorful than pre-crumbled. Substitution: French feta (milder), Bulgarian feta (creamier), or goat cheese for similar tanginess.
Tzatziki Sauce: This Greek yogurt-based sauce with cucumber, garlic, and dill adds creaminess and authentic Mediterranean flavor. Store-bought works for convenience, but homemade tastes exponentially better. Substitution: Plain Greek yogurt mixed with lemon juice and garlic, ranch dressing (less authentic but kid-friendly), or hummus for vegan option.
Optional Additions: Hummus adds creaminess and protein, fresh dill or oregano boost Mediterranean flavor, and a drizzle of olive oil and red wine vinegar add richness and tang.
Equipment Needed
You’ll need minimal equipment for these no-cook wraps—just basic kitchen tools:
- Sharp Chef’s Knife (for chopping vegetables)
- Cutting Board
- Large Mixing Bowl (for combining salad ingredients)
- Small Bowl (for mixing tzatziki if making homemade)
- Measuring Cups and Spoons
- Vegetable Peeler (optional, for cucumbers)
- Cheese Grater (if shredding feta, though crumbling by hand works fine)
- Spoon or Spatula (for spreading sauce)
- Paper Towels (for drying vegetables)
- Optional: Panini Press or Skillet (if making grilled/pressed wraps)
- Plastic Wrap or Parchment Paper (for wrapping and storing)
Greek Salad Wrap Recipe
These fresh Greek salad wraps combine crisp cucumbers, juicy tomatoes, Kalamata olives, feta cheese, and crunchy vegetables in soft tortillas with creamy tzatziki sauce. A quick, healthy Mediterranean lunch ready in 15 minutes!
- Total Time: 15 minutes
- Yield: 4 wraps 1x
Ingredients
For the Greek Salad Filling:
- 1 large English cucumber (or 2 Persian cucumbers), diced
- 2 cups cherry or grape tomatoes, halved (or 2 Roma tomatoes, diced)
- 1 medium red bell pepper, diced
- ½ medium red onion, thinly sliced or diced
- ¾ cup Kalamata olives, pitted and halved
- 1 cup crumbled feta cheese (about 6 oz)
- 2 cups chopped romaine lettuce or mixed greens (optional but recommended)
- 2 tablespoons fresh dill, chopped (or 1 tablespoon dried oregano)
- 2 tablespoons extra virgin olive oil
- 1 tablespoon red wine vinegar
- Salt and black pepper to taste
For the Wraps:
- 4 large flour tortillas (10-12 inches)
- ½ cup tzatziki sauce (store-bought or homemade)
- ½ cup hummus (optional but recommended)
For Homemade Tzatziki (Optional):
- 1 cup Greek yogurt (full-fat for creamiest texture)
- ½ cup cucumber, grated and squeezed dry
- 2 cloves garlic, minced
- 1 tablespoon fresh lemon juice
- 1 tablespoon fresh dill, chopped
- 1 tablespoon olive oil
- Salt and pepper to taste
Instructions
- Prep the Vegetables: Start by preparing all your vegetables. Dice the cucumber into small, bite-sized pieces (about ½-inch cubes). If using English cucumber, you don’t need to peel it; if using regular cucumber, peel and remove seeds first. Halve the cherry tomatoes, or dice Roma tomatoes and remove excess seeds and juice. Dice the bell pepper into small pieces. Thinly slice or dice the red onion—if you find raw onion too sharp, soak the slices in cold water for 10 minutes, then drain and pat dry. Halve the Kalamata olives. If using lettuce, chop it into thin ribbons.
- Make Tzatziki (If Homemade): If making homemade tzatziki, grate the cucumber using a box grater, then place the grated cucumber in a clean kitchen towel or cheesecloth and squeeze firmly to remove as much liquid as possible—this is crucial to prevent watery sauce. In a small bowl, combine the Greek yogurt, squeezed cucumber, minced garlic, lemon juice, dill, olive oil, salt, and pepper. Mix well and refrigerate until ready to use. The sauce can be made up to 3 days ahead and flavors improve over time.
- Combine the Salad: In a large mixing bowl, combine the diced cucumber, tomatoes, bell pepper, red onion, and Kalamata olives. Add the chopped fresh dill (or dried oregano). Drizzle with olive oil and red wine vinegar. Season with salt and black pepper to taste. Gently toss everything together until well combined. The olive oil and vinegar act as a light dressing that brings all the flavors together. Crumble in the feta cheese and gently fold it through—be careful not to over-mix or the feta will break down too much.
- Warm the Tortillas: For the most pliable, easiest-to-roll wraps, warm your tortillas briefly. You can do this by heating them directly over a gas burner for 10-15 seconds per side, microwaving them wrapped in a damp paper towel for 20-30 seconds, or warming them in a dry skillet over medium heat for about 20 seconds per side. Warm tortillas are much less likely to crack or tear when rolling.
- Assemble the Wraps: Lay one tortilla flat on a clean work surface. Spread 2 tablespoons of hummus across the center of the tortilla in a horizontal line, leaving about 2 inches on each side and at the bottom. This acts as a base layer and adds creaminess. Spread 2 tablespoons of tzatziki sauce on top of the hummus. If using lettuce, lay a handful down the center—this creates a protective barrier between the tortilla and the wetter ingredients.
- Add the Filling: Spoon about 1 to 1½ cups of the Greek salad mixture down the center of the tortilla, on top of the lettuce. Don’t overfill—you should have a line of filling about 2 inches wide running horizontally across the middle of the tortilla. Overfilling makes wraps impossible to roll and messy to eat. Top with a little extra feta cheese if desired.
- Roll the Wrap: This is the crucial step! Fold the left and right sides of the tortilla over the filling (about 1-2 inches on each side), then starting from the bottom (the side closest to you), tightly roll the tortilla up and away from you, tucking in the filling as you go. The tighter you roll, the better the wrap holds together. Continue rolling until you have a complete cylinder.
- Slice and Serve: Using a sharp serrated knife, cut the wrap in half diagonally. This not only looks beautiful but makes it easier to eat. If making ahead for meal prep, wrap each whole wrap tightly in plastic wrap or parchment paper and refrigerate. Serve immediately, or pack for lunch!
Notes
- Prevent Soggy Wraps: Pat all vegetables completely dry with paper towels before assembling. Remove seeds and excess juice from tomatoes. Squeeze grated cucumber very dry if making homemade tzatziki.
- Don’t Overfill: The most common mistake is overstuffing wraps. Use about 1 to 1½ cups of filling per wrap—it seems like less than you’d think, but it’s the right amount for successful rolling.
- Lettuce Layer: Adding lettuce creates a protective barrier between the tortilla and wet ingredients, significantly reducing sogginess, especially for meal prep.
- Warm Tortillas: Always warm tortillas before rolling. Cold tortillas crack and tear easily. Warm ones are pliable and easy to work with.
- Assembly Order Matters: Layer ingredients strategically—hummus and tzatziki first (they stick to the tortilla), then lettuce (barrier), then the salad mixture on top. This prevents sliding ingredients.
- Storage: These wraps are best eaten within a few hours of assembly. For meal prep, store components separately and assemble when ready to eat for best texture.
- Prep Time: 15 minutes
- Cook Time: 0 minutes
- Category: Lunch
- Method: No-Cook
- Cuisine: Greek
- Diet: Vegetarian
Nutrition
- Serving Size: 1 wrap
- Calories: 385
- Sugar: 6g
- Sodium: 890mg
- Fat: 19g
- Saturated Fat: 6g
- Unsaturated Fat: 12g
- Trans Fat: 0g
- Carbohydrates: 42g
- Fiber: 5g
- Protein: 13g
- Cholesterol: 30mg
Tips & Variations
The beauty of Greek salad wraps is their incredible versatility—customize them to match your preferences or dietary needs:
Protein Additions:
- Grilled Chicken Greek Wrap: Add sliced grilled chicken breast seasoned with lemon, garlic, and oregano
- Falafel: Crumbled or sliced falafel turns this into a heartier Mediterranean meal
- Chickpeas: Roasted chickpeas add plant-based protein and satisfying crunch
- Lamb or Gyro Meat: Traditional Greek protein that pairs perfectly with these flavors
- Grilled Shrimp: Lemon-garlic marinated shrimp makes this feel restaurant-fancy
- Tuna: Mediterranean-style tuna salad with olives and capers
Vegan Greek Wrap:
- Omit the feta cheese or use vegan feta alternative
- Replace tzatziki with cashew-based tzatziki or extra hummus
- Add avocado for creaminess
- Increase olives and chickpeas for substance
Low-Carb/Keto Options:
- Use large lettuce leaves (romaine or butter lettuce) instead of tortillas
- Try low-carb tortillas or coconut wraps
- Make it a Greek salad bowl instead of wrapping
Flavor Variations:
- Spicy Greek Wrap: Add sliced pepperoncini, jalapeños, or red pepper flakes
- Herb-Forward: Double the fresh dill and add fresh mint and parsley
- Lemon Lovers: Add extra lemon juice and even some lemon zest to the filling
- Creamy Version: Add avocado slices or extra tzatziki sauce
- Grain Bowl Style: Add quinoa or bulgur to the filling for extra substance
Different Vegetables:
- Swap bell peppers for roasted red peppers (more depth)
- Add shredded carrots for extra crunch and color
- Include thinly sliced radishes for peppery bite
- Add spinach or arugula instead of romaine
- Include sun-dried tomatoes for concentrated flavor
Pro Chef Tips
Elevate your Greek salad wraps from good to absolutely restaurant-quality with these professional techniques:
1. The Salt-and-Rest Technique: After dicing your tomatoes and cucumbers, place them in a colander, sprinkle lightly with salt, and let them sit for 10 minutes. This draws out excess moisture that would otherwise make your wrap soggy. Pat them completely dry with paper towels before adding to your salad mixture. This simple step makes an enormous difference in wrap longevity.
2. Cheese Quality Matters: Always buy block feta packed in brine rather than pre-crumbled feta. Block feta is creamier, more flavorful, and less dry. When you’re ready to use it, drain it, pat it dry, and crumble it yourself by hand into irregular chunks. The texture and taste difference is remarkable—pre-crumbled feta often contains anti-caking agents that affect flavor and texture.
3. Strategic Layering System: The order of ingredients isn’t arbitrary—it’s engineered to prevent sogginess and ingredient slippage. Always spread your creamy elements (hummus, tzatziki) first so they adhere to the tortilla. Next, add lettuce as a moisture barrier. Finally, add your vegetable mixture on top. This “wet, dry barrier, wet” system prevents the tortilla from becoming soggy and helps everything stay in place.
4. The Professional Roll: Here’s how restaurants get those perfect, tight wraps: After adding filling, fold the sides in first, then use your fingers to pull the bottom edge up and over the filling tightly while simultaneously pulling back slightly toward you. This creates tension that compresses the filling. Continue rolling forward while maintaining that tension. A tight roll means ingredients don’t fall out and the wrap stays together beautifully.
5. Double Wrap for Meal Prep: If making these ahead for meal prep, use two tortillas per wrap—one regular-sized and one slightly larger. Place the filling on the smaller one, roll it, then wrap that entire wrapped sandwich in the larger tortilla. This double-layer protection prevents leaking and keeps everything fresh longer.
6. Chill Before Cutting: After rolling your wrap, if you have 10 minutes, wrap it tightly in plastic wrap and refrigerate before cutting. This firms everything up and makes slicing much cleaner—you’ll get that perfect Instagram-worthy cross-section without everything falling out.
7. Toast for Texture: For a completely different (and amazing) experience, after rolling your wrap, brush the outside lightly with olive oil and grill it in a panini press or heavy skillet for 2-3 minutes per side until golden and crispy. This creates a warm, slightly crunchy exterior while melting the feta inside. It’s restaurant-level delicious!
Common Mistakes to Avoid
Even though Greek wraps are simple, these common errors can sabotage your success:
1. Overfilling the Wrap: This is by far the most common mistake! It’s tempting to stuff as much delicious filling as possible into your tortilla, but overfilling makes wraps impossible to roll, causes ingredients to fall out, and results in a messy eating experience. Stick to about 1 to 1½ cups of filling per large tortilla—it seems modest, but it’s the perfect amount for a rollable, holdable wrap that actually stays together.
2. Not Drying Ingredients Properly: Wet vegetables are the enemy of a good wrap. If you skip patting your tomatoes, cucumbers, and olives dry, you’ll end up with a soggy tortilla within 30 minutes. Always dry your vegetables thoroughly with paper towels after washing or draining. For tomatoes, remove the seeds and gel—they’re mostly water and contribute nothing but sogginess.
3. Using Cold, Stiff Tortillas: Rolling cold tortillas straight from the refrigerator almost always results in cracking and tearing. Cold tortillas are stiff and brittle. Always warm your tortillas for 20-30 seconds before assembling—this makes them pliable and stretchy, allowing you to roll tightly without cracking. This 30-second step saves so much frustration!
4. Poor Rolling Technique: Many people try to roll a wrap like a burrito, starting from one end and just rolling forward. This creates loose, sloppy wraps where ingredients fall out. The correct method: fold the sides in first to create barriers, then roll from bottom to top while maintaining tension and tucking the filling inward as you roll. Practice makes perfect!
5. Assembling Too Far in Advance: While the individual components can be prepped ahead, fully assembled wraps start deteriorating after a few hours. The moisture from vegetables and sauces gradually softens the tortilla, making it soggy and potentially causing it to tear. For best results, assemble wraps no more than 3-4 hours before eating, or better yet, pack components separately and assemble fresh.
Storage & Meal Prep
Greek salad wraps are excellent for meal prep when stored properly:
Component Storage: The best approach for meal prep is storing components separately and assembling when ready to eat. Store the Greek salad mixture in an airtight container in the refrigerator for up to 3 days. Keep the feta separate if possible, as it can get watery when mixed with vegetables too far ahead. Store tzatziki sauce and hummus in separate containers. Keep tortillas in their original packaging or wrapped well. This method ensures maximum freshness and prevents soggy wraps.
Assembled Wrap Storage: If you must assemble wraps ahead of time, wrap each one tightly in plastic wrap or parchment paper, making sure it’s completely sealed. Refrigerate for up to 6-8 hours maximum—beyond that, sogginess becomes an issue. The lettuce barrier and properly dried vegetables help extend freshness, but these are still best eaten within a few hours of assembly.
Preventing Sogginess: To extend the life of assembled wraps, use extra lettuce leaves as a moisture barrier between the tortilla and fillings. Don’t add tomatoes to wraps you’re storing longer than 2 hours—pack them separately and add when eating. Consider lightly toasting or grilling the tortilla before assembly, which creates a slightly more resistant barrier to moisture.
Vegetable Prep Ahead: You can dice all your vegetables up to 2 days ahead. Store them in separate airtight containers with paper towels in the bottom to absorb moisture. Don’t combine vegetables with olive oil, vinegar, or salt until you’re ready to assemble—these ingredients draw out moisture from vegetables, making them weepy.
Leftover Salad Mixture: If you have leftover Greek salad mixture, it makes an excellent side salad, topping for grain bowls, addition to pasta salad, or filling for pita pockets. It keeps well refrigerated for up to 3 days. Just drain any accumulated liquid before using.
Make-Ahead & Freezer Notes
Greek salad wraps are perfect for advance preparation with the right strategy:
Make-Ahead Strategy: The best make-ahead approach is preparing all components separately. Chop all vegetables up to 2 days ahead and store in airtight containers in the refrigerator. Make homemade tzatziki up to 3 days ahead—it actually improves in flavor as it sits. Keep feta cheese in its brine until ready to use. Assemble wraps fresh when needed, which takes only 5 minutes once components are prepped.
Morning Meal Prep: If packing for lunch, assemble your wrap the night before or morning of, wrap tightly in parchment paper or plastic wrap, and refrigerate. For absolute best results, pack the Greek salad mixture and sauces separately in small containers, and assemble your wrap at lunchtime. This requires a bit more effort but results in a perfectly fresh wrap.
Freezer Considerations: Unfortunately, Greek salad wraps don’t freeze well due to the high water content in fresh vegetables. Cucumbers, tomatoes, and lettuce all become mushy and release excessive water when thawed, resulting in soggy, unappetizing wraps. The feta cheese and tzatziki sauce also don’t freeze ideally.
What You CAN Freeze: If you want to prep ahead for easy meals, you can freeze certain components. Tzatziki sauce freezes reasonably well for up to 1 month—thaw overnight in the refrigerator and stir well before using (it may separate slightly but stirring fixes this). Hummus also freezes well. Feta cheese can be frozen if still in its brine for up to 3 months. However, fresh vegetables cannot be frozen for this recipe.
Quick Assembly System: For the fastest meal prep, set up an assembly line. Lay out 4 tortillas, spread all of them with hummus and tzatziki, add lettuce to all, then divide the Greek salad mixture among them, roll all four, wrap, and refrigerate. This batch assembly takes about 10 minutes and gives you four ready-to-go meals.
Serving Suggestions
Greek salad wraps pair beautifully with numerous sides and accompaniments to create a complete Mediterranean meal:
Traditional Mediterranean Sides:
- Greek Lemon Potatoes: Crispy roasted potato wedges with lemon, oregano, and garlic
- Hummus and Pita: Extra hummus served with warm pita triangles and vegetables
- Tzatziki and Veggies: Fresh vegetable crudités with extra tzatziki for dipping
- Tabbouleh Salad: Fresh parsley and bulgur salad with tomatoes and lemon
- Mediterranean Pasta Salad: Cold pasta with olives, tomatoes, feta, and Italian dressing
Soup Pairings:
- Lemon Chicken Soup (Avgolemono): Creamy Greek soup with rice and lemon
- Red Lentil Soup: Warm, protein-rich soup with cumin and lemon
- Roasted Tomato Soup: Light and refreshing, perfect for summer
- Chickpea and Spinach Soup: Hearty yet light Mediterranean soup
Light Sides:
- Fresh Fruit Salad: Watermelon, feta, and mint makes a perfect summer side
- Marinated Olives: Mixed Mediterranean olives with herbs and citrus
- Stuffed Grape Leaves (Dolmas): Traditional Greek appetizer
- Greek Roasted Vegetables: Zucchini, eggplant, and bell peppers with olive oil
Chips and Crunchy Sides:
- Pita Chips: Store-bought or homemade with za’atar seasoning
- Vegetable Chips: Baked zucchini, beet, or sweet potato chips
- Lentil Chips: Protein-packed crunchy alternative
- Mediterranean Crackers: Multigrain crackers with herbs
Beverage Pairings:
- Iced Tea with Mint: Refreshing and pairs perfectly with Mediterranean flavors
- Lemonade: Fresh-squeezed lemonade complements the tangy feta
- Sparkling Water with Cucumber: Light and refreshing
- White Wine: Crisp Sauvignon Blanc or Greek Assyrtiko for adult meals
Make it a Meal: Serve your Greek wrap alongside a small Greek salad (yes, more Greek salad!), some crispy fries or roasted potatoes, and fresh fruit for a complete, satisfying Mediterranean meal that feels restaurant-special.
FAQs Section
Q: Can I make Greek wraps without tzatziki sauce?
A: Absolutely! While tzatziki is traditional and adds authentic Greek flavor, you have several alternatives. Plain Greek yogurt mixed with lemon juice and garlic works wonderfully. Hummus alone provides creaminess (though it’s not authentically Greek). Ranch dressing is kid-friendly, though less authentic. You could even use a simple lemon-olive oil vinaigrette. The wrap will still be delicious—tzatziki just adds that signature creamy, tangy, garlicky flavor that makes it taste distinctly Greek.
Q: How do I prevent my Greek wraps from getting soggy?
A: Preventing soggy wraps requires several techniques: (1) Pat ALL vegetables completely dry with paper towels after washing. (2) Remove seeds and gel from tomatoes—they’re mostly water. (3) Salt cucumbers and tomatoes, let sit 10 minutes, then pat dry—this draws out excess moisture. (4) Use lettuce as a barrier layer between the tortilla and wet ingredients. (5) Don’t assemble wraps more than 3-4 hours before eating. (6) Store components separately for meal prep and assemble fresh. Following these steps makes a huge difference!
Q: Can I make these Greek salad wraps vegan?
A: Yes, with easy substitutions! Omit the feta cheese or use vegan feta (available at most health food stores). Replace tzatziki with cashew-based tzatziki (blend soaked cashews with lemon, garlic, dill, and plant milk) or simply use more hummus for creaminess. Add avocado slices for richness and healthy fats. Consider adding chickpeas or falafel for protein. The core vegetables remain the same, so you’ll still have that fresh Mediterranean flavor profile.
Q: What’s the best tortilla to use for Greek wraps?
A: Large (10-12 inch) flour tortillas work best because they’re soft, pliable, and have a neutral flavor that lets the Greek ingredients shine. Whole wheat tortillas add nutty flavor and extra fiber. Spinach or tomato-flavored tortillas add visual appeal and extra flavor. For low-carb options, try low-carb tortillas or large coconut wraps. Traditional Greek pita bread works but is harder to roll tightly. Lavash (thin Armenian flatbread) rolls beautifully and stays together well. Always warm whichever type you choose to make rolling easier!
Q: Can I add protein to my Greek wrap?
A: Definitely! While the original recipe is vegetarian, adding protein makes it more substantial. Grilled chicken breast (seasoned with lemon, garlic, and oregano) is classic and delicious. Gyro meat or lamb gives authentic Greek flavor. Falafel adds plant-based protein and traditional Middle Eastern flair.