Creamy Roasted Red Pepper Hummus Recipe (Better Than Store-Bought!)
If you’re ready to transform your snack game and impress everyone at your next gathering, this homemade roasted red pepper hummus recipe is about to become your new obsession. This vibrant, creamy Middle Eastern dip combines the nutty richness of traditional chickpea hummus with the sweet, smoky flavor of roasted red peppers, creating something truly magical. Whether you’re hosting a party, meal prepping for the week, or just craving a healthy snack, this easy roasted red pepper hummus delivers restaurant-quality results in your own kitchen.
What makes this roasted red pepper hummus so special is its gorgeous coral-pink color, silky-smooth texture, and perfectly balanced flavor profile. The roasted peppers add natural sweetness and depth that elevates plain hummus to something extraordinary, while the tahini, garlic, and lemon juice create that classic hummus taste we all love. It’s incredibly versatile—serve it as an appetizer with pita chips and vegetables, spread it on sandwiches and wraps, or use it as a healthy alternative to mayonnaise. Best of all, this homemade version costs a fraction of what you’d pay at the store and tastes infinitely better, with no preservatives or additives.
History / Background
Hummus has ancient roots that stretch back thousands of years across the Middle East and Mediterranean regions. The word “hummus” comes from the Arabic word for chickpeas, and while the exact origin is debated among historians, we know that chickpeas have been cultivated in the region for at least 7,000 years. Early versions of hummus-like dishes appear in 13th-century Egyptian cookbooks, though the modern preparation we recognize today likely developed in the Levant region, encompassing modern-day Lebanon, Syria, Israel, Palestine, and Jordan.
Traditional hummus is made from cooked chickpeas blended with tahini (sesame seed paste), lemon juice, garlic, and olive oil. Each country and region has developed its own variations and techniques, with families passing down recipes through generations. In Lebanon, hummus is often served as part of a mezze spread with other small dishes. In Israel, it’s become a national staple served for breakfast, lunch, and dinner. The Palestinian version often features warm chickpeas and is finished with pine nuts and paprika.
Roasted red pepper hummus is a more modern innovation that emerged as hummus gained popularity in Western countries, particularly in the United States during the 1990s and 2000s. As Americans fell in love with hummus’s healthy profile and delicious taste, creative variations began appearing in stores and restaurants. Roasted red pepper quickly became one of the most beloved flavored hummus varieties because it maintains the authentic character of traditional hummus while adding visual appeal and a sweet, smoky dimension that appeals to American palates.
The roasting of peppers itself has deep Mediterranean roots, where peppers are charred over open flames or in hot ovens, then peeled to reveal tender, sweet flesh with complex caramelized flavors. This technique has been used for centuries in Spanish, Italian, Turkish, and Middle Eastern cooking. When combined with hummus, the roasted peppers create a fusion that honors both traditional Middle Eastern cuisine and Mediterranean cooking methods, resulting in a dip that feels both authentic and contemporary.
Why You’ll Love This Recipe
This homemade roasted red pepper hummus is going to revolutionize the way you think about healthy snacking and entertaining, and I’m so excited to share why it’s absolutely worth making from scratch. Unlike store-bought versions that can taste bland or overly salty, this recipe delivers fresh, vibrant flavor with a texture so creamy and smooth it practically melts on your tongue.
Here’s what makes this roasted red pepper hummus recipe absolutely irresistible:
- Incredibly quick and easy – Ready in just 10 minutes using a food processor or blender
- Healthier than store-bought – No preservatives, additives, or excessive sodium—just real, wholesome ingredients
- Budget-friendly – Costs less than $3 to make, compared to $5-7 for store-bought versions
- Stunning presentation – Beautiful coral color makes it Pinterest-perfect and party-ready
- Highly nutritious – Packed with plant-based protein, fiber, healthy fats, and vitamins
- Infinitely customizable – Adjust garlic, lemon, or spice levels to your exact preferences
- Vegan and allergen-friendly – Naturally dairy-free, gluten-free, and nut-free
- Meal prep superstar – Lasts up to a week in the refrigerator and actually tastes better the next day
- Versatile usage – Works as a dip, spread, sandwich filling, or even salad dressing
- Crowd-pleasing flavor – Appeals to both hummus enthusiasts and those new to it
Ingredient Notes
Every ingredient in this roasted red pepper hummus plays an important role in creating that perfect balance of flavors and silky texture. Here’s what you need to know:
Chickpeas (Garbanzo Beans) – The foundation of any hummus, chickpeas provide protein, fiber, and that characteristic earthy, nutty flavor. Use canned chickpeas for convenience—they’re already cooked and tender. Rinse them thoroughly to remove excess sodium and the slightly metallic canned taste. Substitution: You can cook dried chickpeas from scratch (soak overnight, then simmer for 1-2 hours), which will give you even creamier results and save money if making large batches.
Roasted Red Peppers – These bring sweetness, smokiness, and that gorgeous coral color. You can use jarred roasted red peppers from the store (packed in water or oil, both work) or roast your own fresh bell peppers. Substitution: Fresh bell peppers roasted at home give superior flavor—just char them under the broiler or over a gas flame, then steam in a covered bowl before peeling.
Tahini – This sesame seed paste is absolutely essential for authentic hummus flavor. It adds nutty richness, creaminess, and helps bind everything together. Buy good quality tahini that’s smooth and pourable, not separated and grainy. Stir well before using as the oil separates naturally. Substitution: In a pinch, you can use smooth peanut butter or sunflower seed butter, though the flavor will be noticeably different.
Fresh Lemon Juice – Brightness and acidity are crucial for balancing the rich tahini and chickpeas. Always use fresh lemon juice rather than bottled—the difference in flavor is dramatic. Substitution: Fresh lime juice works in a pinch and adds an interesting twist.
Garlic – Fresh garlic cloves provide pungent, aromatic flavor that’s essential to hummus. Start with one clove and add more to taste—garlic intensity is very personal. Raw garlic becomes more mellow as the hummus sits. Substitution: Roasted garlic gives a sweeter, milder flavor, or use garlic powder (½ teaspoon) if you must.
Cumin – This warm spice adds earthy depth and is traditional in many Middle Eastern hummus recipes. Just a small amount enhances all the other flavors without being overtly spicy. Substitution: Omit if you prefer a cleaner flavor, or substitute with paprika for a different but equally delicious profile.
Olive Oil – Extra virgin olive oil adds richness and helps create that luxuriously smooth texture. It’s also traditional to drizzle more on top when serving. Substitution: Any neutral oil works, though you’ll lose some flavor complexity.
Ice Water – The secret ingredient for ultra-creamy hummus! Cold water (or the reserved chickpea liquid, called aquafaba) thins the hummus to perfect consistency while the food processor is running. The coldness helps emulsify everything smoothly.
Salt – Essential for bringing out all the flavors. Start with less than you think you need and adjust after tasting, especially if using jarred roasted peppers packed in brine.
Paprika (optional garnish) – Smoked or sweet paprika sprinkled on top adds color and a subtle flavor boost when serving.
Equipment Needed
Making roasted red pepper hummus requires minimal equipment, but having the right tools makes the process effortless:
- Food processor or high-powered blender – Absolutely essential for achieving that creamy, smooth texture. A food processor is ideal, but a high-powered blender (like a Vitamix) also works beautifully.
- Can opener – For opening your chickpea cans
- Measuring cups and spoons – For accurate ingredient proportions
- Colander or strainer – For rinsing and draining the chickpeas
- Citrus juicer – Makes extracting lemon juice easier and more efficient
- Rubber spatula – For scraping down the sides of the food processor and transferring the hummus
- Storage container – Airtight container for refrigerating leftovers
- Serving bowl – An attractive shallow bowl for presentation
Optional but helpful:
- Garlic press – Makes mincing garlic quick and easy
- Kitchen towel – If roasting your own peppers, for rubbing off the charred skin
- Microplane zester – For adding lemon zest if you want extra citrus flavor

Creamy Roasted Red Pepper Hummus Recipe
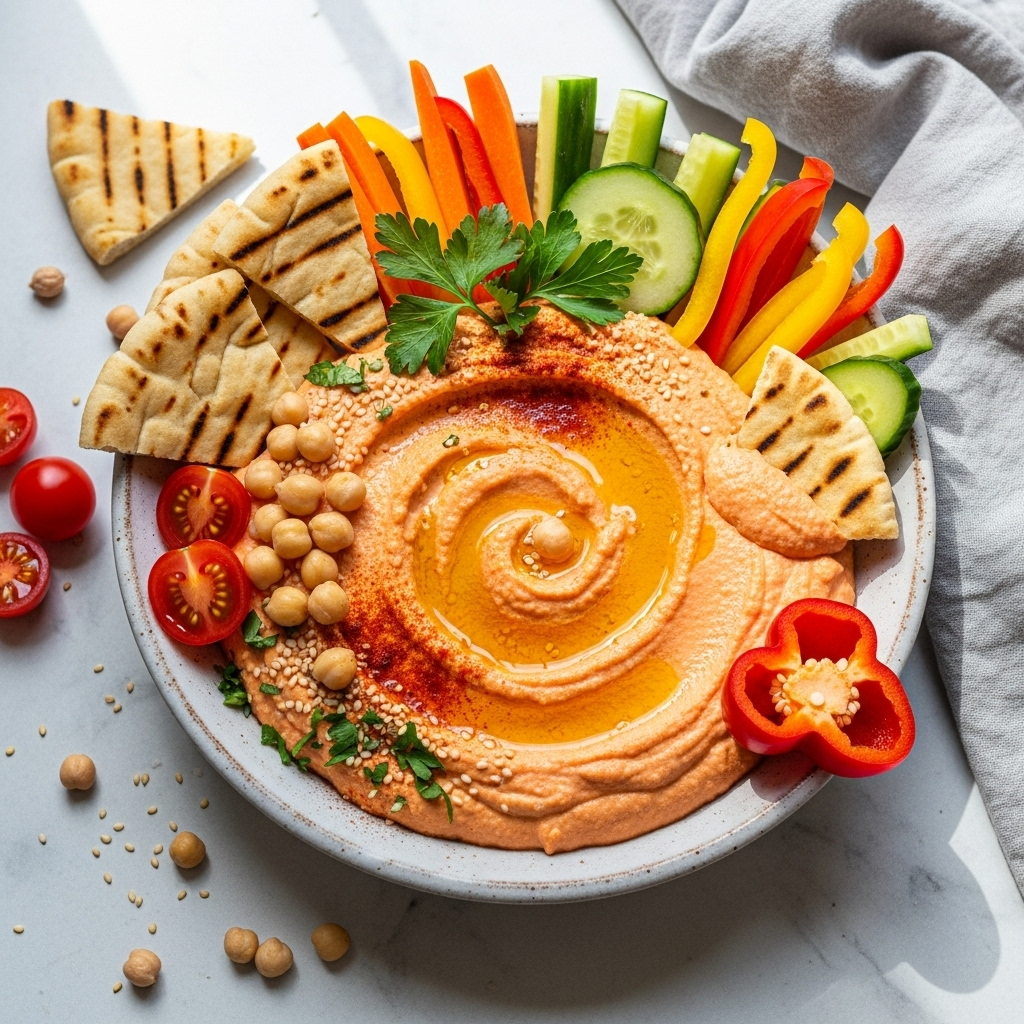
This ultra-creamy roasted red pepper hummus is bursting with flavor and takes just 10 minutes to make. Sweet roasted red peppers blend with chickpeas, tahini, lemon, and garlic to create a silky-smooth dip that’s healthier and tastier than anything store-bought. Perfect for parties, meal prep, or healthy snacking!
- Total Time: 10 minutes
- Yield: About 2 cups (8 servings, ¼ cup each) 1x
Ingredients
- 1 can (15 ounces) chickpeas, drained and rinsed (about 1½ cups cooked)
- ½ cup roasted red peppers from jar, drained (about 2-3 medium peppers)
- ¼ cup tahini (well-stirred)
- 3 tablespoons fresh lemon juice (about 1 large lemon)
- 1-2 cloves garlic, peeled (start with 1, add more to taste)
- ½ teaspoon ground cumin
- ½ teaspoon salt (adjust to taste)
- ¼ teaspoon black pepper
- 3-4 tablespoons ice-cold water (or reserved chickpea liquid)
- 2 tablespoons extra virgin olive oil, plus more for drizzling
- ¼ teaspoon smoked paprika (optional, for garnish)
- Fresh parsley or cilantro, chopped (optional, for garnish)
Instructions
- Prepare your ingredients: Drain and rinse the chickpeas thoroughly under cold water in a colander, rubbing them gently to remove the skins (they’ll float off). While not essential, removing some skins creates even smoother hummus. Drain the roasted red peppers and pat them dry with paper towels to remove excess moisture. Squeeze the lemon juice and measure all other ingredients.
- Start with the tahini and lemon: Add the tahini and lemon juice to your food processor first. This is a professional trick—processing these two ingredients together for about 1 minute creates a smooth, creamy base that helps the hummus become incredibly silky. The mixture will look grainy and thick at first, then become smooth and light in color. Scrape down the sides with a spatula.
- Add the flavor base: To the whipped tahini mixture, add the garlic cloves, cumin, salt, black pepper, and olive oil. Process for another 30 seconds until everything is well combined and the garlic is fully minced and incorporated.
- Add the roasted red peppers: Drop in the drained roasted red peppers and process for 45-60 seconds until they’re completely broken down and the mixture turns a beautiful coral-pink color. Scrape down the sides of the processor bowl to ensure even blending.
- Incorporate the chickpeas: Add half of the chickpeas to the food processor and blend for about 1 minute. Scrape down the sides, then add the remaining chickpeas and process for another full minute. The hummus should be getting smooth and creamy but will still be quite thick.
- Achieve the perfect consistency: With the food processor running, slowly drizzle in the ice-cold water, 1 tablespoon at a time, until you reach your desired consistency. The hummus should be smooth, creamy, and light—almost whipped in texture. This can take 2-4 minutes of continuous processing. Don’t rush this step; the longer you process with the cold water, the creamier your hummus becomes.
- Taste and adjust: Stop the processor and taste your hummus. Add more salt, lemon juice, garlic, or cumin as needed to suit your preferences. Remember that flavors will develop and intensify after the hummus rests in the refrigerator.
- Serve or store: Transfer the hummus to a serving bowl or storage container. If serving immediately, create a shallow well in the center with the back of a spoon, drizzle with olive oil, and sprinkle with paprika and fresh herbs. For meal prep, transfer to an airtight container and refrigerate. The hummus will thicken slightly as it chills—this is normal and desirable.
Notes
- Texture control: For ultra-smooth hummus, peel the chickpeas by rubbing them in the colander. It takes a few extra minutes but creates restaurant-quality results.
- Flavor intensity: Start with one garlic clove and add more if desired. Raw garlic becomes more pronounced as hummus sits, so err on the side of less initially.
- Consistency adjustment: Hummus thickens in the refrigerator. Add a tablespoon or two of water or olive oil before serving if needed.
- Roasted pepper options: Two medium fresh roasted bell peppers can replace jarred peppers for superior flavor. Any color works, though red is traditional and sweetest.
- Make it extra creamy: Reserve ¼ cup of the chickpea liquid (aquafaba) and use it instead of water for an even silkier texture.
- Serving temperature: Hummus tastes best at room temperature. Remove from refrigerator 20-30 minutes before serving.
- Prep Time: 10 minutes
- Cook Time: 0 minutes
Nutrition
- Serving Size: ¼ cup
- Calories: 110
- Sugar: 2g
- Sodium: 200mg
- Fat: 6g
- Saturated Fat: 1g
- Unsaturated Fat: 5g
- Trans Fat: 0g
- Carbohydrates: 11g
- Fiber: 3g
- Protein: 4g
- Cholesterol: 0mg
Tips & Variations
Spicy Roasted Red Pepper Hummus: Add ½ teaspoon of red pepper flakes, a pinch of cayenne pepper, or 1-2 teaspoons of harissa paste for a spicy kick that complements the sweet roasted peppers beautifully.
Extra Smoky Version: Use fire-roasted red peppers or add ½ teaspoon of smoked paprika to the blend (in addition to the garnish) for deep, smoky flavor reminiscent of baba ganoush.
Sun-Dried Tomato Twist: Replace half the roasted red peppers with oil-packed sun-dried tomatoes for a more intense, concentrated flavor profile.
Roasted Garlic Hummus: Replace the raw garlic with a whole head of roasted garlic (squeeze out the soft cloves) for mellow, sweet, caramelized garlic flavor without the sharp bite.
Extra Protein Boost: Stir in 2-3 tablespoons of hemp hearts or add an extra tablespoon of tahini to increase the protein content.
Lighter Version: Reduce the olive oil to 1 tablespoon and use additional ice water or low-sodium vegetable broth to thin the hummus while cutting calories.
Greek-Inspired: Add 2 tablespoons of crumbled feta cheese, fresh oregano, and some chopped Kalamata olives folded in at the end.
Herb Garden Fresh: Blend in ½ cup of fresh basil, cilantro, or parsley for a vibrant green-speckled hummus with herbaceous notes.
Pro Chef Tips
The tahini-lemon whip trick: Processing tahini and lemon juice together first before adding anything else is the secret to restaurant-quality hummus. This creates an emulsion that becomes light, fluffy, and incredibly smooth—it’s the foundation of creamy hummus.
Temperature matters: Use ice-cold water when thinning your hummus. The cold temperature helps maintain the emulsion and prevents the tahini from separating, resulting in a creamier, more stable texture.
Don’t skimp on processing time: The difference between good hummus and spectacular hummus is patience. Process for a full 3-5 minutes total, especially after adding the chickpeas and water. The longer you blend, the smoother and creamier it becomes as the chickpea fibers break down completely.
Peel those chickpeas for perfection: While optional, removing the chickpea skins (just rub them in the colander and the skins float off) creates exceptionally silky hummus without any graininess. It adds 5 minutes but the texture improvement is remarkable.
Let it rest: Hummus tastes significantly better after resting in the refrigerator for at least 2 hours, preferably overnight. The flavors meld together, the garlic mellows, and the consistency becomes perfectly creamy.
Quality ingredients make a difference: Invest in good tahini—it should be smooth, pourable, and nutty-tasting, not bitter or grainy. The tahini can make or break your hummus since it’s such a prominent flavor.
Roast your own peppers: If you have time, roasting fresh bell peppers yourself creates exponentially better flavor than jarred versions. The freshly charred, smoky taste is incomparable and takes your hummus from good to extraordinary.
Common Mistakes to Avoid
Using old or bitter tahini: Tahini can go rancid and develop an unpleasant bitter taste. Always taste your tahini before adding it to the hummus. Fresh tahini should taste nutty and mildly sweet, never harsh or bitter. Store opened tahini in the refrigerator to extend its shelf life.
Not processing long enough: The most common mistake is stopping too soon. Many home cooks process for just 30-60 seconds, which leaves the hummus grainy and thick. You need to process for at least 3-4 minutes total to break down the chickpea fiber completely and create that signature silky texture.
Adding all the liquid at once: Dumping all the water in at once can make the hummus too thin and prevent proper emulsification. Always add liquid gradually with the processor running, giving the mixture time to incorporate each addition and adjust as you go.
Serving it straight from the refrigerator: Cold hummus has muted flavors and stiff texture. Always let your hummus come to room temperature for 20-30 minutes before serving so the olive oil softens, the flavors bloom, and the texture becomes perfectly creamy and scoopable.
Using low-quality or separated tahini: If your tahini is separated with a thick layer of oil on top and rock-hard paste below, it’s either old or low-quality. Good tahini should be relatively uniform in consistency (though some separation is normal) and stir together easily. Quality matters enormously since tahini is a primary ingredient.
Storage & Meal Prep
Refrigerator Storage: Store your roasted red pepper hummus in an airtight container in the refrigerator for up to 7 days. For best preservation, press plastic wrap directly onto the surface of the hummus before sealing the lid to prevent oxidation and maintain freshness.
Preventing Discoloration: The surface of hummus may darken slightly due to oxidation—this is normal and doesn’t affect flavor or safety. The plastic wrap trick mentioned above minimizes this, or simply scrape off the top layer before serving.
Consistency After Storage: Hummus will thicken considerably after a day or two in the refrigerator as the chickpeas absorb moisture. This is completely normal. Simply stir in 1-2 tablespoons of water, olive oil, or lemon juice to restore the perfect creamy consistency.
Meal Prep Strategy: This hummus is perfect for weekly meal prep. Make a batch on Sunday and portion it into smaller containers for easy grab-and-go snacks throughout the week. Pair with pre-cut vegetables in separate containers for healthy, convenient snacking.
Signs of Spoilage: Discard the hummus if you notice any mold growth, off odors (sour or fermented smell), or if liquid separation won’t reincorporate with stirring. Fresh hummus smells pleasantly nutty and garlicky.
Extending Shelf Life: For maximum freshness, always use clean utensils when scooping hummus to avoid introducing bacteria. A thin layer of olive oil poured over the surface before refrigerating also helps preserve freshness.
Make-Ahead & Freezer Notes
Make-Ahead Instructions: This roasted red pepper hummus is ideal for making ahead—in fact, I strongly recommend it! The flavors develop and deepen beautifully as the hummus rests. Prepare it up to 5 days in advance and store it covered in the refrigerator. The garlic mellows, the spices integrate, and everything harmonizes into something even more delicious than when freshly made.
Freezing Instructions: Yes, hummus freezes surprisingly well! Transfer to freezer-safe containers, leaving about ½ inch of headspace for expansion. Pour a thin layer of olive oil over the top before sealing to prevent freezer burn. Freeze for up to 3 months.
Thawing Method: Transfer frozen hummus to the refrigerator and let it thaw completely overnight (about 8-12 hours). Never microwave hummus as this can cause the tahini to separate and create an unpleasant grainy texture.
Post-Freezing Texture: After thawing, the hummus may look slightly separated or grainy. Simply give it a good stir, or better yet, pulse it briefly in the food processor with a tablespoon of fresh olive oil or water to restore the creamy consistency.
Portion Freezing: For convenience, freeze hummus in smaller portions using ice cube trays or small containers. Once frozen solid, transfer the cubes to a freezer bag. This allows you to thaw just what you need without defrosting the entire batch.
Serving Suggestions
Roasted red pepper hummus is incredibly versatile and pairs beautifully with countless foods. Here are the best ways to serve and enjoy it:
Classic Dipping Options:
- Warm pita bread wedges or pita chips
- Fresh vegetable crudité (carrots, cucumbers, bell peppers, celery, cherry tomatoes, radishes)
- Crispy bagel chips or pita crisps
- Pretzel crisps or regular pretzels
- Crackers (whole grain, sesame, or multi-seed varieties)
- Toasted baguette slices or crostini
Creative Serving Ideas:
- As a spread on sandwiches and wraps instead of mayonnaise
- Dolloped on grain bowls, Buddha bowls, or Mediterranean bowls
- As a base for flatbread pizza or naan pizza
- Swirled into soup for added creaminess and flavor
- As a salad dressing (thin with extra lemon juice and olive oil)
- On avocado toast or underneath poached eggs for breakfast
- As a dip for falafel, grilled chicken, or lamb skewers
- Spread on burgers or veggie burgers
Build a Mediterranean Mezze Platter: Create an impressive appetizer spread by serving your roasted red pepper hummus alongside baba ganoush, tzatziki, stuffed grape leaves, marinated olives, feta cheese, cucumber salad, and tabbouleh with plenty of warm pita bread.
Beverage Pairings: The bright, tangy flavors work beautifully with crisp white wines (Sauvignon Blanc or Pinot Grigio), light rosés, Mediterranean-style beers, mint lemonade, or iced herbal teas.
Presentation Tips: Serve in a shallow bowl with a well in the center filled with olive oil, sprinkled with paprika, za’atar, or pine nuts, and garnished with fresh parsley. This traditional presentation is stunning and Instagram-worthy!
FAQs Section
Can I make roasted red pepper hummus without tahini? While tahini is traditional and provides essential nutty flavor and creamy texture, you can substitute it if necessary. Try smooth peanut butter, almond butter, or sunflower seed butter (for nut-free). The flavor will be different but still delicious. For a tahini-free version, increase the olive oil to ¼ cup and add an extra tablespoon of lemon juice for balance.
Why is my hummus too thick or too thin? Hummus consistency depends on how much liquid you add and how long you process it. If too thick, add water or olive oil one tablespoon at a time until you reach the desired consistency. If too thin, add more chickpeas (start with ¼ cup) or let it refrigerate uncovered for an hour to thicken naturally.
Can I use dried chickpeas instead of canned? Absolutely! In fact, cooking dried chickpeas from scratch yields even creamier hummus. Soak 1 cup of dried chickpeas overnight, drain, then simmer in fresh water for 1-2 hours until very tender. Reserve the cooking liquid to use instead of water when blending. This method is more economical for large batches and gives you more control over texture.
How do I roast my own red peppers? Place whole bell peppers directly on a gas burner flame (turning with tongs) or under the broiler on a baking sheet until the skin is completely charred and blackened on all sides. Transfer to a bowl and cover with plastic wrap or a lid for 10-15 minutes to steam. The charred skin will then peel off easily. Remove seeds and stems, and you’re done!
Is this hummus gluten-free? Yes! Roasted red pepper hummus is naturally gluten-free as long as all your ingredients are gluten-free (check labels on tahini and any spice blends). It’s perfect for those with celiac disease or gluten sensitivities. Just be sure to serve with gluten-free crackers or vegetables.
Can I make this in a regular blender instead of a food processor? Yes, a high-powered blender (like Vitamix or Blendtec) works very well for hummus. You may need to stop and scrape down the sides more frequently, and you might need to add the water sooner to help everything blend smoothly. Regular blenders with lower power may struggle—if yours isn’t blending smoothly, add an extra tablespoon or two of liquid.
Why does my hummus taste bland? The most common causes are not enough salt, lemon juice, or garlic, or serving the hummus too cold. Always taste and adjust seasonings before refrigerating, then taste again before serving. Remember that cold temperatures mute flavors, so hummus should always be served at room temperature. Don’t be shy with the lemon juice—it’s crucial for bright, bold flavor!
Conclusion
And there you have it—the ultimate roasted red pepper hummus recipe that’s going to change your snacking and entertaining game forever! This vibrant, creamy, flavor-packed dip proves that homemade is always better than store-bought, and once you taste the difference, you’ll never go back to those plastic containers from the grocery store.
The beauty of this recipe is its simplicity and versatility. With just a handful of wholesome ingredients and 10 minutes of your time, you can create something that’s not only delicious but also nutritious, budget-friendly, and impressive enough for any occasion. Whether you’re meal prepping for healthy workweek lunches, hosting a party, or just treating yourself to a better snack, this roasted red pepper hummus delivers every single time.
I’d absolutely love to hear how your hummus turns out! Did you add any creative variations? What’s your favorite way to serve it? Drop a comment below and share your experience, and if you loved this recipe, please pin it to your favorite Pinterest board so other home cooks can discover it too. Your shares help me continue creating these detailed, helpful recipes for you!
Now grab that food processor and get blending—your best hummus ever is just minutes away!