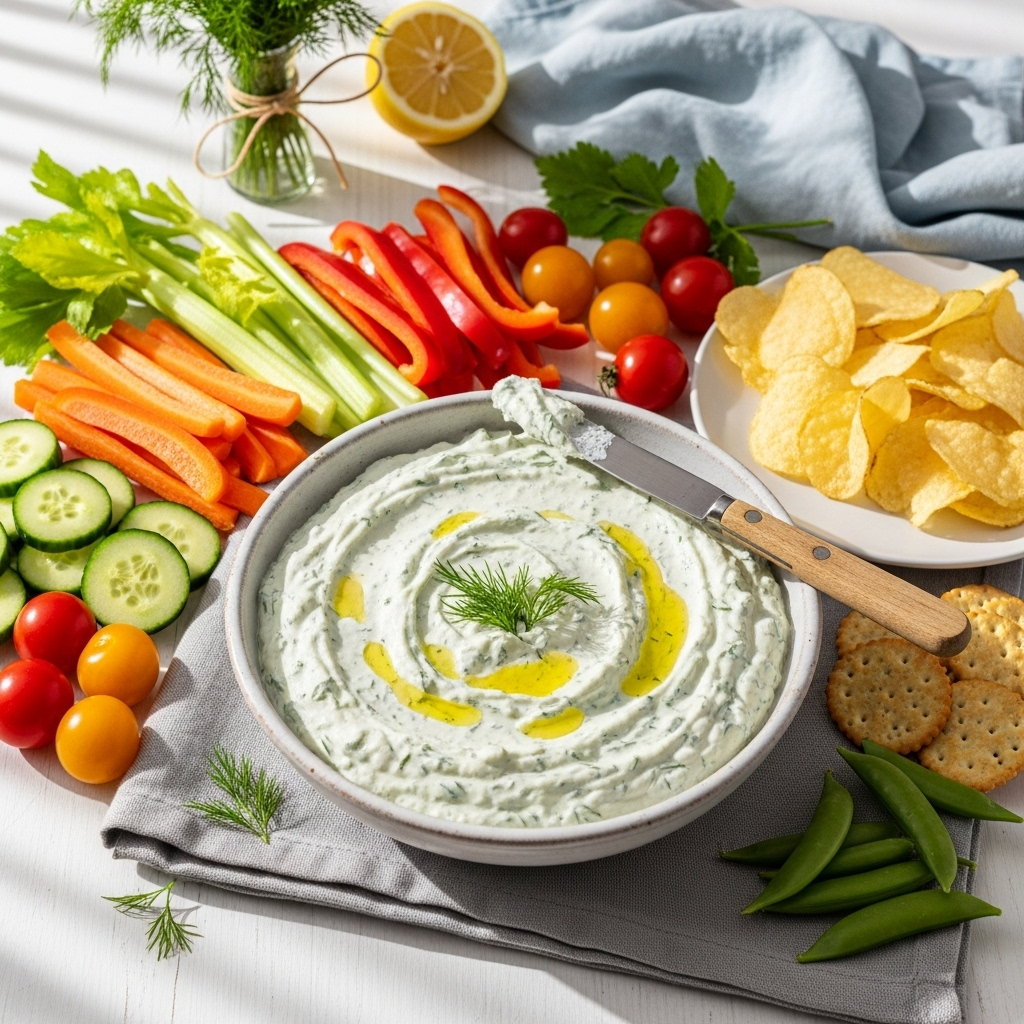
Creamy Dill Dip: Easy Sour Cream Party Dip Recipe
Creamy dill dip is the ultimate crowd-pleasing appetizer that transforms simple ingredients into something truly irresistible. This cool, tangy dip combines the richness of sour cream and mayonnaise with the fresh, herbaceous flavor of dill and aromatic seasonings to create a versatile party favorite that’s been gracing tables at gatherings for decades. Whether you’re hosting a backyard barbecue, planning a game day spread, or looking for an easy potluck contribution, this creamy dill dip delivers every single time.
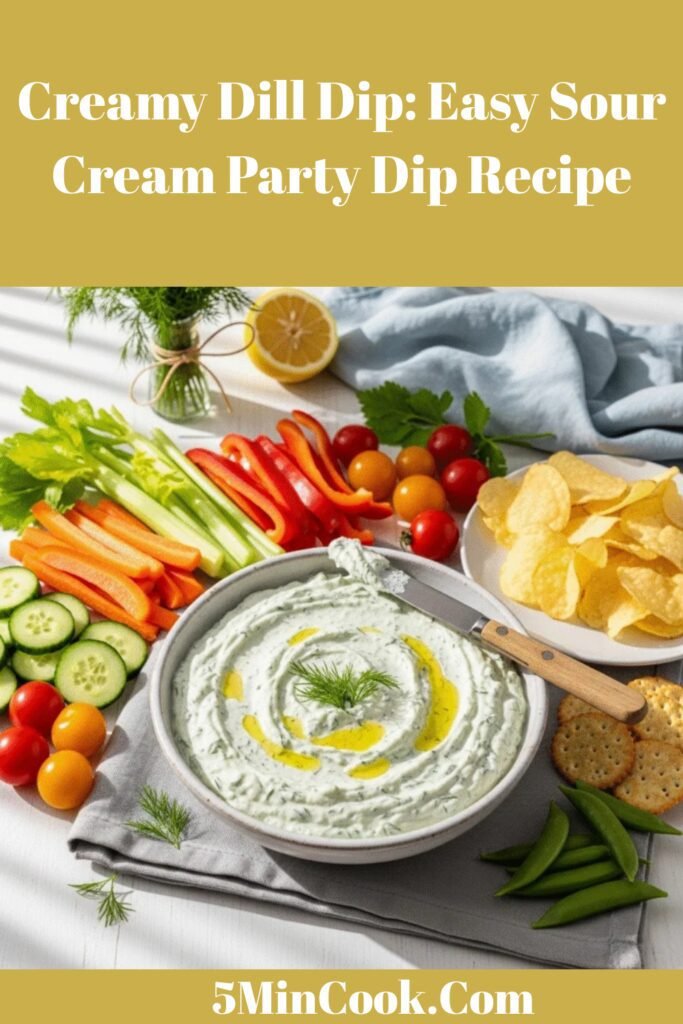
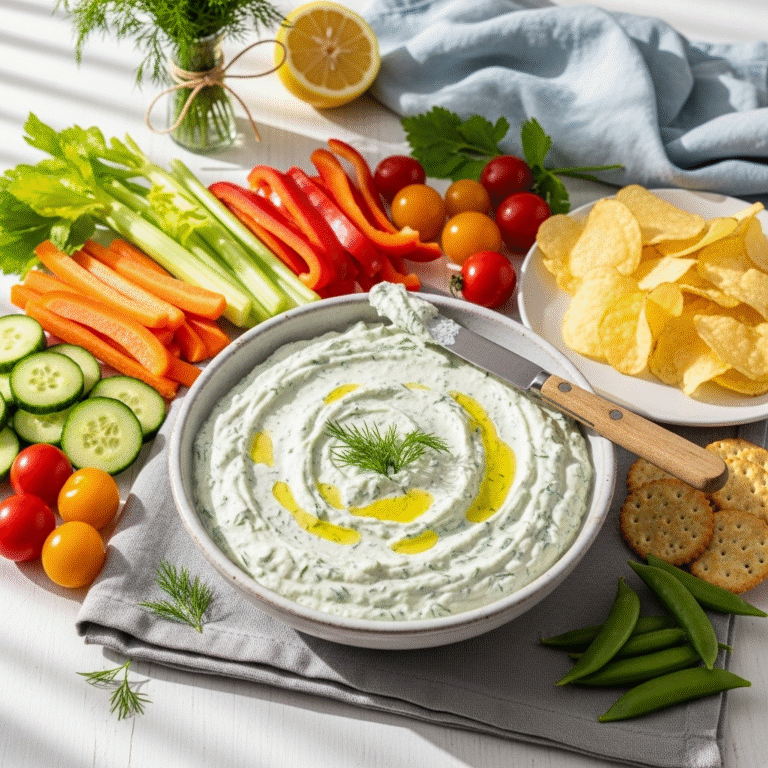
What makes this recipe so popular is its incredible simplicity paired with maximum flavor impact. You can whip up this easy dill dip in just five minutes with ingredients you likely already have in your pantry and refrigerator. It’s the perfect accompaniment for fresh vegetables, crispy potato chips, crackers, or even as a spread on sandwiches and wraps. The bright green flecks of fresh dill make it visually appealing for Pinterest-worthy photos, while the cool, creamy texture provides that perfect contrast to crunchy dippers.
Serve this sour cream dill dip at summer picnics, holiday parties, casual get-togethers, or anytime you need a reliable appetizer that everyone will love. It’s also fantastic for meal prep—make it on Sunday and enjoy healthy snacking options all week long with cut vegetables and whole grain crackers.
History / Background
Creamy dill dip belongs to a beloved category of American party foods that emerged during the mid-20th century when convenient entertaining became a cultural phenomenon. The 1950s and 1960s saw an explosion of easy-to-make dips as hostesses sought simple yet impressive appetizers for the increasingly popular cocktail parties and casual home gatherings that defined the era.
Dill itself has a much longer and more storied history. This aromatic herb has been cultivated for over 5,000 years, with origins in the Mediterranean region and Western Asia. Ancient Egyptians used dill for medicinal purposes, while Romans considered it a symbol of vitality and good luck. The word “dill” comes from the Old Norse word “dilla,” meaning “to soothe,” as the herb was traditionally used to calm upset stomachs and help babies sleep.
In culinary traditions, dill has been particularly prominent in Eastern European, Scandinavian, and German cuisines. It’s an essential flavoring in pickles (hence “dill pickles”), gravlax, borscht, and countless other traditional dishes. When European immigrants brought their food traditions to America, dill came along and gradually became integrated into American home cooking.
The specific combination of sour cream, mayonnaise, and dill likely evolved from Eastern European recipes that featured sour cream-based sauces and dips. Russian and Polish cuisines, for example, have long traditions of using sour cream (smetana) as a base for cold sauces and accompaniments. As these culinary influences merged with American convenience cooking in the post-war era, the creamy dill dip we know today was born.
By the 1970s and 1980s, serving dips in hollowed-out bread bowls or accompanied by crudités (raw vegetables) became the height of casual entertaining style. Creamy dill dip was often featured in women’s magazines, community cookbooks, and on the backs of sour cream containers as a foolproof recipe for busy hostesses. Today, it remains a classic precisely because it’s never gone out of style—good flavor never does.
Why You’ll Love This Recipe
This creamy dill dip recipe is about to become your entertaining secret weapon, and once you see how easy it is, you’ll wonder why you ever bought store-bought dips. The combination of tangy sour cream and rich mayonnaise creates the perfect creamy base, while fresh dill brings a burst of brightness that makes every bite refreshing and delicious.
Here’s why this easy dill dip deserves a permanent spot in your recipe collection:
- Lightning-fast preparation – Ready in just 5 minutes with zero cooking required; simply stir and serve
- Minimal ingredients – Uses basic pantry staples you probably already have on hand
- Make-ahead friendly – Tastes even better when made a day ahead, allowing flavors to develop and deepen
- Incredibly versatile – Works as a dip, spread, salad dressing, or sandwich condiment
- Crowd-pleaser guaranteed – Appeals to all ages and even picky eaters love the cool, creamy flavor
- Budget-friendly – Costs just a few dollars to make and serves a crowd
- Naturally gluten-free – Perfect for guests with dietary restrictions (when served with appropriate dippers)
- Customizable – Easily adjust herbs, spices, and intensity to match your taste preferences
- Perfect for meal prep – Pair with cut vegetables for healthy snacks throughout the week
- Pinterest-perfect – The flecks of green herbs create a beautiful, photogenic presentation
- No special equipment needed – Just a bowl and spoon required
- Light and refreshing – Not heavy or overly rich, making it perfect for warm weather gatherings
Ingredient Notes
Understanding your ingredients helps you achieve the best results and make smart substitutions when needed. Here’s what you need to know about each component in this creamy dill dip recipe:
Sour Cream – The primary base of this dip, sour cream provides that signature tangy flavor and thick, creamy texture. Full-fat sour cream works best for richness, but you can use reduced-fat versions if you prefer. For a tangier dip, substitute half the sour cream with plain Greek yogurt, which also adds extra protein. Avoid fat-free sour cream, as it can be watery and lacks the body needed for proper dip consistency.
Mayonnaise – Adds richness, smoothness, and helps create that perfectly spreadable consistency. Real mayonnaise (not salad dressing like Miracle Whip) works best for authentic flavor. You can use light mayonnaise to reduce calories without sacrificing too much texture. For a healthier twist, Greek yogurt can replace some or all of the mayo, though the flavor will be tangier.
Fresh Dill – The star ingredient that gives this dip its distinctive flavor and beautiful appearance. Fresh dill is far superior to dried dill in this recipe, providing a bright, aromatic quality that dried herbs simply can’t match. The feathery green fronds add visual appeal and a slightly sweet, grassy flavor with hints of anise. Look for fresh dill with vibrant green color and no yellowing or wilting.
Garlic Powder – Provides savory depth without the harshness of raw garlic. Garlic powder distributes more evenly throughout the dip and won’t overpower the delicate dill flavor. If you prefer using fresh garlic, use just one small clove, minced very fine, or grated on a microplane. Let the dip rest for at least an hour so the raw garlic mellows.
Onion Powder – Adds subtle savory sweetness and rounds out the flavor profile. Like garlic powder, it blends seamlessly into the dip without leaving chunks or an overpowering bite. You can substitute with finely minced fresh chives or green onions for a different but equally delicious flavor.
Worcestershire Sauce – This secret ingredient adds umami depth and complexity that makes people wonder what makes your dip taste so good. Just a small amount enhances all the other flavors without being identifiable. It contains anchovies, so vegetarians may want to use a vegetarian Worcestershire sauce or simply omit it.
Lemon Juice – Brightens all the flavors and adds acidity that balances the richness of the cream base. Fresh lemon juice is always best, but bottled will work in a pinch. The acid also helps preserve the dip and keeps it fresh longer in the refrigerator.
Salt and Black Pepper – Essential for bringing out all the other flavors. Start with the amounts listed and adjust to your taste after the dip has rested for at least 30 minutes, as the flavors will develop and intensify.
Equipment Needed
The beauty of this creamy dill dip is that you need almost nothing to make it. Here are the simple tools you’ll use:
- Medium mixing bowl – For combining all the ingredients
- Measuring cups and spoons – For accurate proportions
- Whisk or wooden spoon – For stirring ingredients together until smooth and creamy
- Rubber spatula – For scraping down the sides of the bowl and transferring dip to serving dish
- Serving bowl – For presenting your finished dip
- Knife and cutting board – For chopping fresh dill
- Plastic wrap or airtight container – For storing the dip in the refrigerator
Creamy Dill Dip
Cool, creamy dill dip made with sour cream, mayonnaise, and fresh herbs. This easy 5-minute appetizer is perfect for parties, gatherings, and everyday snacking with vegetables or chips.
- Total Time: 5 minutes
- Yield: 12 servings (about 1½ cups) 1x
Ingredients
- 1 cup sour cream (full-fat recommended)
- ½ cup mayonnaise
- 3 tablespoons fresh dill, finely chopped (about 3-4 sprigs)
- 1 teaspoon garlic powder
- 1 teaspoon onion powder
- ½ teaspoon Worcestershire sauce
- 1 tablespoon fresh lemon juice
- ½ teaspoon salt (adjust to taste)
- ¼ teaspoon black pepper
- Optional: 2 tablespoons finely chopped fresh parsley
- Optional: 1 tablespoon finely minced chives
Instructions
- Prepare the fresh herbs. Rinse the fresh dill under cold water and pat dry with paper towels. Remove the feathery fronds from the tough stems and discard the stems. Finely chop the dill fronds until you have about 3 tablespoons. If using parsley or chives, chop these finely as well.
- Combine base ingredients. In a medium mixing bowl, add the sour cream and mayonnaise. Whisk together until completely smooth and well combined with no streaks remaining.
- Add seasonings. Add the chopped fresh dill, garlic powder, onion powder, Worcestershire sauce, lemon juice, salt, and black pepper to the sour cream mixture.
- Mix thoroughly. Stir everything together with a whisk or spoon until all ingredients are evenly distributed throughout the dip. Make sure no pockets of seasoning remain unmixed.
- Taste and adjust. Taste the dip and adjust seasonings as needed. You might want more salt, lemon juice for brightness, or additional dill for stronger herb flavor.
- Rest the dip. Cover the bowl with plastic wrap and refrigerate for at least 30 minutes before serving. This resting time allows the flavors to meld together and develop. For best results, make it 2-4 hours ahead or even the night before.
- Serve. Transfer the dip to your serving bowl, garnish with a small sprig of fresh dill if desired, and serve chilled with your choice of dippers.
Notes
- Fresh vs. dried dill: If you must use dried dill, use only 1 tablespoon, as dried herbs are more concentrated. However, fresh dill is strongly recommended for the best flavor and appearance.
- Make it lighter: Replace half the sour cream with plain Greek yogurt for a protein boost and tangier flavor with fewer calories.
- Consistency adjustment: If your dip is too thick, thin it with a tablespoon of milk or water. If it’s too thin, add more sour cream.
- Flavor intensification: The dip tastes significantly better after resting. Make it at least 2 hours ahead for optimal flavor.
- Serving temperature: Always serve this dip cold, straight from the refrigerator for the best texture and food safety.
- Prep Time: 5 minutes
- Cook Time: 0 minutes
Nutrition
- Serving Size: 2 tablespoons
- Calories: 85
- Sugar: 1g
- Sodium: 135mg
- Fat: 8g
- Saturated Fat: 3g
- Unsaturated Fat: 4g
- Trans Fat: 0g
- Carbohydrates: 2g
- Fiber: 0g
- Protein: 1g
- Cholesterol: 15mg
Tips & Variations
Greek Yogurt Dill Dip: Replace half or all of the sour cream with thick Greek yogurt for a tangier, higher-protein version. This works especially well with full-fat Greek yogurt, which maintains the creamy texture.
Spicy Dill Dip: Add a pinch of cayenne pepper, a dash of hot sauce, or some finely minced jalapeño for a kick of heat that complements the cool creaminess beautifully.
Cucumber Dill Dip: Finely dice ½ cup of cucumber (seeded and patted dry) and fold it into the dip for added crunch and freshness. This variation is particularly refreshing in summer.
Lemon Dill Dip: Increase the lemon juice to 2 tablespoons and add ½ teaspoon of lemon zest for a brighter, more citrus-forward flavor that’s perfect with seafood.
Ranch-Style Dill Dip: Add 1 tablespoon of fresh minced parsley, 1 tablespoon of minced chives, and a pinch of paprika for a ranch-dill hybrid that kids love.
Vegan Dill Dip: Use vegan sour cream and vegan mayonnaise as direct substitutes. The flavor will be slightly different but still delicious.
Dill Pickle Dip: Add 2 tablespoons of finely minced dill pickles and 1 teaspoon of pickle juice for a tangy variation that pickle lovers will devour.
Lighter Version: Use light sour cream, light mayonnaise, and reduce the amount of mayo slightly. You can also replace half the mayo with Greek yogurt to cut calories without sacrificing too much richness.
Pro Chef Tips
Salt at the end. Professional chefs know that dairy-based dips continue to develop flavor as they sit. The salty and acidic components intensify over time, so it’s wise to slightly under-season initially and adjust after the dip has rested for at least 30 minutes. This prevents over-salting.
Chop herbs properly. Use a very sharp knife and a gentle rocking motion to chop fresh dill rather than crushing it with a dull blade. Crushing bruises the herbs and causes them to turn brown and lose their bright, fresh flavor. Stack the dill fronds, roll them loosely, and slice crosswise for clean cuts.
Room temperature mixing. Let your sour cream and mayonnaise sit at room temperature for 15-20 minutes before mixing. Ingredients at the same temperature blend more smoothly and create a silkier texture without lumps. Just don’t let them sit out too long for food safety.
Use a microplane for aromatics. If you’re using fresh garlic instead of garlic powder, grate it on a microplane rather than mincing. This creates a paste that distributes more evenly throughout the dip and won’t leave bites of harsh raw garlic.
The waiting game pays off. While you can serve this dip immediately, restaurants and catering professionals always make their dips at least 4 hours ahead, and often the day before. This resting time in the refrigerator allows the dried seasonings to hydrate fully, the flavors to marry together, and the overall taste to become more cohesive and rounded.
Balance is key. Professional cooks constantly adjust the balance between fat (sour cream, mayo), acid (lemon juice), salt, and aromatics (dill, garlic). Taste as you go and remember that each ingredient should be detectable but none should dominate. The best dips have harmony among all components.
Common Mistakes to Avoid
Using dried dill instead of fresh. While dried dill can work in a pinch, it simply doesn’t provide the bright, aromatic quality that makes this dip special. Fresh dill is widely available and inexpensive—it’s worth the small effort to use it. Dried dill can taste musty or stale if it’s been sitting in your spice cabinet too long.
Serving the dip immediately after making it. This is the biggest mistake home cooks make. The dip needs time for the flavors to develop and meld together. Without resting time, the seasonings taste separate and harsh rather than harmonious. Even 30 minutes makes a noticeable difference, but 2-4 hours is ideal.
Chopping dill with the stems included. The stems of dill are tough, fibrous, and can taste slightly bitter. Always remove the delicate fronds from the stems before chopping. The stems won’t break down or soften in the dip—they’ll just be unpleasant stringy bits.
Over-mixing or using a food processor. This dip should be mixed just until combined, not whipped or processed. Over-mixing can make it thin and runny as you break down the structure of the sour cream. Gently fold ingredients together with a spoon or whisk for the best texture.
Not adjusting seasoning after chilling. Cold temperatures dull your taste buds and mute flavors. A dip that tastes perfectly seasoned at room temperature may taste bland when served cold. Always taste your dip cold, right before serving, and adjust salt and lemon juice as needed.
Letting it sit at room temperature too long. Dairy-based dips are perishable and should never sit out for more than 2 hours at room temperature (or 1 hour if it’s above 90°F outside). For parties, set out a smaller bowl and replenish from the refrigerator rather than leaving a large batch at room temperature all day.
Storage & Meal Prep
Proper storage keeps your creamy dill dip fresh, flavorful, and safe to eat for several days. Transfer the dip to an airtight container immediately after making it, pressing plastic wrap directly onto the surface of the dip before sealing the container. This prevents a skin from forming and keeps the dip from absorbing other refrigerator odors.
Store your sour cream dill dip in the refrigerator for up to 5 days. The flavors will actually continue to develop and improve over the first 24 hours, making day-old dip taste even better than freshly made. After about 3 days, the fresh dill flavor may start to fade slightly, though the dip will still be safe to eat and delicious.
For meal prep purposes, this dip is absolutely perfect. Make a batch on Sunday evening and portion out vegetables throughout the week for healthy, satisfying snacks. Pair it with cut celery, carrots, bell peppers, cherry tomatoes, and snap peas portioned into individual containers. The dip will stay fresh all week, giving you grab-and-go snack options that keep you away from processed foods.
Before serving dip that’s been refrigerated, give it a good stir to reincorporate any liquid that may have separated. This is completely normal with dairy-based dips. If the dip has thickened too much in the refrigerator, you can thin it slightly with a teaspoon of milk or water and stir well.
Always use clean utensils when serving to prevent contamination. If you’re setting out dip for a party, never return dip that’s been sitting at room temperature back into the refrigerated container—food safety should always be a priority.
Make-Ahead & Freezer Notes
Creamy dill dip is an ideal make-ahead recipe that actually benefits from advance preparation. Make it anywhere from 2 hours to 2 days before you plan to serve it. The optimal time is 4-24 hours ahead, when the flavors have fully developed but the fresh dill is still bright and vibrant. Store it in an airtight container in the refrigerator.
For maximum flavor, prepare the dip the night before your event. This gives the dried seasonings time to hydrate, the garlic and onion powders to mellow and distribute, and the fresh dill to infuse throughout the creamy base. Many people find that day-old dip tastes significantly better than freshly made dip.
Freezing is not recommended for this creamy dill dip. Sour cream and mayonnaise both contain emulsified fats and water that separate when frozen and thawed. The result is a grainy, watery, broken texture that cannot be fully restored. The fresh dill will also turn dark and musty-tasting after freezing. This dip is best enjoyed fresh or refrigerated.
If you absolutely must extend the life of leftover dip, you could freeze it as a last resort, but know that you’ll need to use it in cooked applications rather than as a dip. Frozen and thawed dill dip can be stirred into hot baked potatoes, mixed into pasta salad dressing, or used as a base for cream soup—applications where the texture change won’t be as noticeable.
For best results, simply make smaller batches that you’ll use within 5 days, or cut the recipe in half if you’re serving a smaller crowd. The recipe is so quick and easy that there’s no reason to make more than you need.
Serving Suggestions
Creamy dill dip is wonderfully versatile and pairs beautifully with countless foods. Here are some delicious ways to serve this crowd-pleasing appetizer:
Fresh Vegetable Crudités: Carrot sticks, celery stalks, bell pepper strips (red, yellow, orange), cherry tomatoes, cucumber rounds, broccoli florets, cauliflower florets, snap peas, radishes, and blanched asparagus spears.
Chips and Crackers: Potato chips (especially rippled or kettle-cooked for sturdy scooping), pita chips, bagel chips, pretzels, water crackers, wheat crackers, rice crackers, and tortilla chips.
Bread Service: Toasted baguette slices, garlic bread, dinner rolls, breadsticks, or serve in a hollowed-out bread bowl for dramatic presentation.
Seafood Accompaniment: This dip is exceptional with chilled shrimp, smoked salmon, crab cakes, fish sticks, or fried calamari. The cool, herby flavor complements seafood perfectly.
Potato Preparations: Use as a topping for baked potatoes, roasted baby potatoes, sweet potato wedges, French fries, or tater tots.
Sandwich and Wrap Spread: Use in place of mayonnaise on sandwiches, wraps, burgers, or club sandwiches. It’s particularly good on turkey, roast beef, or veggie sandwiches.
Salad Dressing: Thin the dip with a tablespoon or two of milk or buttermilk to create a creamy dill salad dressing for green salads, potato salad, or coleslaw.
Brunch Applications: Serve alongside bagels and lox, on a brunch board with smoked fish, or as a spread for breakfast sandwiches.
Party Platters: Include it as part of a larger appetizer spread with other dips like hummus, guacamole, and salsa, surrounded by various dippers.
FAQs Section
Q: Can I use Greek yogurt instead of sour cream in dill dip?
A: Yes! Greek yogurt makes an excellent substitute for all or part of the sour cream. Use thick, full-fat Greek yogurt for the best texture and richness. The dip will have a tangier flavor and be slightly lighter in calories and higher in protein. Many people prefer a 50/50 mix of Greek yogurt and sour cream for the perfect balance of tang and creaminess.
Q: How long does homemade dill dip last in the refrigerator?
A: When stored properly in an airtight container, creamy dill dip will stay fresh for 4-5 days in the refrigerator. The fresh dill flavor is brightest in the first 3 days but remains delicious throughout. Always check for any off odors or appearance changes before serving, and never eat dip that’s been sitting at room temperature for more than 2 hours.
Q: Can I make creamy dill dip without mayonnaise?
A: Absolutely! You can replace the mayonnaise with additional sour cream or Greek yogurt for an all-dairy version. The texture will be slightly less rich and the flavor more tangy, but it’s still delicious. Another option is to use a dairy-free mayonnaise if you want to maintain that classic creamy dip texture.
Q: Why does my dill dip taste bland?
A: This usually happens when the dip hasn’t had time to rest and develop flavor, or when it’s under-seasoned. Make sure to let the dip chill for at least 30 minutes (preferably 2-4 hours) so the dried spices can hydrate and the flavors can meld. Also, remember that cold temperatures dull taste, so dips need more seasoning than you might expect. Taste it cold and adjust salt and lemon juice as needed.
Q: Can I use dried dill instead of fresh?
A: While fresh dill is strongly recommended for the best flavor and appearance, you can use dried dill in a pinch. Use only 1 tablespoon of dried dill to replace the 3 tablespoons of fresh, as dried herbs are more concentrated. Keep in mind that dried dill lacks the bright, aromatic quality of fresh and may taste somewhat flat or musty, especially if it’s old.
Q: Is creamy dill dip keto-friendly?
A: Yes! This dip is naturally low in carbohydrates and fits well within keto diet parameters. Each 2-tablespoon serving contains only about 2g of carbs. Just be mindful of what you’re dipping—choose keto-friendly options like celery, cucumber, bell peppers, or pork rinds instead of crackers or chips.
Q: Can I make this dip dairy-free or vegan?
A: Yes, you can make a vegan version using dairy-free sour cream (like those made from cashews or coconut) and vegan mayonnaise. The flavor will be slightly different but still tasty. Brands like Kite Hill, Tofutti, or homemade cashew cream work well as sour cream substitutes. Use a vegan Worcestershire sauce or omit it entirely.
Q: What can I do with leftover dill dip?
A: Leftover dill dip is incredibly versatile! Use it as a sandwich spread, thin it with milk for salad dressing, dollop it on baked potatoes or roasted vegetables, stir it into pasta salad, use it as a sauce for grilled fish or chicken, mix it into egg salad or tuna salad for extra creaminess, or spread it on pizza crust for a white sauce base.
Conclusion
And there you have it—the easiest, most delicious creamy dill dip recipe that’s about to become your go-to appetizer for every occasion! With just a handful of simple ingredients and five minutes of your time, you can create a crowd-pleasing dip that rivals anything you’d buy at the store but tastes infinitely better and fresher.
The beauty of this easy dill dip lies in its simplicity and versatility. Whether you’re bringing it to a potluck, serving it at your next party, or simply keeping it in the fridge for healthy snacking throughout the week, this sour cream dill dip never disappoints. The cool, creamy texture paired with the bright freshness of dill creates a flavor combination that appeals to everyone from kids to adults.
Remember, the secret to the best-tasting dip is giving it time to rest in the refrigerator so those flavors can meld together beautifully. Make it ahead, serve it cold with your favorite dippers, and watch it disappear before your eyes. Your guests will be asking for the recipe—and you can smile knowing how incredibly easy it was to make!
We’d love to hear how your creamy dill dip turned out! Share your photos on Pinterest, let us know in the comments what you served it with, and don’t forget to save this recipe for your next gathering. Whether you’re team veggies or team chips, this dip is ready to make your snacking dreams come true. Happy dipping!