Ingredients
Scale
- 3 cups chocolate ice cream (about 4 generous scoops, slightly softened)
- 1/3 cup chocolate hazelnut spread (Nutella or similar brand)
- 1/2 cup whole milk (adjust for desired thickness)
- Optional: 1 tablespoon chocolate syrup
- Optional: 1 shot espresso or 2 tablespoons cold brew (for adults)
- Optional: 1/4 teaspoon vanilla extract
- Optional: Pinch of sea salt
For Garnish:
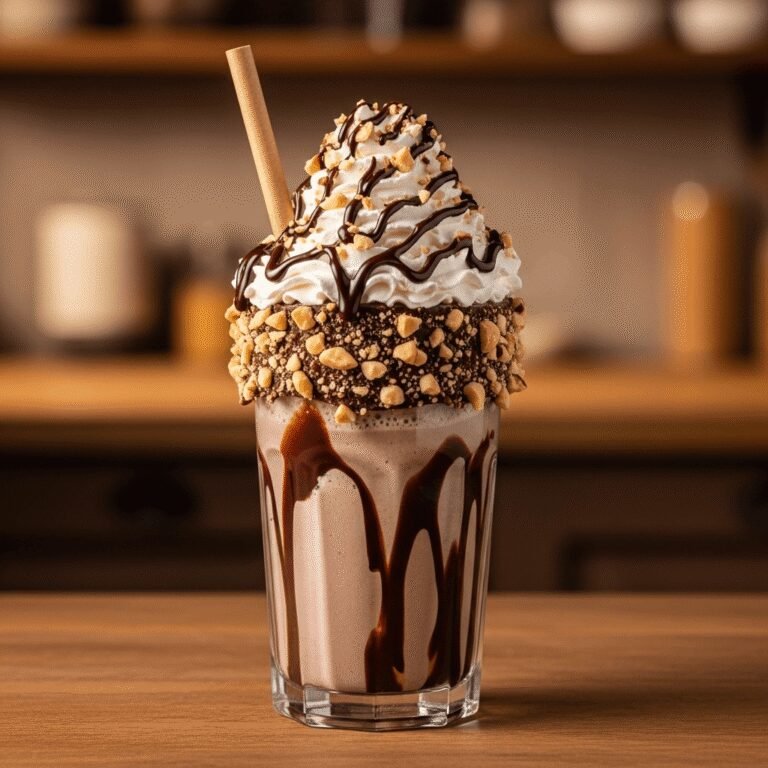
- Whipped cream
- Chocolate shavings or cocoa powder
- Crushed toasted hazelnuts
- Extra chocolate hazelnut spread for drizzling
Instructions
- Prepare Your Ingredients: Remove chocolate ice cream from the freezer and let it sit at room temperature for 3-5 minutes to soften slightly—it should be scoop-able but not melting. Check your chocolate hazelnut spread; if it’s very thick or cold from the pantry, microwave it for 10-15 seconds until it becomes pourable and easier to blend. This prevents lumps and ensures smooth integration.
- Optional Toast Hazelnuts: If using hazelnuts for garnish, toast them now so they can cool. Place whole or roughly chopped hazelnuts in a dry skillet over medium heat. Toast for 3-4 minutes, shaking the pan frequently, until fragrant and lightly golden. Transfer immediately to a plate to cool, then roughly chop or crush in a plastic bag with a rolling pin.
- Layer Ingredients in Blender: Add ingredients in the optimal order for best blending: start with the softened chocolate ice cream on the bottom (this creates the proper vortex), followed by the chocolate hazelnut spread, then the milk. If using optional additions like chocolate syrup, espresso, vanilla extract, or salt, add them now.
- Blend to Perfection: Start your blender on the lowest speed to begin incorporating ingredients without air pockets. Gradually increase to medium-high speed and blend for 30-45 seconds until completely smooth and uniformly colored. The shake should have no visible streaks of hazelnut spread and should look glossy and thick. Stop once and scrape down the sides with your rubber spatula if needed, then blend for another 10-15 seconds.
- Check and Adjust Consistency: Your ideal texture is thick enough to coat a spoon but pourable. Dip a spoon in the shake—it should leave a thick coating that slowly drips off. If too thick (won’t pour easily), add milk 1-2 tablespoons at a time, pulsing to incorporate. If too thin (runs right off the spoon), add more ice cream 1/2 cup at a time and blend again. Remember: easier to thin than thicken, so err on the side of less milk initially.
- Prepare Glasses for Wow Factor (Optional but Impressive): Warm 2-3 tablespoons of chocolate hazelnut spread in the microwave for 15-20 seconds until it’s thin enough to drizzle. Using a spoon, squeeze bottle, or piping bag, create decorative swirls on the inside of your serving glasses. Place prepared glasses in the freezer for 2-3 minutes to set while you finish blending—this keeps the drizzle from sliding down when you pour the shake.
- Pour and Build: Remove glasses from freezer and pour your chocolate hazelnut milkshake carefully, dividing evenly between glasses. Pour slowly to avoid disrupting your decorative drizzle work. Fill to about 1 inch from the rim to leave space for toppings.
- Garnish Like a Pro: Top each milkshake generously with whipped cream, creating a nice tall swirl. Sprinkle with chocolate shavings or dust with cocoa powder using a fine-mesh sieve. Add crushed toasted hazelnuts for crunch and authentic flavor. For the final touch, drizzle additional warmed chocolate hazelnut spread over the whipped cream in an artistic zigzag pattern.
- Serve Immediately: This milkshake is at its absolute best when served immediately while perfectly cold and thick. Provide both a wide straw and a long spoon—this shake is thick enough that you’ll want both options. Encourage drinking/eating it within 10-15 minutes for the best texture experience.
Notes
- Ice Cream Softening is Key: Slightly softened (but not melted) ice cream blends smoothly without requiring excess liquid, keeping your shake thick.
- Hazelnut Spread Temperature: Room temperature or slightly warmed spread incorporates much more smoothly than cold spread straight from the pantry.
- Start with Less Milk: Begin with 1/3 cup milk and add more only if needed—you can always thin a shake, but thickening requires more ice cream.
- Adult Version: The espresso addition creates a sophisticated mocha-hazelnut flavor perfect for grown-up palates.
- Make It Boozy: Add 1-2 oz of Frangelico (hazelnut liqueur), Irish cream, or chocolate vodka for adults.
- Dairy-Free Option: Use non-dairy chocolate ice cream and plant-based milk; most chocolate hazelnut spreads are already dairy-free.
- Prep Time: 5 minutes
- Cook Time: 0 minutes
- Category: Beverage
- Method: Blending
- Cuisine: American
- Diet: Vegetarian
Nutrition
- Serving Size: 1 large milkshake (approximately 16 oz)
- Calories: 625
- Sugar: 64g
- Sodium: 210mg
- Fat: 32g
- Saturated Fat: 16g
- Unsaturated Fat: 14g
- Trans Fat: 0g
- Carbohydrates: 78g
- Fiber: 4g
- Protein: 11g
- Cholesterol: 85mg