Chicken Caesar Wrap Recipe: Quick, Fresh, and Absolutely Delicious
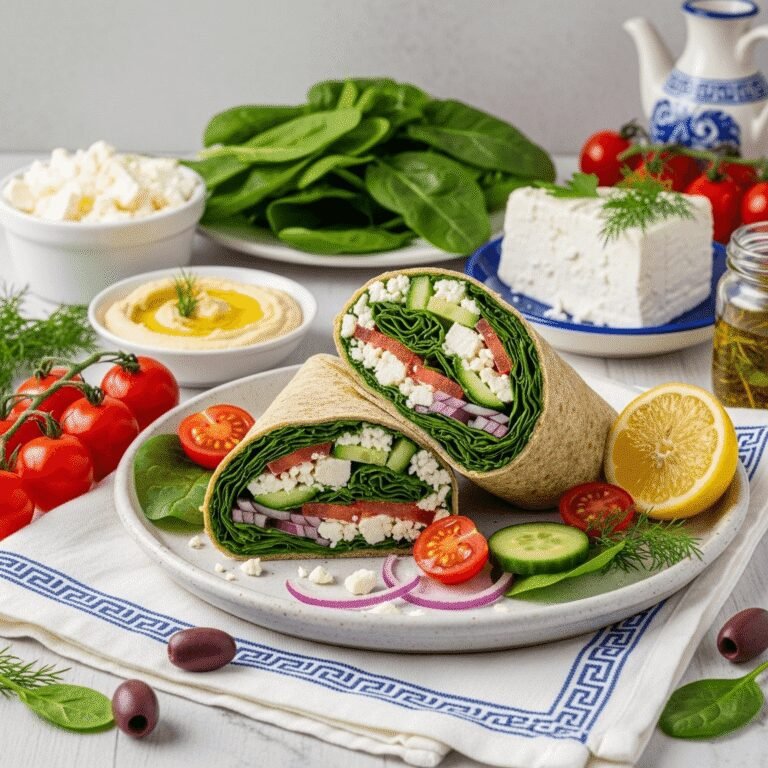
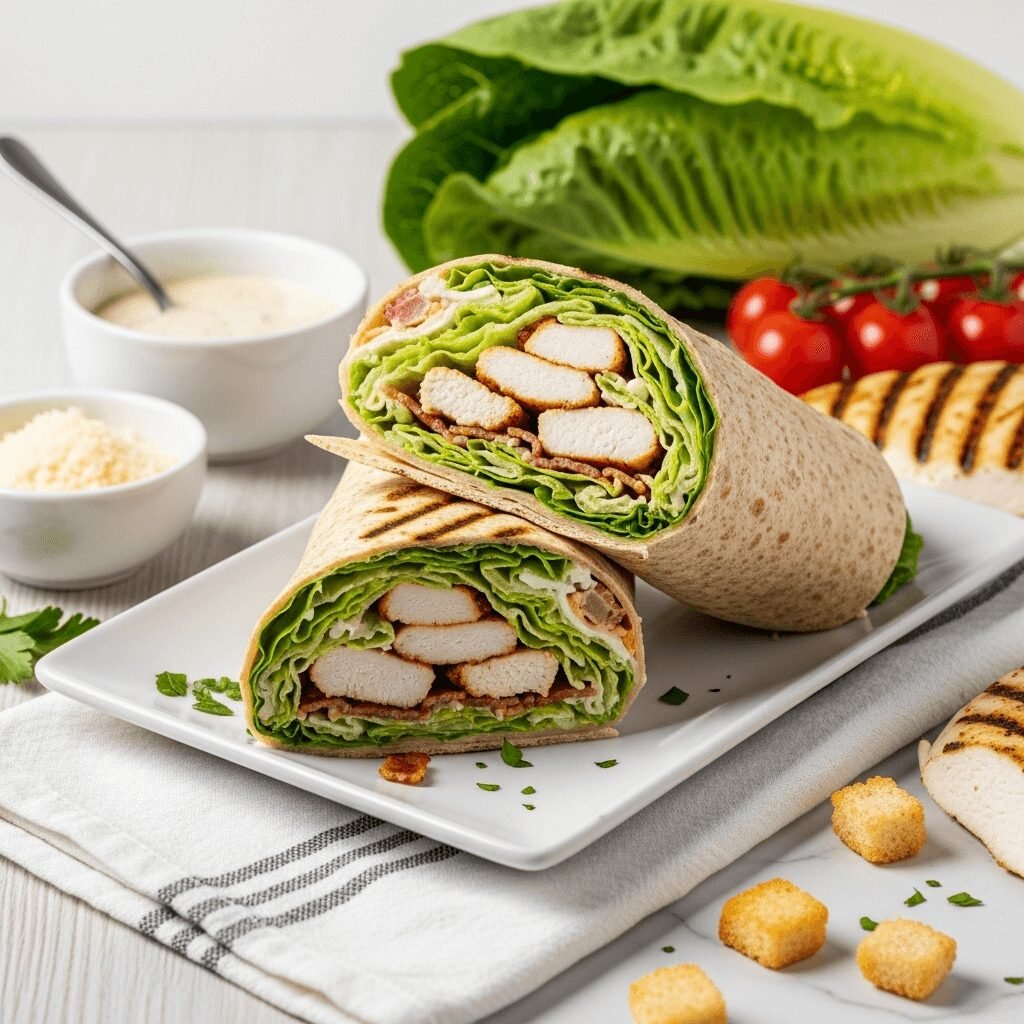
The chicken caesar wrap is a flavor-packed, handheld meal that combines all the classic flavors of a Caesar salad with tender grilled chicken, wrapped up in a soft tortilla for ultimate convenience! This beloved wrap features juicy seasoned chicken, crisp romaine lettuce, tangy Caesar dressing, and salty Parmesan cheese, all rolled together in a portable package that’s perfect for eating on the go. The combination of creamy dressing, crunchy lettuce, and savory chicken creates an irresistible flavor profile that’s both satisfying and refreshing. This easy chicken caesar wrap is perfect for so many occasions: pack it for work lunches where you need something that stays fresh and travels well, make it for quick weeknight dinners when you don’t feel like cooking elaborate meals, prepare it for casual gatherings where guests can eat with their hands, enjoy it as a post-workout meal with excellent protein, create it for meal prep Sundays to have ready-made lunches all week, or whip it up when you’re craving restaurant-quality flavors without leaving home. The beauty of this homemade chicken caesar wrap lies in its perfect balance—it’s substantial enough to keep you full for hours, light enough that you won’t feel weighed down, packed with protein and nutrients that fuel your body, and comes together in just 20 minutes from start to finish. Whether you’re a busy professional seeking quick lunch solutions, a meal prep enthusiast, someone who loves classic Caesar salad flavors, or simply a wrap lover looking for the perfect combination of taste and convenience, this chicken caesar wrap for lunch delivers incredible flavor, satisfying crunch, and pure deliciousness in every single bite!
History / Background
The chicken caesar wrap represents a perfect marriage between two iconic dishes: the classic Caesar salad and the convenient wrap sandwich. To understand this popular lunch item, we need to explore the fascinating histories of both components.
The Caesar salad itself has a well-documented origin story that begins in Tijuana, Mexico, in 1924. Caesar Cardini, an Italian immigrant who owned a restaurant in Tijuana, created the salad on July 4th when his kitchen was running low on supplies due to holiday crowds. The story goes that he improvised with what he had: romaine lettuce, garlic, croutons, Parmesan cheese, eggs, olive oil, and Worcestershire sauce. He prepared it tableside with dramatic flair, tossing the ingredients in a wooden bowl. The salad became an instant sensation with Hollywood celebrities who frequented his restaurant, and its fame spread rapidly throughout Southern California and eventually across the United States.
The original Caesar salad contained no chicken—it was a simple vegetable course meant to showcase the dressing. The addition of grilled chicken to Caesar salad likely began in the 1960s and 1970s as restaurants sought to transform the side salad into a main course. “Chicken Caesar Salad” became a menu staple at American restaurants by the 1980s, offering diners a lighter yet protein-rich meal option.
The wrap sandwich format has a different but equally interesting history. While wraps and rolled sandwiches have existed in various cultures for centuries (think Middle Eastern shawarma, Mexican burritos, and Asian spring rolls), the modern American wrap sandwich emerged in the 1990s as part of the health food movement. Wraps were marketed as a lighter, more portable alternative to traditional sandwiches made with thick bread. California cuisine, with its emphasis on fresh ingredients and fusion concepts, played a significant role in popularizing wraps.
The specific combination of chicken, Caesar salad, and wrap format likely emerged in the mid-to-late 1990s. Fast-casual restaurant chains like Subway began offering wraps around this time, and the Chicken Caesar Wrap quickly became one of the most popular options. It perfectly captured the zeitgeist: healthy (perceived), convenient, flavorful, and familiar enough to appeal to mainstream tastes while feeling slightly sophisticated.
By the early 2000s, the chicken caesar wrap had become ubiquitous in American food culture. It appeared in airport restaurants, chain cafés, deli counters, and home kitchens across the country. Food bloggers and meal prep enthusiasts embraced it in the 2010s as an ideal make-ahead lunch—portable, Instagram-worthy, and genuinely delicious.
Today, the chicken caesar wrap represents the evolution of American casual dining—taking classic flavors, reimagining them in a convenient format, and making them accessible for everyday eating. It’s comfort food that feels healthy, restaurant food that’s simple enough to make at home, and a lunch that never gets boring no matter how many times you eat it.
Why You’ll Love This Recipe
This chicken caesar wrap recipe takes a restaurant favorite and shows you exactly how to make it at home with fresh ingredients and smart techniques! While wraps might seem straightforward—just roll ingredients in a tortilla—there are actually specific methods that elevate this from ordinary to extraordinary: properly seasoning and cooking chicken for maximum flavor, achieving the right lettuce-to-dressing ratio so it’s neither dry nor soggy, layering ingredients strategically for structural integrity, and rolling tightly so nothing falls out when you eat it.
What makes this particular approach to the easy chicken caesar wrap special is the attention to detail and the focus on creating restaurant-quality results in your own kitchen. We’re not just throwing ingredients in a tortilla—we’re thinking about how to get juicy, flavorful chicken, how to keep the lettuce crisp, how to distribute Caesar dressing evenly for flavor in every bite, and how to roll the wrap so it holds together perfectly and looks as good as it tastes.
Here’s why this homemade chicken caesar wrap will become your new favorite lunch:
- Ready in 20 Minutes – From raw chicken to finished wrap in just twenty minutes
- Restaurant Quality at Home – Tastes as good (or better!) than takeout for a fraction of the cost
- Perfect for Meal Prep – Make multiple wraps at once for the whole week
- Incredibly Portable – Travels beautifully in lunchboxes and coolers
- Protein-Packed – Substantial protein keeps you full and energized
- Kid-Friendly – Even picky eaters love the familiar Caesar flavors
- Customizable – Easy to adjust ingredients to your preferences
- Budget-Friendly – Costs much less than buying lunch out
- Fresh & Satisfying – Light yet filling, perfect for any season
- No Cooking Skills Required – Simple enough for beginners
- Crowd-Pleaser – Great for parties, potlucks, and gatherings
- Gluten-Free Option – Use gluten-free tortillas and you’re all set
Ingredient Notes
This wrap uses simple, fresh ingredients where quality really makes a difference!
Chicken Breast: The protein star! Boneless, skinless chicken breast is lean, healthy, and cooks quickly. Amount: About 1 pound for 4 wraps (one large or two small breasts). Preparation: Season well and cook until internal temperature reaches 165°F. Substitution: Rotisserie chicken saves time (use about 2 cups shredded), chicken thighs offer more flavor and moisture, or try grilled shrimp for a seafood twist. Vegetarian option: Use chickpeas, grilled tofu, or crispy white beans.
Caesar Dressing: The flavor foundation! Store-bought Caesar dressing is convenient—look for quality brands with real Parmesan and anchovies listed in ingredients. Homemade Caesar dressing is divine if you have time and tastes fresher. Amount: About ¼ cup per wrap. Pro tip: Don’t overdo the dressing or your wrap will be soggy and messy!
Romaine Lettuce: The essential crunch! Romaine provides crisp texture and fresh flavor while holding up well to dressing without wilting immediately. Amount: About 1-2 cups chopped per wrap. Preparation: Chop into bite-sized pieces and ensure it’s completely dry! Substitution: Kale for a heartier option, butter lettuce for tender texture, or mixed greens for variety.
Parmesan Cheese: The salty, umami element! Freshly grated Parmesan is far superior to pre-grated in both flavor and texture. Amount: About 2-3 tablespoons per wrap. Tip: Buy a wedge of real Parmigiano-Reggiano and grate it yourself for best results!
Large Tortillas: Your wrap vessel! Flour tortillas are traditional and pliable. Whole wheat adds fiber and nutrition. Spinach, tomato, or flavored wraps add color and variety. Size: Use “burrito-size” or large 10-12 inch tortillas for proper wrapping. Gluten-free: Many excellent gluten-free wraps available. Pro tip: Warm tortillas slightly for easier rolling!
Optional Add-Ins:
- Crispy bacon for smoky, salty richness
- Cherry tomatoes for juicy sweetness
- Avocado for creaminess and healthy fats
- Croutons for extra crunch (though they soften over time)
- Red onion for sharpness
- Cucumber for refreshing coolness
- Hard-boiled egg for extra protein
Equipment Needed
This simple recipe requires minimal kitchen tools!
- Large skillet or grill pan (for cooking chicken)
- Tongs or spatula (for flipping chicken)
- Sharp knife (for slicing chicken and chopping lettuce)
- Cutting board
- Meat thermometer (to ensure chicken reaches 165°F)
- Large mixing bowl (for tossing salad)
- Measuring cups and spoons
- Plate (for assembling wraps)
- Plastic wrap or parchment paper (for wrapping finished wraps)
That’s it! Basic kitchen equipment is all you need.
Print
Chicken Caesar Wrap Recipe
Easy chicken caesar wrap with juicy grilled chicken, crisp romaine lettuce, tangy Caesar dressing, and Parmesan cheese wrapped in a soft tortilla. A restaurant-quality lunch ready in just 20 minutes!
- Total Time: 20 minutes
- Yield: 4 wraps 1x
Ingredients
For the Chicken:
- 1 pound boneless, skinless chicken breast (about 2 medium breasts)
- 1 tablespoon olive oil
- 1 teaspoon garlic powder
- ½ teaspoon paprika
- ½ teaspoon salt
- ¼ teaspoon black pepper
For the Wraps:
- 4 large flour tortillas (10-12 inch, burrito size)
- 4 cups romaine lettuce, chopped into bite-sized pieces
- ¾ cup Caesar dressing (store-bought or homemade)
- ½ cup freshly grated Parmesan cheese
- Optional: 4 strips cooked bacon, crumbled
- Optional: ½ cup cherry tomatoes, halved
- Optional: ½ avocado, sliced
Instructions
Cook the Chicken:
- Season the Chicken: Pat chicken breasts dry with paper towels. Rub both sides with olive oil. In a small bowl, mix together garlic powder, paprika, salt, and pepper. Sprinkle this seasoning mixture evenly over both sides of the chicken, pressing gently to adhere.
- Heat the Pan: Heat a large skillet or grill pan over medium-high heat. Let it get hot for 2-3 minutes—you want a good sear!
- Cook the Chicken: Place seasoned chicken breasts in the hot pan. Cook for 5-7 minutes without moving them (this creates a nice golden crust). Flip and cook the other side for another 5-7 minutes, or until the internal temperature reaches 165°F when checked with a meat thermometer. The exact time depends on thickness—thinner breasts cook faster.
- Rest and Slice: Remove chicken from heat and let rest on a cutting board for 5 minutes (this keeps the juices inside!). Then slice into thin strips or dice into bite-sized pieces.
Assemble the Wraps:
- Warm the Tortillas: Warm tortillas for 10-15 seconds in the microwave wrapped in a damp paper towel, or heat briefly in a dry skillet. This makes them more pliable and easier to roll.
- Prepare the Salad: In a large bowl, combine chopped romaine lettuce with about ½ cup of the Caesar dressing. Toss well to coat. You want the lettuce coated but not drowning—you’ll add more dressing to each wrap.
- Lay Out Tortilla: Place one warmed tortilla on a clean work surface or large plate.
- Add Lettuce: Place about 1 cup of the dressed lettuce in the center of the tortilla, leaving 2 inches clear on each side and 3 inches clear at the bottom edge. Arrange it in a horizontal line rather than a pile.
- Add Chicken: Top the lettuce with about ¼ of the sliced chicken (roughly ¾ cup), arranging it in a line over the lettuce.
- Add Cheese and Extras: Sprinkle with 2 tablespoons grated Parmesan cheese. Drizzle with an additional 1-2 tablespoons Caesar dressing. Add optional ingredients like bacon, tomatoes, or avocado if using.
- Fold and Roll: Fold the bottom edge of the tortilla up over the filling, pulling it tight to enclose. Fold in the left and right sides, then continue rolling away from you, keeping it tight as you roll. The final roll should seal at the top.
- Slice and Serve: Slice the wrap in half diagonally. Serve immediately, or wrap tightly in plastic wrap or parchment paper for later.
- Repeat: Continue with remaining tortillas and ingredients to make 3 more wraps.
Notes
- Chicken Shortcut: Use 2 cups of shredded rotisserie chicken to save time—skip the cooking step entirely!
- Dressing Amount: Start with less dressing and add more if needed. Too much makes wraps soggy and messy.
- Lettuce Dryness: Make sure lettuce is completely dry after washing. Wet lettuce makes wraps fall apart.
- Rolling Tight: The tighter you roll, the easier the wrap is to eat. Don’t overfill!
- Storage: Wrapped tightly, these keep in the fridge for 1-2 days. The first day is best; lettuce softens slightly by day 2.
- Prep Time: 10 minutes
- Cook Time: 10 minutes
- Category: Lunch
- Method: Stovetop
- Cuisine: American
- Diet: Gluten Free
Nutrition
- Serving Size: 1 wrap
- Calories: 485
- Sugar: 3g
- Sodium: 920mg
- Fat: 24g
- Saturated Fat: 6g
- Unsaturated Fat: 16g
- Trans Fat: 0g
- Carbohydrates: 35g
- Fiber: 3g
- Protein: 32g
- Cholesterol: 85mg
Tips & Variations
Buffalo Chicken Caesar: Toss cooked chicken in buffalo sauce before adding to wrap, and drizzle with ranch dressing alongside the Caesar for spicy, tangy flavor.
Bacon Ranch Caesar: Use ranch dressing mixed with Caesar (half and half), and add plenty of crispy bacon crumbles for a bacon ranch flavor profile.
Greek Caesar Twist: Add diced cucumber, cherry tomatoes, red onion, and crumbled feta cheese for a Greek-inspired variation.
Kale Caesar: Replace romaine with chopped kale (massage it briefly with dressing to tenderize) for a heartier, more nutritious option.
Shrimp Caesar Wrap: Substitute grilled or sautéed shrimp for chicken for a seafood version that’s equally delicious.
Vegetarian Caesar: Use crispy chickpeas, marinated tofu, or white beans instead of chicken for a plant-based protein option.
Avocado Caesar: Add sliced avocado for creaminess and healthy fats that complement Caesar flavors beautifully.
Caprese Caesar: Add sliced fresh mozzarella, tomatoes, and fresh basil for an Italian-inspired twist.
Meal Prep Version: Cook all chicken at once, portion ingredients into containers, and assemble wraps fresh each morning in under 3 minutes.
Lettuce Wrap: For low-carb, skip the tortilla and use large romaine lettuce leaves as your “wrap”—still delicious!
Pro Chef Tips
Pound for Even Cooking: Professional kitchens always pound chicken breasts to even thickness before cooking. Place chicken between plastic wrap and gently pound with a meat mallet or rolling pin until it’s an even ¾-inch thickness throughout. This ensures even cooking—no more dried-out ends and undercooked middles!
The Dry Lettuce Rule: This cannot be overstated! Restaurant chefs know that wet lettuce is the enemy of a good wrap. After washing romaine, use a salad spinner, then lay it on paper towels and pat completely dry. Any moisture makes wraps soggy and causes tortillas to tear. Dry lettuce = successful wraps every single time.
Dress in Stages: Professional wrap makers dress the lettuce lightly in a bowl first (this distributes dressing evenly), then add another drizzle directly on the assembled wrap. This two-stage approach ensures flavor throughout without making things too wet. Think of it as layering flavor.
The Warm Tortilla Trick: Cold tortillas from the fridge are stiff and crack when you try to roll them. Warm tortillas are pliable, soft, and roll beautifully without tearing. Just 10-15 seconds in the microwave (covered with a damp paper towel) or 30 seconds in a dry skillet makes all the difference. This is a restaurant industry standard.
Rest the Chicken: Slicing into chicken immediately after cooking causes all the juices to run out, leaving dry chicken. Let it rest for 5 minutes first—the juices redistribute, and every bite stays moist. This is fundamental technique that home cooks often skip but professionals always do.
The Tight Roll Technique: Restaurant wrap artists know to pull the first fold TIGHT over the filling before rolling. This creates a compact wrap that holds together. The key is that first fold—pull it over the filling, tuck it under, then fold in the sides and continue rolling while keeping tension. Practice makes perfect!
Slice on the Diagonal: Always slice wraps on a sharp diagonal rather than straight across. This creates attractive presentation and makes them easier to eat. The pointed ends are perfect for taking that first bite, and the diagonal cut showcases the beautiful layers inside.
Common Mistakes to Avoid
Overfilling the Wrap: The most common mistake! Piling too much filling makes wraps impossible to roll properly, causes ingredients to fall out when eating, and creates a messy disaster. Less is more—you want a portable meal, not an overstuffed burrito that requires a plate and fork. Stick to about 1 cup lettuce and ¾ cup chicken per wrap maximum.
Using Too Much Dressing: Drowning the lettuce and chicken in Caesar dressing makes everything soggy, causes the wrap to fall apart, and creates a mess when eating. Start with less than you think you need—you can always add more, but you can’t take it away. About 3-4 tablespoons total per wrap is ideal.
Not Drying the Lettuce: Putting wet, freshly washed lettuce directly into wraps guarantees failure. The excess water dilutes the dressing, makes everything soggy, and causes tortillas to get slimy and tear. Always thoroughly dry lettuce using a salad spinner and paper towels. This one step prevents 90% of wrap failures!
Slicing Chicken While Hot: Cutting into chicken immediately after cooking releases all the internal juices onto your cutting board instead of staying in the meat. The result is dry, stringy chicken. Always let cooked chicken rest for at least 5 minutes before slicing. Use this time to prep other ingredients!
Cold Tortillas: Trying to roll cold, stiff tortillas from the refrigerator results in cracked, torn wraps that fall apart. Always warm tortillas before rolling—it makes them pliable and easy to work with. This takes just seconds and makes a huge difference in the final result.
Wrong Rolling Technique: Rolling wraps loosely or starting from the wrong end creates wraps that fall apart, leak, or unravel when you eat them. The correct method is: fill the center, fold bottom up and pull tight, fold in sides, then roll away from you while maintaining tension. The tighter the better!
Storage & Meal Prep
Immediate Storage: If not eating immediately, wrap each completed wrap tightly in plastic wrap or parchment paper, then store in the refrigerator. Properly wrapped, they stay fresh for 1-2 days, though they’re always best the day they’re made.
Meal Prep Strategy: The best approach for meal prep is keeping components separate and assembling fresh:
- Cooked chicken: Store in airtight container for 3-4 days
- Washed, dried lettuce: Wrap in paper towels, store in container for 5-7 days
- Caesar dressing: Store in jar or bottle in fridge
- Parmesan: Store grated in airtight container
- Tortillas: Keep at room temperature or refrigerated
- Assemble: Make wraps fresh each morning in under 3 minutes
Lunchbox Packing: Pack wrapped wraps with an ice pack or in an insulated lunch bag to keep them cold and fresh. Don’t let them sit at room temperature for more than 2 hours for food safety. Remove from refrigerator about 10 minutes before eating if you prefer not ice-cold.
Day-Old Quality: Wraps made the night before for next-day lunch are still good, but the texture changes slightly—lettuce softens and tortilla becomes less crispy. For best quality, assemble the morning of, but overnight storage is acceptable if needed.
Signs of Spoilage: Discard wraps if the chicken develops an off smell, the lettuce becomes slimy, or they’ve been refrigerated for more than 2 days. When in doubt, throw it out—food safety first!
Make-Ahead & Freezer Notes
Component Prep: You can absolutely prep components ahead to make assembly quick:
- Cook chicken: Up to 3 days ahead, store refrigerated
- Wash and dry lettuce: Up to 5 days ahead
- Grate cheese: Up to 1 week ahead
- Assemble wraps: Best same-day, acceptable 1 day ahead
Freezing Assembled Wraps: Unfortunately, assembled chicken caesar wraps do NOT freeze well. The lettuce becomes soggy and wilted, the Caesar dressing separates and becomes watery, and the tortilla gets soggy and unpleasant. The texture is completely ruined. Don’t freeze assembled wraps!
Freezing Components: You CAN freeze cooked, sliced chicken (without dressing) for up to 3 months. Freeze in portion sizes, then thaw overnight in the refrigerator when needed. Thawed chicken works perfectly for assembling wraps.
Best Make-Ahead Approach: Cook a batch of chicken on Sunday, store it refrigerated, and make fresh wraps throughout the week. This gives you convenience without sacrificing quality. Each wrap assembly takes under 3 minutes when components are prepped!
Rotisserie Shortcut: Buy a rotisserie chicken, shred the meat, portion it into containers, and you have instant wrap-ready protein for the week. This is the ultimate time-saver for busy weeks!
Serving Suggestions
Kettle Chips: Serve with sea salt kettle chips, BBQ chips, or your favorite crunchy chips for a classic lunch combination.
Fresh Fruit: Pair with fresh grapes, apple slices, berries, or a fruit salad for refreshing balance and natural sweetness.
Vegetable Sticks: Add carrot sticks, celery, bell pepper strips, and cherry tomatoes with ranch or hummus for extra vegetables.
Soup Pairing: Serve with tomato soup, chicken noodle soup, or creamy potato soup for a comforting lunch combo.
Side Salad: A simple green salad or Caesar salad (extra!) complements the wrap beautifully.
Pickles: Dill pickle spears, bread and butter pickles, or pickled vegetables add tangy crunch.
Sweet Potato Fries: Baked or air-fried sweet potato fries make a delicious, slightly healthier side option.
Coleslaw: Creamy or vinegar-based coleslaw provides cooling contrast and extra crunch.
Beverage Pairings: Serve with iced tea, lemonade, sparkling water, fresh juice, iced coffee, or for adults, a crisp white wine or light beer.
Pasta Salad: Cold pasta salad or macaroni salad rounds out a picnic or potluck spread perfectly.
FAQs Section
Q: Can you make chicken caesar wraps ahead of time?
A: Yes, but with caveats! Assembled wraps can be made up to 1 day ahead, wrapped tightly, and refrigerated. However, they’re always best made fresh. For optimal texture and flavor, prep all components separately and assemble wraps fresh each morning—this takes only 3 minutes but maintains the best quality.
Q: How do you keep chicken caesar wraps from getting soggy?
A: Three key steps prevent sogginess: 1) Make sure lettuce is completely dry after washing—use a salad spinner and pat with paper towels; 2) Don’t use too much Caesar dressing—coat the lettuce but don’t drown it; 3) If making ahead, consider keeping dressing separate and adding it right before eating. These steps keep wraps fresh for 1-2 days!
Q: Can you use rotisserie chicken for caesar wraps?
A: Absolutely! Rotisserie chicken is perfect and saves you cooking time. Simply remove the skin and bones, shred or chop the meat (you need about 2 cups for 4 wraps), and proceed with the recipe. The pre-seasoned, roasted flavor is ideal for this recipe.
Q: What can I use instead of tortillas for wraps?
A: For low-carb options, use large romaine lettuce leaves, collard green leaves (blanched briefly), or low-carb tortillas. For gluten-free, use gluten-free tortillas or wraps. Lavash bread and flatbreads also work well. Each alternative changes the texture and carb count but still delivers the classic Caesar flavor!
Q: How long do chicken caesar wraps last in the fridge?
A: Properly wrapped in plastic wrap or stored in airtight containers, chicken caesar wraps last 1-2 days in the refrigerator. The first day is always best—by day 2, the lettuce softens and the tortilla becomes less crispy. For optimal quality, assemble fresh or prep components separately.
Q: Can you heat up a chicken caesar wrap?
A: While you technically can warm the chicken separately, Caesar wraps are traditionally served cold or at room temperature. The lettuce and Caesar dressing don’t heat well—the lettuce wilts and the dressing separates. If you want a warm chicken wrap, consider a different style (like buffalo chicken or fajita wraps) that’s designed to be served hot.
Q: What kind of chicken is best for wraps?
A: Boneless, skinless chicken breast is the classic choice—it’s lean, healthy, and slices beautifully. Chicken thighs are more flavorful and juicy but slightly higher in fat. Rotisserie chicken is the ultimate convenience option. For best results, slice chicken thinly rather than in chunks—this makes wraps easier to bite through and keeps everything contained.
Conclusion
And there you have it—everything you need to make the most delicious, restaurant-quality chicken caesar wrap right in your own kitchen! While this recipe might seem simple on the surface, paying attention to the details—from properly cooking and resting the chicken to thoroughly drying the lettuce to rolling tightly—transforms a basic wrap into something truly special and genuinely satisfying.
This easy chicken caesar wrap is proof that you don’t need to spend money on takeout to enjoy delicious, convenient lunches. With just 20 minutes of effort, you can create wraps that taste better than anything you’d buy, cost a fraction of the price, and give you complete control over ingredients and quality. It’s the kind of recipe that makes meal prep exciting rather than boring, and turns ordinary lunches into something you actually look forward to!
Whether you’re making this homemade chicken caesar wrap for weekly meal prep, quick weeknight dinners, casual gatherings, lunchbox perfection, or simply because you’re craving those classic Caesar flavors in a convenient handheld format, this recipe delivers every single time. It’s fresh, flavorful, portable, and endlessly customizable—everything a great wrap should be!
Now it’s your turn to create your own perfect chicken caesar wrap for lunch! I’d love to hear about your experience—did you add any creative extras? What’s your favorite way to season the chicken? Did you try any of the variations? Share your thoughts, creative twists, and beautiful wrap photos in the comments below! Your feedback and ideas inspire other readers and help build our cooking community.
Don’t forget to save this chicken caesar wrap recipe to your Pinterest boards—pin it to “Easy Lunch Ideas,” “Meal Prep Recipes,” “Wrap Recipes,” or “Quick Dinners” so you can find it whenever you need lunch inspiration. If you know someone who’s always looking for better lunch ideas, trying to meal prep, or loves Caesar salad, share this article with them. And when you make your fresh, flavorful, absolutely delicious wraps, snap a photo and tag me on social media—I absolutely love seeing your creations!
Now go create your own portable Caesar masterpiece—lunch just got a whole lot better!