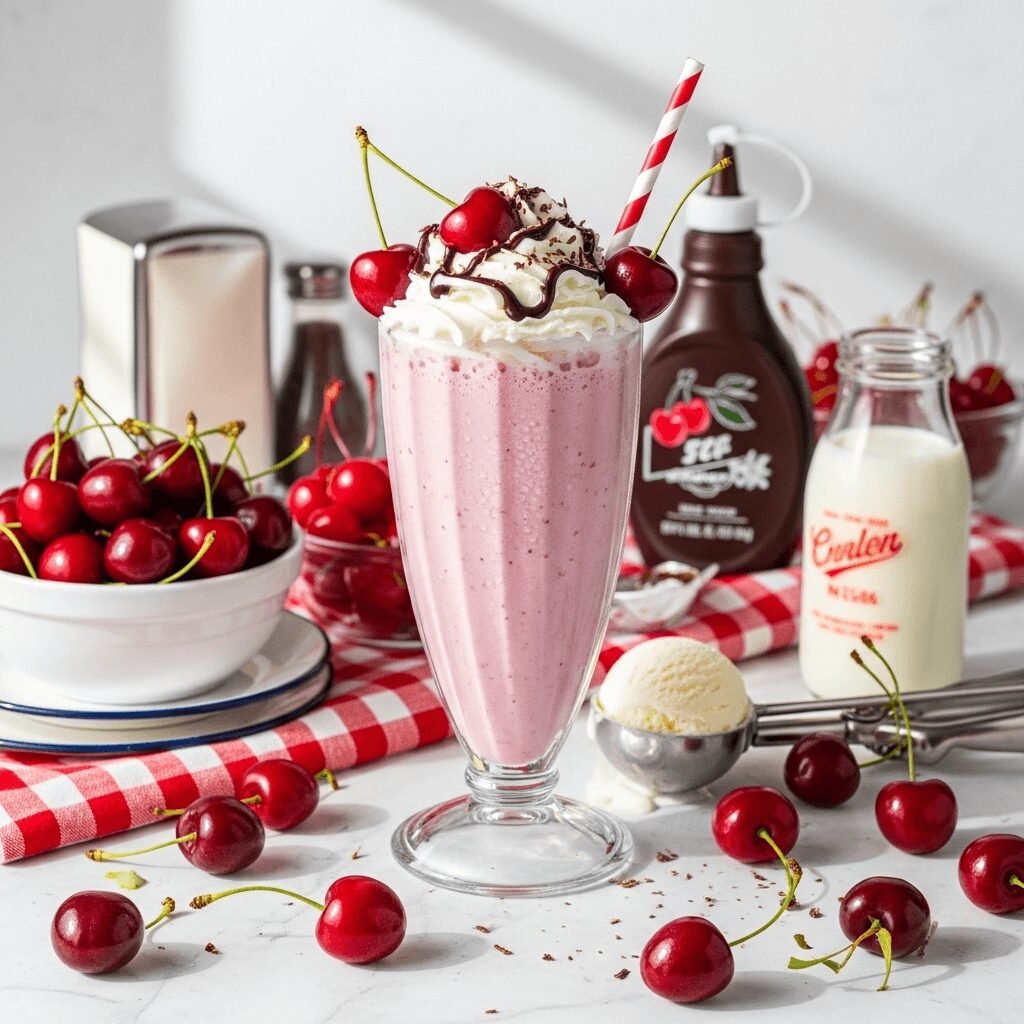
Sweet Cherry Milkshake Recipe – Thick, Creamy & Bursting with Cherry Flavor!
Get ready to experience pure cherry bliss in a glass with this cherry milkshake that’s thick, creamy, and tastes like summer! This homemade cherry milkshake combines sweet, juicy cherries with rich vanilla ice cream to create a gorgeous pink shake that’s bursting with authentic cherry flavor. Unlike artificial cherry-flavored drinks, this shake uses real cherries to deliver that bright, fruity taste that’s both refreshing and indulgent – it’s like drinking a cherry pie à la mode!
This easy cherry shake is exactly what you need when you’re craving something fruity, sweet, and satisfying all at once. The natural sweetness of cherries pairs beautifully with creamy vanilla ice cream, creating a flavor combination that’s nostalgic yet sophisticated. The beautiful pink color is completely natural (no artificial dyes needed!), making it as pretty as it is delicious. Whether you use fresh sweet cherries or convenient frozen ones, this shake delivers restaurant-quality results every single time.
Whether you’re celebrating cherry season in summer, looking for a fun and fruity dessert, treating the kids to something special, cooling down on a hot day, or serving something impressive at a gathering, this cherry shake recipe is your answer. It’s naturally gluten-free, ready in just 5 minutes, and can easily be made dairy-free. Serve it as a decadent dessert, special breakfast treat, or afternoon indulgence. Once you taste this thick, cherry-licious shake, you’ll understand why cherry milkshakes are a timeless classic!
History / Background
Cherries have been cultivated for thousands of years, with evidence of cherry consumption dating back to prehistoric times. Sweet cherries originated in the region between the Black and Caspian Seas, while sour cherries came from Eastern Europe and Western Asia. The Romans spread cherry cultivation throughout their empire, and by the 16th century, English colonists brought cherry trees to America.
The United States has a rich cherry-growing tradition, particularly in Michigan, Washington, Oregon, and California. Michigan alone produces about 75% of the nation’s tart cherries and 20% of sweet cherries. The cherry harvest typically runs from late May through August, making summer the prime season for fresh cherry treats.
Cherry-flavored foods became particularly popular in American culture during the 1950s and 1960s. This was partly due to the introduction of maraschino cherries (which originated in Yugoslavia but were commercialized in the United States) and the availability of cherry sodas and cherry-flavored products. The bright red color and sweet-tart flavor made cherry a favorite for desserts, sodas, and of course, milkshakes.
The cherry milkshake specifically became a soda fountain staple during the golden age of American diners. While vanilla, chocolate, and strawberry were the “holy trinity” of milkshake flavors, cherry was the sophisticated alternative – fruity like strawberry but with a more complex, slightly tart flavor profile. Cherry shakes were especially popular in regions with cherry orchards, where fresh cherries made the shakes exceptional.
Interestingly, the cherry milkshake has a nostalgic connection to cherry Coke floats and cherry phosphates (old-fashioned soda fountain drinks), making it feel both retro and timeless. The addition of a maraschino cherry on top became the signature garnish that made cherry shakes instantly recognizable.
Today’s homemade cherry milkshake honors this delicious tradition while emphasizing real fruit over artificial flavoring. Using actual cherries creates a more sophisticated, authentic taste that’s both refreshing and indulgent!
Why You’ll Love This Recipe
This easy cherry shake is about to become your new favorite fruity indulgence! What makes this recipe absolutely irresistible is how it captures the bright, sweet-tart flavor of real cherries in a thick, creamy milkshake. The natural cherry flavor shines through beautifully, creating a more sophisticated and interesting taste than typical chocolate or vanilla shakes. Plus, that gorgeous natural pink color makes it Instagram-worthy without any artificial food coloring!
The beauty of this cherry milkshake is its versatility and convenience. You can use fresh sweet cherries when they’re in season for peak flavor, or use frozen cherries year-round for consistent results. The shake is thick enough to eat with a spoon but smooth enough to drink through a straw. It tastes like a decadent dessert but comes together in just 5 minutes with simple ingredients you probably already have!
Here’s why you’ll absolutely love this cherry milkshake:
- Ready in 5 minutes – Quickest way to satisfy a cherry craving
- Real cherry flavor – Uses actual cherries, not artificial flavoring
- Gorgeous natural pink color – Beautiful without food dyes
- Perfectly balanced – Sweet with a hint of tartness
- Uses fresh or frozen cherries – Make it any time of year
- Thick and creamy texture – Restaurant-quality consistency
- Kid and adult approved – Everyone loves cherry!
- Naturally gluten-free – Safe for those avoiding gluten
- Great for cherry season – Perfect use for fresh summer cherries
- Easily made dairy-free – Simple vegan substitutions
- Budget-friendly – Uses affordable ingredients
- Nostalgic and fun – Reminiscent of classic soda fountains
- Beautiful for photos – Pinterest and Instagram perfect!
Ingredient Notes
Let’s talk about the simple but important ingredients that create this delicious cherry milkshake:
Fresh or Frozen Sweet Cherries – The star ingredient! You’ll need about 1-1½ cups of pitted cherries. Sweet cherries (like Bing, Rainier, or Lambert varieties) work best for milkshakes because they’re naturally sweet and don’t make the shake too tart. Fresh cherries are amazing when in season (June-August), but frozen pitted cherries are incredibly convenient and available year-round. Frozen cherries actually work wonderfully because they help create that thick, frosty texture without adding ice. If using fresh cherries, pit them first and consider freezing them for 1-2 hours before making the shake for better texture. Tart cherries can be used if you prefer a more tangy flavor, but you’ll need to add more sweetener.
Premium Vanilla Ice Cream – The creamy base! Use high-quality vanilla ice cream with cream as the first ingredient for the richest, smoothest shake. You’ll need about 2½-3 cups (5-6 scoops). Premium ice cream with higher butterfat content creates the best texture. French vanilla or vanilla bean works beautifully. The vanilla flavor complements cherries perfectly without competing. Can’t do dairy? Use premium dairy-free vanilla ice cream made from oat milk, coconut milk, or cashew milk – oat milk ice cream creates especially creamy dairy-free results!
Whole Milk – The liquid that helps everything blend smoothly. Whole milk creates the creamiest shake with the best mouthfeel. You’ll need about ½-¾ cup – start with less and add more if needed. For extra richness, use half milk and half heavy cream. Can’t do dairy? Unsweetened almond milk, oat milk, or coconut milk work well. Oat milk is especially good for maintaining creaminess in dairy-free versions.
Sugar or Honey – For adjusting sweetness! Depending on your cherries’ sweetness, you may need 1-3 tablespoons of sugar or honey. Sweet cherries in peak season often need minimal added sweetener, while tart cherries or frozen varieties might need more. Honey adds a lovely floral note, while granulated sugar creates clean sweetness. Maple syrup also works beautifully. Always taste before adding all the sweetener – you can add more but can’t take it away!
Pure Vanilla Extract – Enhances all the flavors! Just ½ teaspoon adds aromatic depth that makes the cherry flavor pop. Use pure vanilla extract, never imitation.
Almond Extract (Optional but Amazing) – This is the secret ingredient! Just ⅛-¼ teaspoon of almond extract enhances cherry flavor dramatically. Cherries and almonds are botanical cousins, so they taste amazing together. This creates that classic “cherry pie” flavor profile. Don’t skip this if you have it!
Optional Enhancements:
- Lemon juice (1 teaspoon) – Brightens the cherry flavor
- Maraschino cherry juice (1-2 tablespoons) – For that classic cherry shake taste
- Greek yogurt (¼ cup) – Adds protein and creaminess
- Chocolate chips – For chocolate-covered cherry variation
- Fresh mint – Adds refreshing note
Equipment Needed
Making this cherry milkshake requires just basic kitchen equipment:
- Blender – Any standard countertop blender works! High-powered blenders handle frozen cherries more easily
- Cherry pitter – If using fresh cherries (makes pitting much easier!)
- Measuring cups and spoons – For accurate ingredient portions
- Ice cream scoop – For portioning ice cream
- Tall glasses – For serving (16 oz glasses are perfect)
- Thick straws or spoons – Regular straws work for this smooth shake
- Spatula – For scraping down blender sides
- Small strainer (optional) – If you want ultra-smooth texture without cherry bits

Sweet Cherry Milkshake Recipe
This sweet Cherry Milkshake is thick, creamy, and bursting with real cherry flavor! Made with fresh or frozen cherries, vanilla ice cream, milk, and a touch of almond extract, it creates a gorgeous pink shake that tastes like cherry pie in a glass. Ready in just 5 minutes!
- Total Time: 5 minutes
- Yield: 2 servings 1x
Ingredients
- 1¼ cups sweet cherries, pitted (fresh or frozen)
- 2½ cups premium vanilla ice cream (about 5 scoops), slightly softened
- ¾ cup whole milk (adjust for desired thickness)
- 2-3 tablespoons sugar or honey (adjust based on cherry sweetness)
- ½ teaspoon pure vanilla extract
- ⅛-¼ teaspoon almond extract (optional but highly recommended)
- Pinch of salt (enhances sweetness)
For Serving (Optional):
- Whipped cream
- Fresh cherries or maraschino cherries for garnish
- Chocolate shavings
- Cherry syrup drizzle
Instructions
- Prepare Cherries – If using fresh cherries, wash them and remove stems and pits using a cherry pitter or small knife. If using frozen cherries, they’re ready to use straight from the freezer! For the thickest shake, freeze fresh cherries for 1-2 hours before making the shake.
- Soften Ice Cream Slightly – Remove vanilla ice cream from the freezer and let it sit at room temperature for 3-5 minutes. It should be soft enough to scoop easily but still very cold and firm, not melting or drippy. This makes blending easier and prevents straining your blender motor.
- Add Ingredients to Blender in Order – Layer strategically for best blending: milk first (helps blender blades move freely), then pitted cherries, slightly softened ice cream scoops, 2 tablespoons sugar (add more after tasting), vanilla extract, almond extract if using, and a pinch of salt.
- Start Blending on Low Speed – Secure the blender lid tightly. Start on the lowest speed setting for 10-15 seconds to break down the cherries and begin combining everything. This prevents cherry chunks from flying around and protects your motor.
- Increase to Medium-High Speed – Once ingredients start moving and combining, gradually increase to medium-high speed. Blend for 30-45 seconds until the mixture is smooth and creamy with a uniform pink color. You can blend until completely smooth or leave tiny cherry specks for texture – your choice! Use your blender’s tamper if you have one.
- Stop and Scrape Down Sides – Turn off the blender and use a spatula to scrape down any ingredients stuck to the sides. This ensures everything blends evenly and you get that gorgeous uniform pink color.
- Blend Again Briefly – Give it one more 10-15 second blend for perfect smoothness.
- Check Consistency – Your shake should be thick and creamy but still pourable – like soft-serve consistency. If it’s too thick and won’t blend, add 2-3 tablespoons more milk and pulse briefly. If it’s too thin, add another scoop of ice cream or a handful more frozen cherries.
- Taste and Adjust Sweetness – This is crucial! Give it a taste. If it needs more sweetness (depends on cherry ripeness), add another tablespoon of sugar and blend for 10 seconds. If cherry flavor needs brightening, add ⅛ teaspoon more almond extract or a squeeze of lemon juice. If it’s perfect, stop here!
- Serve Immediately – Pour into tall, chilled glasses (pre-chilling glasses in the freezer for 10 minutes keeps shakes colder longer). The beautiful pink color looks stunning! Top with whipped cream and a fresh cherry if desired. Serve with a straw or spoon and enjoy immediately while perfectly cold and thick!
Notes
- Cherry Type: Sweet cherries create the best flavor. Bing cherries are excellent. Tart cherries work but need more sweetener.
- Frozen vs. Fresh: Frozen cherries create thicker texture and are convenient year-round. Fresh cherries have peak flavor in summer.
- Sweetness: Cherry sweetness varies dramatically. Always taste before adding all the sugar!
- Almond Extract: This is optional but really enhances cherry flavor. Start with just ⅛ teaspoon – it’s potent!
- Smooth vs. Chunky: Blend longer for perfectly smooth, or less for texture with tiny cherry bits.
- Color: Natural pink color depends on cherry variety. Some cherries create deeper pink than others.
- Prep Time: 5 minutes
- Cook Time: 0 minutes
Nutrition
- Serving Size: 1 milkshake (approximately 14 oz)
- Calories: 420
- Sugar: 54g
- Sodium: 150mg
- Fat: 18g
- Saturated Fat: 11g
- Unsaturated Fat: 6g
- Trans Fat: 0g
- Carbohydrates: 60g
- Fiber: 2g
- Protein: 8g
- Cholesterol: 65mg
Tips & Variations
This cherry milkshake is delicious as-is, but here’s how to customize it:
Flavor Variations:
- Chocolate Cherry: Add 2 tablespoons chocolate syrup for chocolate-covered cherry flavor
- Cherry Cheesecake: Add 2 tablespoons cream cheese for tangy richness
- Black Forest: Add 1 tablespoon cocoa powder and chocolate shavings
- Cherry Vanilla Bean: Use vanilla bean ice cream and scrape in ½ vanilla bean
- Cherry Amaretto: Add ½ teaspoon amaretto extract for sophisticated flavor
Mix-In Ideas:
- Dark chocolate chunks
- Brownie pieces
- Graham cracker crumbs (cherry pie shake!)
- Crushed vanilla wafers
- White chocolate chips
- Fresh mint leaves
Texture Adjustments:
- Extra Thick: Use only ½ cup milk, add extra ice cream or more frozen cherries
- Standard Thick: ¾ cup milk to 2½ cups ice cream (recipe as written)
- Thinner: Use 1 cup milk
- Creamier: Add ¼ cup heavy cream or Greek yogurt
Dietary Modifications:
- Dairy-Free: Use oat milk ice cream and plant-based milk
- Lower Sugar: Use sugar-free ice cream, reduce added sweetener
- Protein-Packed: Add 1 scoop vanilla protein powder or ½ cup Greek yogurt
- Vegan: Use plant-based ice cream and milk, maple syrup instead of honey
Topping & Presentation Ideas:
- Fresh whipped cream
- Fresh cherries (with stems!)
- Maraschino cherry (classic!)
- Chocolate syrup drizzle
- Chocolate shavings
- Crushed graham crackers
- Vanilla wafer cookie on rim
Pro Chef Tips
Want to make an absolutely perfect cherry milkshake? Here are professional secrets:
Add Almond Extract for “Cherry Pie” Flavor – This is THE secret ingredient that makes cherry shakes taste extraordinary! Just ⅛-¼ teaspoon of almond extract enhances cherry flavor dramatically because cherries and almonds are botanical relatives. It creates that classic “cherry pie” taste that’s incredibly nostalgic. Start with ⅛ teaspoon and increase if desired – it’s very potent!
Freeze Fresh Cherries First – If using fresh cherries, pit them and freeze for 1-2 hours before making your shake. This creates the same thick, frosty texture as frozen cherries without needing ice that would water down the flavor. Room temperature fresh cherries create thin, watery shakes.
Balance Sweet and Tart – The best cherry shakes have a touch of tartness to balance the sweetness. If your cherries are very sweet, add 1 teaspoon of lemon juice to brighten the flavor. If they’re tart, add extra sweetener. The goal is balanced cherry flavor, not candy-sweet or mouth-puckeringly tart.
Use Dark Sweet Cherries – Bing cherries, Lambert cherries, or other dark red varieties create the most intense cherry flavor and the most beautiful pink-red color. Yellow cherries (like Rainier) taste delicious but create a pale peachy color that doesn’t look as “cherry” even though it tastes great!
Don’t Over-Blend – Cherries blend quickly! Over-blending (more than 45 seconds) warms up the shake and can make the color dull. Blend just until smooth and uniformly colored, then stop. The shake should be cold and vibrant pink!
Pit Cherries Carefully – Cherry pits are hard and will damage your blender blades. Make absolutely certain all pits are removed before blending. A cherry pitter tool makes this fast and easy, or you can carefully use a small knife or straw to push out pits.
Chill Your Glasses – Put serving glasses in the freezer for 15-20 minutes before making your shake. Cold glasses keep the shake from melting quickly and maintain that perfect thick texture longer.
Add a Pinch of Salt – Salt enhances sweetness and brings out cherry flavor. Don’t skip this tiny but mighty ingredient!
Common Mistakes to Avoid
Don’t let these errors ruin your perfect cherry milkshake!
Not Removing All Cherry Pits – This is dangerous! Cherry pits are very hard and can break blender blades, damage the motor, or worse, end up in someone’s shake. Always double-check that every single pit is removed before blending. Use a cherry pitter for efficiency and safety.
Using Room Temperature Fresh Cherries – Fresh cherries at room temperature create thin, watery shakes that separate quickly. If using fresh cherries instead of frozen, you MUST freeze them first (1-2 hours) or add ice cubes to achieve proper thickness. Frozen cherries straight from the freezer work best!
Adding Too Much Milk – Like all milkshakes, adding too much liquid creates a disappointing, thin shake. Start with just ½ cup of milk and add more only if the blender absolutely won’t process the ingredients. Thick is always better than thin!
Not Tasting Before Sweetening – Cherry sweetness varies dramatically based on variety, season, ripeness, and whether they’re fresh or frozen. Some cherries are naturally very sweet and need minimal sugar, while others are quite tart. Always blend first, taste, then adjust sweetness. Many people add too much sugar and mask the beautiful cherry flavor.
Over-Blending – Blending for too long (more than 45 seconds) warms up the shake from motor friction, makes it thin instead of thick, and can dull the vibrant pink color. Cherries blend quickly – once smooth and pink, stop immediately!
Using Tart Cherries Without Adjusting Sweetness – Tart cherries (like Montmorency) are much more acidic than sweet cherries. If using tart cherries, you’ll need to add significantly more sweetener (3-4 tablespoons instead of 2) to balance the tartness. Taste and adjust!
Storage & Meal Prep
While cherry milkshakes are best enjoyed fresh, here’s how to handle storage:
Immediate Consumption: Cherry milkshakes are at their absolute best within the first 10-15 minutes of making them. The texture is perfect, they’re ice-cold, and the gorgeous pink color is at its most vibrant. Serve and drink immediately whenever possible!
Short-Term Refrigeration: If needed, pour the shake into an airtight container filled to the top (minimizes air exposure and prevents color oxidation) and refrigerate for up to 2 hours maximum. The shake will separate as ice cream melts. Before drinking, give it a vigorous stir or quick 10-second re-blend. The color may dull slightly but taste remains good.
Freezer Storage: Pour leftover shake into freezer-safe containers and freeze for up to 1 month. When ready to enjoy, let it thaw in the refrigerator for 20-30 minutes until it reaches a thick, slushy consistency. You can drink it semi-frozen or give it a quick blend to restore creaminess. The color will dull slightly but flavor remains delicious!
Cherry Prep: Wash, pit, and freeze fresh cherries when they’re in season (June-August). Store in freezer bags for up to 6 months. This way you can make cherry shakes year-round with peak-season flavor!
Make-Ahead & Freezer Notes
Cherry milkshakes are a make-and-enjoy treat, but here are prep strategies:
Pre-Pit and Freeze Cherries: During cherry season, pit lots of fresh cherries and freeze them on parchment-lined baking sheets. Once frozen solid, transfer to freezer bags. Store for up to 6 months. These are ready to blend anytime for shakes, smoothies, or pies!
Pre-Portion Ingredients: Measure 1¼ cups pitted cherries into individual freezer bags. When shake time comes, grab a pre-portioned bag and blend with ice cream and milk. This makes the process even faster!
Pre-Portion Ice Cream: Scoop ice cream portions onto a parchment-lined tray and refreeze until solid. Store frozen scoops in a container for up to 1 week. Grab pre-portioned scoops when making shakes – no wrestling with hard ice cream!
Chill Glasses Ahead: Keep serving glasses in the freezer so they’re always ready. This keeps shakes colder longer.
Cherry Season Prep: Take advantage of fresh cherry season! Buy extra cherries when they’re abundant and affordable, pit them, and freeze for year-round use. Frozen cherries maintain their flavor beautifully.
Best “Reheating” Method: If your milkshake has been refrigerated or frozen, pour into the blender, add 1-2 fresh scoops of ice cream and a handful of frozen cherries, and blend for 10-15 seconds. This restores perfect texture and vibrant color better than just stirring.
Serving Suggestions
This cherry milkshake is delicious on its own, but here’s how to serve it:
Classic Diner Experience: Serve with burgers, crispy fries, and onion rings for the ultimate American diner meal. The sweet cherry shake perfectly complements salty, savory foods. Add coleslaw and pickles for the full retro experience!
Dessert Pairing:
- Chocolate cake or brownies
- Cherry pie (double cherry delight!)
- Vanilla pound cake
- Shortbread cookies
- Sugar cookies
- Angel food cake
- Vanilla or chocolate ice cream sandwich
Summer Celebrations:
- Fourth of July parties (patriotic red color!)
- Summer BBQs and picnics
- Pool parties
- Birthday celebrations
- Cherry festival gatherings
Brunch Indulgence:
- French toast or pancakes
- Belgian waffles
- Crepes with cherry compote
- Breakfast pastries
Special Occasions:
- Valentine’s Day (romantic pink color!)
- Kids’ birthday parties
- Ice cream social events
- Movie night at home
- Date night dessert
Create a Milkshake Bar:
- Set up various toppings and mix-ins
- Offer different ice cream flavors
- Provide multiple fruit options
- Let guests customize their creations
FAQs Section
Q: Can I use frozen cherries instead of fresh?
A: Absolutely! Frozen cherries actually work BETTER for milkshakes. They’re frozen at peak ripeness, help create thick texture without adding ice, and are available year-round. Use them straight from the freezer – no need to thaw! Frozen dark sweet cherries create the best flavor and color. Just make sure they’re pitted!
Q: Do I have to use almond extract?
A: It’s optional but highly recommended! Almond extract dramatically enhances cherry flavor because cherries and almonds are botanical cousins. Just ⅛-¼ teaspoon creates that classic “cherry pie” taste that’s incredibly nostalgic and delicious. If you don’t have it, the shake will still be good, just not quite as flavorful. Start with ⅛ teaspoon – it’s very potent!
Q: Why is my cherry milkshake not thick enough?
A: Thin shakes result from: (1) too much milk – start with just ½ cup and add more only if needed, (2) ice cream too soft – it should be scoopable but still very cold, (3) using room temperature fresh cherries – always use frozen cherries or freeze fresh ones first, or (4) over-blending – blend just 30-45 seconds. To fix immediately: add 1-2 more scoops of ice cream or more frozen cherries and blend briefly.
Q: Can I make this dairy-free?
A: Yes! Use dairy-free vanilla ice cream (oat milk based creates the creamiest results – brands like Oatly or So Delicious work wonderfully) and plant-based milk. Oat milk or coconut milk maintain the best creamy texture. The cherry flavor is so strong that dairy-free versions taste delicious!
Q: What’s the difference between sweet cherries and tart cherries?
A: Sweet cherries (like Bing, Lambert, Rainier) are larger, sweeter, and perfect for eating fresh and milkshakes. Tart cherries (like Montmorency) are smaller, more acidic, and typically used for pies and preserves. For milkshakes, sweet cherries are best because they need minimal added sugar. If using tart cherries, you’ll need to add significantly more sweetener (3-4 tablespoons instead of 2).
Q: How do I get a smooth shake without cherry chunks?
A: For perfectly smooth texture: (1) blend on high speed for a full 45 seconds, (2) make sure cherries are fully pitted, (3) if needed, strain the shake through a fine-mesh sieve before serving to remove any tiny cherry skin pieces, or (4) blend an extra 10-15 seconds. Some people love a few tiny cherry specks for texture – it’s personal preference!
Q: Can I add chocolate to make chocolate cherry?
A: Absolutely! For a chocolate-covered cherry shake, add 2-3 tablespoons chocolate syrup or 1 tablespoon cocoa powder when blending. You can also blend in chocolate chips or swirl chocolate sauce into the finished shake. This creates a delicious Black Forest-inspired flavor!
Q: Why does my shake taste bland?
A: Bland flavor usually means: (1) not enough cherries – make sure you use a full 1¼ cups, (2) cherries aren’t sweet or flavorful – frozen cherries sometimes vary in quality, (3) missing the almond extract – this really makes cherry flavor pop!, (4) over-diluted with too much milk, or (5) needs a pinch of salt to enhance sweetness. Always taste and adjust!
Conclusion
And there you have it – the ultimate cherry milkshake recipe that’s thick, creamy, and bursting with real cherry flavor! This homemade cherry milkshake proves that the best treats combine authentic fruit flavor with indulgent creaminess. With real cherries creating that gorgeous natural pink color and that sweet-tart cherry taste, this shake is both beautiful and delicious – everything a perfect milkshake should be!
This easy cherry shake is the perfect way to celebrate summer cherry season or enjoy cherry flavor any time of year with convenient frozen cherries. Whether you’re cooling down on a hot day, treating yourself to something special, serving dessert to impressed guests, or just craving that nostalgic cherry flavor, this shake delivers restaurant-quality results in just 5 minutes. The beautiful color, balanced flavor, and creamy texture make this a milkshake you’ll crave again and again!
I absolutely can’t wait to hear how your cherry milkshake turns out! Drop a comment below and tell me about your experience. Did you use fresh or frozen cherries? Try the almond extract? Add chocolate? Share all the delicious details! And please pin this recipe to your Pinterest boards – save it to your “Summer Desserts,” “Milkshake Recipes,” and “Cherry Recipes” collections so you can find it whenever you’re craving something fruity and refreshing. Share a photo of your gorgeous pink creation on Instagram and tag me so I can celebrate your beautiful shake!
Now grab those cherries and fire up your blender – the most delicious cherry milkshake you’ve ever tasted is just 5 minutes away! 🍒💕