Cheese and Tomato Sandwich Recipe: Classic Comfort Food Perfection

The cheese and tomato sandwich is the ultimate comfort food classic that elevates a simple grilled cheese to something truly special! This beloved sandwich features melted, gooey cheese paired with juicy, ripe tomato slices, all nestled between perfectly toasted bread with a golden, buttery crust. The combination of warm, melted cheese with cool or warm tomato creates an irresistible contrast of textures and flavors that’s both familiar and utterly satisfying. This easy grilled cheese and tomato sandwich is perfect for countless occasions: make it for quick weeknight dinners when you need comfort food fast, serve it for simple lunches that satisfy the whole family, prepare it as a nostalgic after-school snack, enjoy it on lazy weekend mornings with a bowl of soup, pack it for work lunches (though it’s best warm!), or whip it up as midnight comfort food when cravings strike. The beauty of this classic cheese tomato sandwich lies in its beautiful simplicity—it requires minimal ingredients you probably already have, comes together in just 10 minutes from start to finish, offers endless customization possibilities, and delivers that perfect combination of crispy, melty, tangy, and savory that makes everyone happy. Whether you’re a busy parent feeding hungry kids, a college student on a budget, someone who loves nostalgic comfort food, or simply a sandwich enthusiast seeking the perfect grilled cheese upgrade, this tomato and cheese grilled sandwich delivers pure satisfaction in every golden, melty, delicious bite!
History / Background
The cheese and tomato sandwich sits at the beautiful intersection of several beloved culinary traditions, each contributing to its place as a comfort food icon. To truly appreciate this sandwich, we need to look at the history of its key components and how they came together.
The grilled cheese sandwich itself has a fascinating American history. While humans have been combining bread and cheese since ancient times (the Romans had a dish of bread and cheese), the modern grilled cheese sandwich as we know it became popular in the United States in the 1920s. This timing wasn’t coincidental—it coincided with two major developments: the invention of sliced bread (commercially available starting in 1928) and the mass production of processed cheese (Kraft introduced individually wrapped cheese slices in 1949, though processed cheese existed earlier).
During the Great Depression (1929-1939), the grilled cheese sandwich became an affordable, filling meal for struggling families. It was economical, required few ingredients, and provided needed protein and calories. The sandwich was initially called a “cheese dream” in some regions and was often open-faced. The two-slice, closed format we know today became standard after World War II.
The addition of tomato to grilled cheese represents an evolution that likely emerged in the 1960s and 1970s, as Americans began experimenting more with food and seeking ways to add freshness and nutrition to familiar dishes. Tomatoes, which had long been a staple in American cuisine (despite an earlier period of suspicion in colonial times when they were thought to be poisonous), brought acidity, juiciness, and vitamins to the rich, fatty grilled cheese.
The combination also drew inspiration from other culinary traditions. In Italian cuisine, the pairing of tomatoes and cheese is fundamental—think Margherita pizza (created in 1889), Caprese salad, and countless pasta dishes. This time-honored combination of mozzarella (or other cheeses) with fresh tomatoes and basil demonstrated that these flavors were naturally complementary. The cheese and tomato sandwich can be seen as an American adaptation of these Italian flavor principles.
In the UK, the “cheese and tomato toastie” has been a popular pub and café offering since at least the 1960s, using sandwich presses or toasting under a broiler. British sandwich shops embraced this combination early on, making it a staple of casual lunch culture.
The tomato grilled cheese sandwich gained renewed popularity in the 2000s and 2010s as part of the “gourmet grilled cheese” movement. Artisan cafés and food trucks began elevating the humble grilled cheese with quality ingredients, interesting bread, artisanal cheeses, and additions like heirloom tomatoes, making what was once considered lowbrow comfort food into something worthy of culinary attention.
Today, the cheese and tomato sandwich represents accessible comfort food with a touch of sophistication. It’s nostalgic enough to remind us of childhood lunches, yet versatile enough to be elevated with heirloom tomatoes, aged cheddar, and artisan sourdough. It’s a bridge between simplicity and quality, between childhood and adulthood, between quick meal and thoughtful cooking.
Why You’ll Love This Recipe
This cheese and tomato sandwich recipe takes a beloved classic and shows you exactly how to make it absolutely perfect every time! While it might seem too simple to need a recipe, there are actually specific techniques that separate a mediocre grilled cheese from an extraordinary one: using the right cheese (or cheese combination) for optimal melt, preparing tomatoes properly so they don’t make everything soggy, achieving that ideal golden-brown crust without burning, and timing everything so the cheese is perfectly melted and gooey when you bite in.
What makes this particular approach to the easy cheese and tomato sandwich special is the attention to details that make all the difference. We’re not just throwing cheese and tomato between bread and hoping for the best—we’re thinking about moisture control, heat management, layering strategy, and flavor enhancement. The result is a sandwich with a perfectly crispy, golden exterior, melted (not just warm) cheese, tomatoes that add flavor without creating a mess, and that magical textural contrast that makes every bite satisfying.
Here’s why this classic grilled cheese with tomato will become your new go-to comfort meal:
- Ready in 10 Minutes – From ingredients to plate faster than ordering takeout
- Simple Ingredients – Just bread, cheese, butter, and tomato—that’s it!
- Ultimate Comfort Food – Warm, melty, nostalgic, and utterly satisfying
- Kid-Approved – Even picky eaters love this classic combination
- Budget-Friendly – Costs less than $2 per sandwich with basic ingredients
- Endlessly Customizable – Add herbs, spices, or other ingredients to make it your own
- Perfect for Any Meal – Breakfast, lunch, dinner, or snack—it works anytime
- Naturally Vegetarian – Meatless but completely filling and satisfying
- Great with Soup – The classic pairing with tomato soup is unbeatable
- Nostalgic Yet Elevated – Familiar comfort with restaurant-quality technique
- No Special Skills Needed – If you can butter bread, you can make this
- Crowd-Pleaser – Everyone from kids to adults loves this sandwich
Ingredient Notes
Even though this recipe uses just four main ingredients, quality and preparation make all the difference!
Bread: Your foundation! White sandwich bread is classic and what most people grew up with—soft, neutral, and perfect for crispy grilling. Sourdough adds tangy complexity and sturdier structure. Whole wheat provides nuttiness and extra fiber. Texas toast (thick-sliced white bread) creates an extra-hearty sandwich. Italian or French bread offers crusty exterior with soft interior. Pro tip: Slightly stale bread (1-2 days old) actually works better than super-fresh bread—it absorbs less butter/grease and crisps up more evenly!
Cheese: The star! American cheese melts beautifully and smoothly—the classic choice. Cheddar (sharp, medium, or mild) provides more complex flavor and melts well. Mozzarella offers stringy, gooey texture and mild flavor. Gruyère adds nutty, sophisticated taste. Monterey Jack melts smoothly with mild flavor. Provolone brings slight smokiness. Pro tip: Mix two types of cheese—like cheddar for flavor and American for smooth melt! Substitution: Use whatever melting cheese you have and enjoy!
Tomato: The fresh element! Ripe, red tomatoes at room temperature offer the best flavor—beefsteak tomatoes are juicy and large, Roma (plum) tomatoes have less water and fewer seeds (less mess!), heirloom tomatoes bring beautiful colors and complex flavors, and vine-ripened tomatoes provide consistent quality. Crucial tip: Always slice tomatoes thin and pat them dry with paper towels to prevent a soggy sandwich! Season: Summer tomatoes are incomparable, but quality supermarket tomatoes work year-round.
Butter: For the golden crust! Salted butter adds flavor and browns beautifully. Unsalted butter gives you more control over seasoning. Amount: About 1 tablespoon per sandwich (½ tablespoon per side of bread). Substitution: Mayonnaise spreads more easily than cold butter and creates an incredibly golden, crispy crust—try it once and you might never go back! Olive oil works but doesn’t add the same rich flavor.
Optional Additions:
- Fresh basil leaves for Italian flair
- Black pepper for subtle heat
- Garlic powder for savory depth
- Red pepper flakes for spicy kick
- Crispy bacon for smoky, salty crunch
- Caramelized onions for sweet complexity
- Pesto for herbaceous flavor
- Avocado for creaminess
Equipment Needed
This simple sandwich requires minimal equipment!
- Large skillet or griddle (nonstick, cast iron, or stainless steel all work)
- Spatula (wide, flat spatula works best for flipping)
- Butter knife (for spreading butter)
- Cutting board (for slicing tomato)
- Sharp knife (for slicing tomato and cutting sandwich)
- Paper towels (for drying tomato slices)
- Plate (for serving)
- Optional: sandwich press or bacon press (for even browning and compression)
That’s it! No fancy equipment needed—just basic kitchen tools.
Print
Cheese and Tomato Sandwich Recipe
Classic cheese and tomato sandwich with perfectly melted cheese, fresh tomato slices, and golden, buttery toasted bread. A nostalgic comfort food favorite ready in just 10 minutes!
- Total Time: 10 minutes
- Yield: 1 sandwich (easily multiplied) 1x
Ingredients
For One Sandwich:
- 2 slices bread of your choice (white, sourdough, whole wheat, or your favorite)
- 2-3 slices cheese (American, cheddar, mozzarella, or a combination—about 2-3 ounces)
- 3-4 slices ripe tomato, about ¼-inch thick
- 1 tablespoon butter, softened (or mayonnaise)
- Pinch of salt
- Pinch of black pepper (optional)
- Optional: fresh basil leaves, garlic powder, or other seasonings
Instructions
- Prepare the Tomato: Slice tomato into ¼-inch thick slices. Place slices on paper towels and pat dry thoroughly—this is crucial! The drier the tomato, the less soggy your sandwich will be. Lightly season tomato slices with a tiny pinch of salt and black pepper if desired. Set aside while you prep the sandwich.
- Butter the Bread: Spread butter evenly on one side of each bread slice, covering all the way to the edges. If using mayonnaise instead, spread a thin, even layer. The fat should cover the entire surface for even browning. Set aside one slice, buttered side down, on your work surface.
- Layer the Cheese: On the unbuttered side of the bread on your work surface, place 1-1½ slices of cheese, covering the bread surface. If using sliced cheese, you can tear it to fit perfectly.
- Add the Tomato: Layer the dried tomato slices on top of the cheese in a single layer, slightly overlapping if needed. Don’t stack tomatoes too thick or they’ll create steam that makes everything soggy.
- Add More Cheese: Top the tomatoes with the remaining cheese (another 1-1½ slices). This “cheese blanket” over the tomatoes helps hold everything together and creates that gorgeous cheese pull. If using fresh basil or other additions, tuck them in now.
- Top the Sandwich: Place the second bread slice on top, buttered side facing up. Press down gently to compress slightly.
- Heat the Skillet: Place your skillet over medium heat (not high!). Let it preheat for 1-2 minutes. The pan should be warm but not smoking hot. Test by flicking a drop of water—it should sizzle gently, not violently.
- Cook the First Side: Carefully place the sandwich in the skillet. Cook undisturbed for 3-4 minutes. Resist the urge to peek or move it around! The key is patient, even heat. The bottom should be golden brown and crispy. If you have a bacon press or second skillet, you can place it on top to gently compress the sandwich for even better contact and browning.
- Flip Carefully: Using a wide spatula, carefully flip the sandwich. Cook the second side for another 3-4 minutes, until golden brown and the cheese is fully melted. You’ll see cheese starting to ooze slightly at the edges—that’s perfect!
- Check for Doneness: The sandwich is ready when both sides are golden brown and crispy, and the cheese is completely melted (not just warm and soft, but actually melted and gooey). If the bread is browning too fast but the cheese isn’t melted, reduce heat to medium-low and give it another minute or two.
- Rest and Cut: Remove from heat and let rest on a cutting board for 1-2 minutes. This allows the cheese to set slightly and prevents it from all running out when you cut. Slice diagonally with a sharp knife.
- Serve Immediately: Enjoy while hot and melty! The contrast between the crispy, golden bread and the gooey, melted cheese is best enjoyed right away.
Notes
- Temperature Control: Medium heat is key! Too high and the bread burns before cheese melts; too low and you get greasy, soggy bread without proper crispness.
- Cheese Melting: If bread is perfect but cheese isn’t melted, cover the skillet with a lid for 30-60 seconds to trap heat and help cheese melt.
- Mayo Trick: Try mayonnaise instead of butter for the easiest spreading and incredibly golden, crispy crust!
- Moisture Management: Always pat tomatoes dry! This prevents the dreaded soggy sandwich.
- Multiple Sandwiches: If making multiple sandwiches, keep finished ones warm in a 200°F oven while you cook the rest.
- Prep Time: 5 minutes
- Cook Time: 5 minutes
- Category: Lunch
- Method: Stovetop
- Cuisine: American
- Diet: Vegetarian
Nutrition
- Serving Size: 1 sandwich (made with white bread, cheddar cheese, butter)
- Calories: 420
- Sugar: 6g
- Sodium: 780mg
- Fat: 24g
- Saturated Fat: 14g
- Unsaturated Fat: 8g
- Trans Fat: 0g
- Carbohydrates: 32g
- Fiber: 2g
- Protein: 16g
- Cholesterol: 65mg
Tips & Variations
Classic Tomato Soup Dipper: Cut into strips instead of triangles for perfect dunking in tomato soup—the ultimate comfort food pairing!
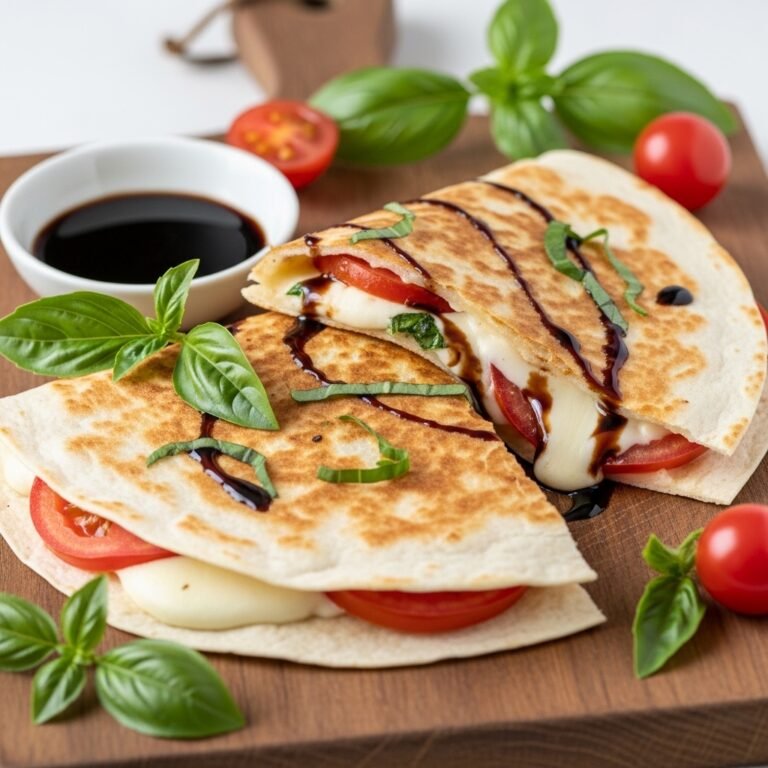
Italian-Style: Use mozzarella and provolone cheese, add fresh basil leaves, and drizzle with balsamic glaze for a Caprese-inspired sandwich.
Bacon Lover’s: Add 2-3 slices of crispy bacon for a BLT-meets-grilled-cheese masterpiece.
Garlic Butter Upgrade: Mix minced garlic or garlic powder into your butter before spreading for incredible savory depth.
Pesto Addition: Spread a thin layer of pesto on the inside of the bread before adding cheese for herbaceous Italian flavor.
Spicy Kick: Add sliced jalapeños, pepper jack cheese, or a sprinkle of red pepper flakes for heat.
Avocado Creamy: Add sliced avocado along with the tomato for extra creaminess and healthy fats.
Caramelized Onion: Layer caramelized onions with the cheese for sweet, complex flavor.
Three-Cheese Blend: Combine cheddar, mozzarella, and Gruyère for the ultimate melty, flavorful combination.
Open-Face Style: Make it open-face by toasting bread, layering cheese and tomato, and broiling until bubbly.
Pro Chef Tips
The Mayo Method: Professional chefs and sandwich shop owners know that mayonnaise creates a better crust than butter! Mayo spreads easily even when cold (unlike hard butter), browns beautifully and evenly, and contains emulsified oil and eggs that create an incredibly crispy, golden exterior. Try it once and you’ll understand why restaurants use this trick. Spread a thin, even layer on the outside of each bread slice just like you would with butter.
Room Temperature Ingredients: Take your cheese out of the fridge 10-15 minutes before cooking. Room temperature cheese melts faster and more evenly, reducing the risk of burning your bread before the cheese melts. This is especially important with harder cheeses like cheddar or Gruyère.
The Grate It Trick: Instead of using sliced cheese, try grating your cheese! Grated cheese melts faster, more evenly, and you can pile it on without creating thick, hard-to-melt layers. A box grater works perfectly. This is a restaurant secret for guaranteed melty cheese every time.
Low and Slow Wins: Patience is crucial! Medium or even medium-low heat seems slow, but it’s the secret to perfectly melted cheese with golden (not burned) bread. If your heat is too high, the bread will brown in 1-2 minutes while the cheese is still solid. Aim for 3-4 minutes per side—this allows proper heat penetration and complete cheese melt.
The Cover Method: If your bread is perfectly golden but the cheese isn’t quite melted, place a lid over the skillet for the last 30-60 seconds. This traps heat and steam, encouraging the cheese to melt without over-browning the bread. This technique is foolproof for guaranteed gooey cheese.
Compress for Contact: Gently pressing down on the sandwich with your spatula during cooking improves contact with the hot pan surface, resulting in more even browning and helping the cheese melt from the heat conducting through the bread. Don’t press so hard you squeeze out all the filling, just gentle, even pressure.
Rest Before Cutting: Let your sandwich rest for 1-2 minutes after cooking. This allows the cheese to set slightly so it doesn’t all run out when you cut it. You still get the gooey texture, but with better structural integrity and less mess.
Common Mistakes to Avoid
Heat Too High: The biggest mistake! High heat burns the bread before the cheese melts, leaving you with charred bread and solid cheese. Always use medium or medium-low heat and be patient. Your 3-4 minutes per side is the sweet spot for golden bread and melted cheese.
Not Drying the Tomato: Wet tomatoes release moisture as they warm up, making the bread soggy and unpleasant. Always pat tomato slices dry with paper towels before adding them to your sandwich. This 20-second step prevents the soggy sandwich disaster and keeps everything crispy.
Too Much Tomato: Stacking thick layers of tomato creates too much moisture and bulk, making the sandwich difficult to eat and preventing even cooking. Keep tomato slices thin (¼-inch) and use just one layer (3-4 slices depending on size). More is not better here!
Cold Butter on Soft Bread: Trying to spread cold, hard butter on soft bread tears the bread and creates uneven coverage (and thus uneven browning). Always use softened butter at room temperature, or switch to mayonnaise which spreads easily even when cold.
Moving It Too Much: Constantly lifting, peeking, or moving the sandwich prevents proper browning and heat distribution. Place it in the pan and leave it alone for 3-4 minutes! Trust the process. You’ll hear it sizzling and smell it toasting—that’s your cue it’s working.
Wrong Pan Temperature: Putting your sandwich in a cold pan means it absorbs butter/oil and gets greasy instead of crisp. Always preheat your pan for 1-2 minutes first. Conversely, a smoking-hot pan burns everything instantly. Medium heat is your friend.
Storage & Meal Prep
Immediate Consumption Best: This sandwich is absolutely best enjoyed immediately after cooking, when the bread is still crispy and the cheese is at peak gooeyness. The textural contrast between crispy bread and melted cheese is what makes it special, and this quality fades quickly.
Short-Term Storage (If Necessary): If you must store a cooked sandwich, wrap it in aluminum foil (not plastic wrap—foil allows some air circulation) and refrigerate for up to 4 hours. The bread will soften and lose its crispness, but you can revive it somewhat by reheating in a skillet or oven.
Component Prep: The smartest approach is to prep components in advance but assemble and cook fresh:
- Bread: Keep fresh bread sealed at room temperature or freeze extra
- Cheese: Pre-slice or grate cheese and store in an airtight container in the fridge
- Tomatoes: Buy ripe tomatoes and store at room temperature until ready to use; slice fresh right before cooking
- Butter: Keep softened butter in a butter keeper at room temperature for easy spreading
Reheating: If you have a leftover sandwich or made-ahead sandwich, the best reheating method is in a dry skillet over medium-low heat for 2-3 minutes per side, or in a 350°F oven for 8-10 minutes until heated through and the exterior re-crisps somewhat. Microwaving makes it soggy—avoid if possible!
Lunchbox Reality: If packing for lunch (like kids’ school lunches), understand that this sandwich won’t have the same crispy-melty perfection after several hours. Consider alternatives like unmelted cheese and tomato sandwiches that are meant to be eaten cold, or pack components separately for assembly at lunch.
Make-Ahead & Freezer Notes
Not Ideal for Make-Ahead: The grilled cheese and tomato sandwich is really meant to be cooked and eaten immediately. The magic is in the contrast between hot, crispy bread and melted cheese—qualities that don’t hold well over time. Making it ahead results in soggy bread and congealed cheese that’s no longer gooey.
Freezing Not Recommended: I don’t recommend freezing assembled or cooked cheese and tomato sandwiches. The tomato’s high water content means it becomes watery and mushy when frozen and thawed, and the bread becomes soggy and unpleasant. The cheese also separates and becomes grainy. This is definitely a fresh-made meal.
Bread Freezing: You CAN freeze bread successfully! Keep extra bread frozen and pull out slices as needed. Bread toasts beautifully from frozen—no need to thaw first. This ensures you always have fresh-ish bread available.
Cheese Freezing: Many cheeses freeze reasonably well! Grated cheese, in particular, freezes nicely for up to 3 months. Pre-grate your cheese, portion it into sandwich-sized amounts (about 2-3 ounces), and freeze in small bags. Use directly from frozen—it’ll melt perfectly in your hot sandwich.
Best Fresh-Cooking Strategy: Since this sandwich takes only 10 minutes from start to finish, the best approach is simply to make it fresh whenever you want it. Have your ingredients prepped and ready (bread in the pantry, cheese in the fridge, fresh tomatoes on the counter, butter softened), and cooking one takes less time than reheating would take anyway!
Multiple Sandwiches: If cooking for a family, cook 2-3 sandwiches at once in a large griddle, or cook in batches and keep finished sandwiches warm in a 200°F oven while you cook additional ones.
Serving Suggestions
Classic Tomato Soup: The ultimate pairing! Serve with creamy tomato soup for dunking—this is comfort food perfection.
Potato Chips: Add crunchy kettle chips, salt and vinegar chips, or your favorite chips for textural contrast.
Pickle Spear: A dill pickle spear or pickle slices cut the richness with tangy, crunchy bites.
Simple Side Salad: A light side salad with mixed greens, cucumber, and vinaigrette balances the rich sandwich.
French Fries: For an indulgent meal, serve with crispy French fries or sweet potato fries.
Coleslaw: Creamy or vinegar-based coleslaw adds freshness and crunch.
Fruit Slices: Fresh apple slices, grapes, or orange segments provide a refreshing sweet contrast.
Vegetable Soup: Any vegetable soup pairs beautifully—minestrone, vegetable beef, or potato soup all work.
Beverage Pairings: Serve with cold milk (classic!), iced tea, lemonade, hot chocolate (for cool days), or for adults, a crisp beer or glass of wine.
Mac and Cheese: For ultimate comfort food indulgence, serve alongside mac and cheese!
FAQs Section
Q: What cheese is best for grilled cheese sandwiches?
A: American cheese melts the smoothest and most evenly—it’s the classic choice. However, cheddar provides more complex flavor, mozzarella offers that irresistible cheese pull, and Gruyère adds sophisticated nuttiness. The absolute best option? Combine two cheeses—like cheddar for flavor plus American for perfect melt. This gives you both great taste and ideal texture!
Q: Should I use butter or mayonnaise on grilled cheese?
A: Both work beautifully! Butter provides traditional rich flavor and golden color. Mayonnaise is actually used by many restaurants because it spreads easier when cold, creates an incredibly crispy and golden crust, and doesn’t burn as easily. Try mayo once—you might be converted! Some people use a combination of both for the best of both worlds.
Q: How do you keep tomatoes from making grilled cheese soggy?
A: Three key steps: 1) Slice tomatoes thin (about ¼-inch); 2) Pat them completely dry with paper towels before adding to sandwich; 3) Don’t use too many tomato slices—one layer of 3-4 slices is perfect. These steps control moisture and prevent sogginess. Also, eating the sandwich while it’s hot and fresh prevents moisture from having time to soak into bread.
Q: What temperature should you cook grilled cheese?
A: Medium or medium-low heat is ideal—around 300-325°F if you have a temperature-controlled griddle. This allows 3-4 minutes per side for perfect golden-brown bread and completely melted cheese. High heat burns the bread before the cheese melts; too-low heat makes greasy, soggy bread without proper crisping. Medium heat is the sweet spot!
Q: Can you make grilled cheese ahead of time?
A: Honestly, no—not really. The magic of grilled cheese is the contrast between hot, crispy bread and melted, gooey cheese. These qualities don’t hold well over time. If you must make ahead, cook the sandwich, wrap in foil, and refrigerate for up to 4 hours, then reheat in a skillet. But it’s always better fresh! Since it only takes 10 minutes to make, cooking fresh is the best option.
Q: Why isn’t my cheese melting in my grilled cheese?
A: Several possible issues: 1) Heat too high—bread burns before cheese melts (solution: reduce to medium heat); 2) Cheese too cold—use room temperature cheese; 3) Cheese too thick—use thinner slices or grated cheese; 4) Not enough cooking time—be patient and cook 3-4 minutes per side. Try the “lid trick”—cover the pan for 30-60 seconds to trap heat and encourage melting.
Q: What bread is best for grilled cheese?
A: Classic white sandwich bread is traditional and loved for its soft texture and neutral flavor. However, sourdough adds tangy complexity, Texas toast (thick-sliced) creates a hearty sandwich, whole wheat adds nuttiness and fiber, and Italian or French bread offers crusty exterior. Really, any bread you enjoy works! Just avoid very thin or delicate breads that might fall apart.
Conclusion
And there you have it—everything you need to make the absolute perfect cheese and tomato sandwich! While this might be one of the simplest recipes in existence, paying attention to the details—from properly drying tomatoes to using the right heat to achieving that perfect golden crust—transforms what could be just another sandwich into something truly special and deeply satisfying.
This classic grilled cheese with tomato is proof that sometimes the best meals are the simplest ones. There’s something magical about the combination of crispy, buttery bread, gooey melted cheese, and fresh, juicy tomato that speaks to our deepest comfort food cravings. It’s nostalgic yet never gets old, simple yet endlessly customizable, quick yet absolutely satisfying.
Whether you’re making this easy cheese and tomato sandwich for a quick lunch, teaching your kids to cook their first meal, seeking comfort on a rainy day, pairing it with tomato soup for the ultimate cozy dinner, or simply craving that perfect melty, crispy, delicious bite, this recipe delivers every single time. It’s the kind of recipe that becomes part of your regular rotation because it’s just that good, just that easy, and just that universally beloved.
Now it’s your turn to create your own perfect grilled cheese masterpiece! I’d love to hear about your experience—did you try the mayo trick? What cheese combination did you use? Did you add any creative extras? Share your thoughts, variations, and beautiful golden sandwich photos in the comments below! Your feedback and creativity inspire other readers and help build our cooking community.
Don’t forget to save this cheese and tomato sandwich recipe to your Pinterest boards—pin it to “Quick Easy Meals,” “Comfort Food Recipes,” “Lunch Ideas,” or “Kid-Friendly Dinners” so you can find it whenever those grilled cheese cravings hit. If you know someone who loves comfort food, is learning to cook, or needs easy meal ideas, share this article with them. And when you make your perfect crispy, melty creation, snap a photo and tag me on social media—I absolutely love seeing your delicious sandwiches!
Now go make yourself (and maybe the whole family!) this perfectly golden, melty, absolutely delicious sandwich—comfort food never tasted so good! 🧀