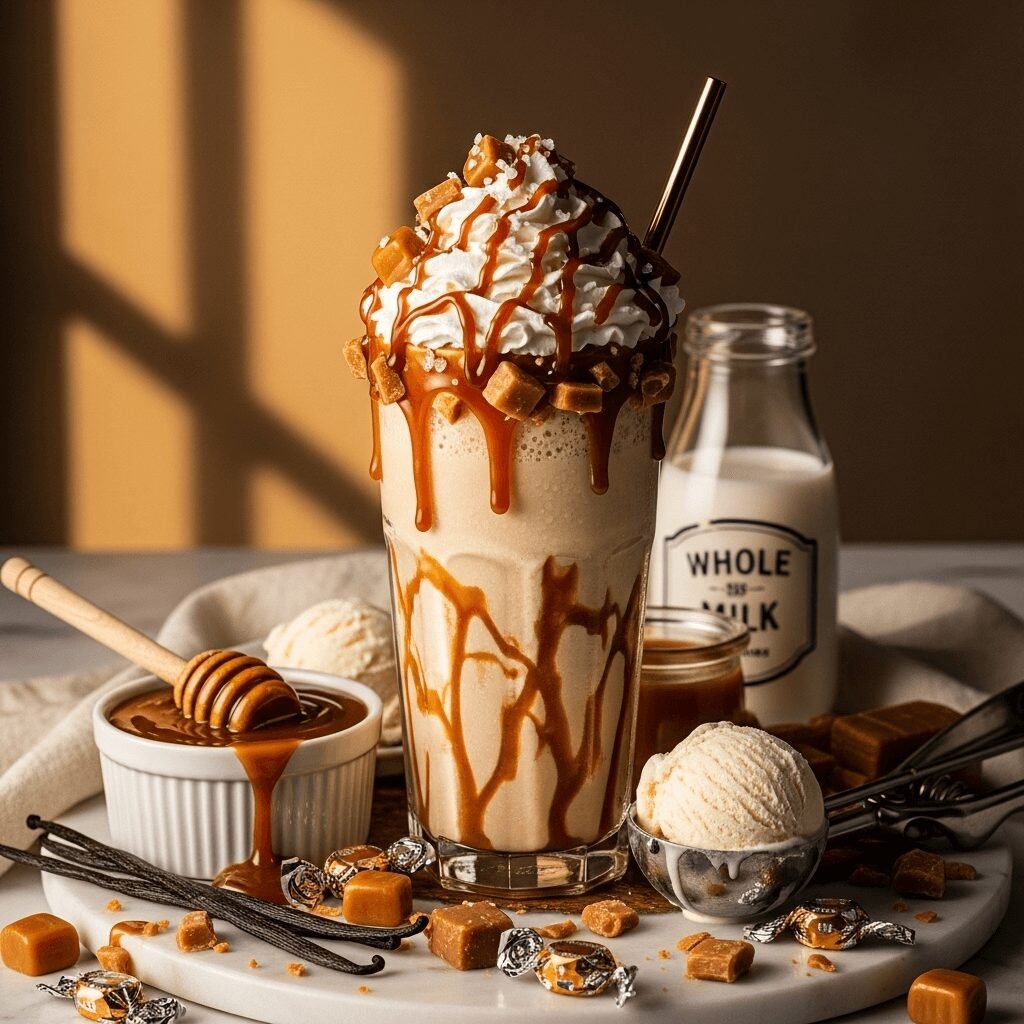
Decadent Caramel Milkshake Recipe – Thick, Rich & Restaurant-Quality!

Get ready to experience pure indulgence in a glass with this caramel milkshake that’s so rich, creamy, and delicious, you’ll think it came from an upscale ice cream parlor! This homemade caramel milkshake combines premium vanilla ice cream with luscious caramel sauce to create a thick, dreamy shake that tastes like liquid gold. With its perfect balance of sweet caramel flavor and velvety texture, this shake is the ultimate dessert drink that satisfies every sweet tooth craving.
This easy caramel milkshake is exactly what you need when you’re in the mood for something truly special and decadent. Unlike store-bought versions that taste artificial or overly sweet, this homemade version uses real caramel sauce and quality ingredients to create an authentically delicious shake that’s perfectly balanced in sweetness and flavor. The best part? It takes just 5 minutes to make and requires only a handful of simple ingredients that you probably already have in your kitchen!
Whether you’re treating yourself after a long week, creating a special dessert for date night at home, serving something impressive at a birthday party, or just craving something sweet and satisfying on a lazy afternoon, this caramel shake recipe delivers restaurant-quality results every time. It’s naturally gluten-free, endlessly customizable with fun toppings and mix-ins, and guaranteed to make any moment feel like a celebration. Pair it with fresh-baked cookies, serve it alongside burgers and fries for the ultimate diner experience, or simply enjoy it as a standalone treat that brings pure joy!
History / Background
Caramel, one of the world’s most beloved flavors, has a history that dates back centuries. The word “caramel” comes from the Latin “cannamellis,” meaning sugar cane. The process of heating sugar to create caramel was discovered by accident – when someone left sugar cooking too long and discovered the resulting rich, complex flavor was actually delicious rather than ruined!
The art of making caramel became refined in France during the 17th century, where confectioners perfected techniques for creating various forms of caramel candies and sauces. By the 1800s, caramel had become a staple flavor in European and American confectionery. Caramel candies, caramel apples, and caramel sauces gained widespread popularity, especially in America where they became associated with fall festivals and celebrations.
The marriage of caramel and milkshakes represents a beautiful convergence of two classic American treats. While milkshakes emerged in the late 1800s and evolved significantly with the invention of the electric blender in the 1920s and 1930s, it wasn’t until the mid-20th century that creative soda fountain operators began experimenting with adding caramel sauce to shakes. The combination was an instant hit!
During the 1950s and 1960s – the golden age of American diners and soda fountains – caramel milkshakes became a menu staple alongside classics like vanilla, chocolate, and strawberry. What made caramel shakes special was their sophisticated, grown-up flavor profile. The deep, buttery sweetness of caramel with hints of toffee and butterscotch appealed to adults who found simple vanilla too plain but didn’t want chocolate.
Interestingly, salted caramel (caramel with sea salt added) became a major trend starting in the early 2000s, thanks to French chocolatier Henri Le Roux and later popularized by chefs like Pierre Hermé. This elevated caramel from a simple sweet flavor to something complex and nuanced. Today’s caramel milkshake recipes often incorporate this salted caramel trend, adding just a pinch of sea salt to enhance the caramel’s depth.
The homemade caramel milkshake we’re making today represents the best of this rich tradition – it’s thick like the classic diner shakes, uses quality caramel sauce for authentic flavor, and can be customized with modern twists like salted caramel or caramel drizzle presentations that look stunning on Instagram and Pinterest!
Why You’ll Love This Recipe
This easy caramel milkshake is about to become your new favorite indulgent treat, and here’s why it’s absolutely irresistible! What makes this recipe so special is how it takes the complex, sophisticated flavor of caramel and transforms it into an ultra-creamy, thick milkshake that feels like pure luxury. The rich caramel sauce swirls through vanilla ice cream, creating pockets of intense flavor in every sip while maintaining that perfect milkshake consistency.
The beauty of making your own caramel milkshake at home is the control you have over quality and flavor intensity. You can use premium caramel sauce (homemade or store-bought), adjust the sweetness to your preference, and make it as thick as soft-serve ice cream or a bit thinner for easier sipping. Plus, you know exactly what’s going into your shake – no weird stabilizers, artificial flavors, or mystery ingredients like you’d find in fast-food versions.
Here’s why you’ll absolutely love this caramel milkshake:
- Ready in 5 minutes – Fastest gourmet dessert you can make
- Only 4 main ingredients – Ice cream, milk, caramel sauce, and vanilla
- Restaurant-quality taste – Rivals anything from expensive ice cream shops
- Incredibly decadent – Rich, buttery caramel flavor in every sip
- Perfectly thick and creamy – That classic milkshake texture you crave
- Customizable sweetness – Control the caramel intensity to your taste
- Impressive but easy – Guests will think you’re a dessert expert
- Kid and adult approved – Everyone loves caramel!
- Naturally gluten-free – Safe for those avoiding gluten
- Great for special occasions – Birthday parties, celebrations, date nights
- Beautiful presentation – Drizzle caramel inside the glass for Instagram-worthy results
- Versatile base – Easy to add toppings, mix-ins, or make flavor variations
- Better than store-bought – Control quality and avoid artificial ingredients
Ingredient Notes
Let’s talk about the simple but crucial ingredients that create the perfect caramel milkshake:
Premium Vanilla Ice Cream – The foundation of your shake! Use the best quality vanilla ice cream you can afford – look for brands with cream as the first ingredient and a short, recognizable ingredient list. Premium ice cream with higher butterfat content (14-16%) creates the richest, creamiest shakes. French vanilla or vanilla bean ice cream works beautifully, adding extra depth. You’ll need about 3-4 generous scoops per serving. Full-fat ice cream is essential for that luxurious texture – low-fat versions won’t give you the same creamy results. Can’t do dairy? Use premium dairy-free vanilla ice cream made from oat milk, coconut milk, or almond milk.
Caramel Sauce – The star flavor! This is where quality truly matters. You can use store-bought caramel sauce (look for brands with real ingredients like Ghirardelli, Torani, or Mrs. Richardson’s) or make your own homemade caramel sauce for ultimate flavor. Avoid “caramel-flavored” syrups which taste artificial. The best caramel sauces have a rich, buttery flavor with notes of brown sugar and vanilla. You’ll need about 3-4 tablespoons per serving, but taste and adjust based on how intense you want the caramel flavor. Salted caramel sauce adds wonderful complexity! Dulce de leche can be substituted for a slightly different but equally delicious caramel flavor.
Whole Milk – The liquid that brings everything together and helps blend smoothly. Whole milk (full-fat) creates the richest, creamiest shake with the best mouthfeel. You can use 2% if needed, but the shake will be slightly less rich. For an even more decadent shake, use half milk and half heavy cream. Start with less milk than you think you need – about ½ cup – and add more only if necessary for blending. Can’t do dairy? Oat milk is your best bet for dairy-free shakes because it’s naturally creamy and thick. Unsweetened almond milk also works but creates a thinner consistency.
Pure Vanilla Extract – Enhances all the other flavors! Even though you’re using vanilla ice cream, adding extra vanilla extract creates more complex, aromatic vanilla notes that complement the caramel beautifully. Use pure vanilla extract, never imitation – the flavor difference is significant. Just ½ teaspoon makes a noticeable impact.
Optional Enhancements:
- Pinch of sea salt – Brings out caramel flavor and creates that trendy salted caramel taste
- Malted milk powder (2 tablespoons) – Creates a caramel malt shake with extra depth
- Heavy cream (2-3 tablespoons) – For ultra-rich, thick texture
- Caramel candies (2-3 pieces) – Blend in for extra intense caramel flavor
- Instant espresso powder (½ teaspoon) – Creates a caramel macchiato shake
For Topping:
- Whipped cream – Fresh is always best!
- Extra caramel sauce – For drizzling
- Sea salt flakes – For salted caramel presentation
- Crushed toffee or butterscotch chips – Adds crunch and flavor
- Caramel popcorn – Fun and delicious garnish
Equipment Needed
Making this caramel milkshake requires just basic kitchen equipment:
- Blender – Any standard countertop blender works! You don’t need a high-powered blender, though it helps. Even a basic Hamilton Beach or personal blender can handle this recipe
- Measuring cups and spoons – For accurate ingredient portions
- Ice cream scoop – Makes portioning ice cream easy
- Tall glasses – Classic milkshake glasses or mason jars (16 oz capacity is perfect)
- Thick straws or long spoons – Regular straws are too narrow for thick shakes!
- Spatula – For scraping down blender sides and getting every drop
- Small squeeze bottle (optional) – For creating pretty caramel drizzle inside glasses
- Whisk or electric mixer (optional) – If making homemade whipped cream

Caramel Milkshake Recipe
This decadent Caramel Milkshake is thick, rich, and absolutely delicious! Made with premium vanilla ice cream, luscious caramel sauce, milk, and vanilla extract, it tastes like it came from a gourmet ice cream shop. Ready in just 5 minutes for the ultimate indulgent treat!
- Total Time: 5 minutes
- Yield: 2 servings 1x
Ingredients
- 3 cups premium vanilla ice cream (about 6 scoops), slightly softened
- 6 tablespoons caramel sauce, divided (use quality sauce, not syrup)
- ¾ cup whole milk (adjust for desired thickness)
- ½ teaspoon pure vanilla extract
- Pinch of sea salt (optional, enhances caramel flavor)
- Extra caramel sauce for drizzling (about 2-3 tablespoons)
For Serving (Optional):
- Fresh whipped cream
- Extra caramel drizzle
- Sea salt flakes (for salted caramel version)
- Crushed toffee or caramel candies
- Vanilla wafer cookies
Instructions
- Prepare Glasses (Optional but Recommended) – For that gorgeous Instagram-worthy presentation, drizzle caramel sauce inside your serving glasses before making the shake. Use a squeeze bottle or spoon to create swirls down the inside of the glass, then place glasses in the freezer while you make the shake. This keeps the caramel visible and the shake colder longer.
- Soften Ice Cream Slightly – Remove vanilla ice cream from the freezer and let it sit at room temperature for 3-5 minutes. It should be soft enough to scoop easily but still very cold and firm, not melting or drippy. This makes blending easier and protects your blender motor from straining.
- Add Ingredients to Blender in Order – This layering matters! Start with milk at the bottom (helps blender blades move freely), then add 4 tablespoons of caramel sauce, the slightly softened ice cream scoops, vanilla extract, and a pinch of sea salt if using. Save 2 tablespoons of caramel sauce for swirling in later.
- Start Blending on Low Speed – Secure the blender lid tightly. Start on the lowest speed setting for about 10-15 seconds to break down the ice cream and begin incorporating everything. This prevents chunks from flying around and ensures even blending without straining the motor.
- Increase to Medium Speed – Once ingredients start moving and combining, gradually increase to medium speed. Blend for 20-30 seconds, using your blender’s tamper if you have one to push ingredients toward the blades. Stop and scrape down the sides with a spatula if needed.
- Add Reserved Caramel for Swirl Effect – Stop the blender and drizzle in the remaining 2 tablespoons of caramel sauce. Pulse 2-3 times (about 2 seconds each) to create caramel swirls throughout the shake without fully incorporating it. This creates beautiful ribbons of caramel and pockets of intense caramel flavor!
- Check Consistency – Your milkshake should be thick and creamy but still pourable – similar to soft-serve ice cream. If it’s too thick and the blender is struggling, add 2-3 tablespoons more milk and blend briefly. If it’s too thin, add 1-2 more scoops of ice cream and blend again.
- Taste and Adjust – Give it a quick taste! If you want stronger caramel flavor, add another tablespoon of caramel sauce and blend for 10 seconds. If it’s too sweet, add a tiny pinch more salt to balance. Remember, you can always add more but can’t take it away!
- Pour and Serve Immediately – Pour the thick, luscious milkshake into your prepared glasses (the ones with caramel drizzle on the sides). Pour slowly to maintain the beautiful swirled appearance. The shake should cascade down in thick ribbons.
- Add Toppings and Serve – Top with a generous swirl of whipped cream, drizzle extra caramel sauce over the top, and add a sprinkle of sea salt flakes if making salted caramel version. Add a thick straw or long spoon and serve immediately while perfectly cold and thick!
Notes
- Caramel Quality: Use real caramel sauce, not caramel-flavored syrup. Check ingredients – it should contain sugar, cream, and butter.
- Ice Cream Temperature: Don’t let ice cream get too soft or melted, or your shake will be thin. It should still be quite firm but scoopable.
- Milk Amount: Start with ½ cup and add more only if needed. Easier to thin than thicken!
- Blending Time: Don’t over-blend! 30-45 seconds total is usually enough. Over-blending warms the shake and makes it thin.
- Caramel Swirl: Pulse rather than fully blend the final caramel addition for beautiful swirls.
- Salted Caramel: Add ⅛ teaspoon sea salt or use salted caramel sauce for trendy salted caramel flavor.
- Prep Time: 5 minutes
- Cook Time: 0 minutes
Nutrition
- Serving Size: 1 milkshake (approximately 14 oz)
- Calories: 520
- Sugar: 68g
- Sodium: 280mg
- Fat: 22g
- Saturated Fat: 13g
- Unsaturated Fat: 8g
- Trans Fat: 0g
- Carbohydrates: 75g
- Fiber: 0g
- Protein: 8g
- Cholesterol: 80mg
Tips & Variations
This caramel milkshake is perfect as-is, but here’s how to customize it:
Flavor Variations:
- Salted Caramel: Use salted caramel sauce or add ⅛-¼ teaspoon sea salt
- Caramel Apple: Add ¼ cup apple sauce and a dash of cinnamon
- Caramel Pecan: Blend in 2 tablespoons toasted pecans
- Chocolate Caramel: Add 2 tablespoons chocolate syrup (turtle shake!)
- Caramel Macchiato: Add ½-1 teaspoon instant espresso powder
- Bourbon Caramel: Add 1 oz bourbon for an adult version
Mix-In Ideas:
- Crushed Biscoff cookies or graham crackers
- Brownie chunks
- Caramel-filled chocolate pieces
- Toffee bits or butterscotch chips
- Pretzels for sweet and salty combo
- Mini chocolate chips
Texture Adjustments:
- Extra Thick: Use only ½ cup milk, add extra scoop of ice cream
- Standard Thick: ¾ cup milk to 3 cups ice cream (recipe as written)
- Thinner/Easier to Sip: Use 1 cup milk
- Creamier: Replace 2-3 tablespoons milk with heavy cream
Dietary Modifications:
- Dairy-Free: Use oat milk ice cream and oat milk (creamiest option)
- Lower Sugar: Use sugar-free caramel sauce and lower-sugar ice cream
- Lower Calorie: Use low-fat ice cream and skim milk (texture will be less rich)
- Protein-Packed: Add 1 scoop vanilla or caramel protein powder
Topping & Presentation Ideas:
- Fresh whipped cream (make your own!)
- Caramel drizzle in artistic patterns
- Sea salt flakes for contrast
- Crushed toffee or caramel popcorn
- Chocolate shavings
- Vanilla wafer or shortbread cookie on rim
- Fresh apple slices (for caramel apple theme)
Pro Chef Tips
Want to make an absolutely perfect, gourmet-quality caramel milkshake? Here are professional secrets:
Warm the Caramel Slightly – If your caramel sauce is refrigerator-cold and thick, warm it in the microwave for 10-15 seconds before adding to the blender. This helps it blend more evenly throughout the shake and creates better flavor distribution. Cold, thick caramel can create clumps that don’t blend well.
Create Caramel Drizzle Inside Glass – This professional technique makes your shake look restaurant-quality! Before making the shake, use a squeeze bottle to drizzle caramel sauce in a zigzag or spiral pattern inside your glass, then freeze the glass for 10 minutes. When you pour the shake, the caramel stays visible against the glass, creating stunning visual appeal.
Use Premium Caramel Sauce – This cannot be overstated! The quality of your caramel sauce directly determines the quality of your shake. Look for sauces with real ingredients: sugar, cream, butter, vanilla. Avoid anything labeled “caramel-flavored” or with corn syrup as the first ingredient. Ghirardelli, Torani Premium, and homemade caramel are excellent choices.
Don’t Fully Blend the Final Caramel – When you add that last bit of caramel sauce, use short pulses rather than continuous blending. This creates beautiful ribbons and swirls of caramel throughout the shake, giving you pockets of intense caramel flavor rather than uniform taste. It’s also more visually appealing!
Add Salt for Depth – Even if you’re not making salted caramel specifically, adding a tiny pinch of sea salt enhances the caramel flavor dramatically. Salt makes sweet things taste sweeter and brings out the buttery, toffee notes in caramel. Start with just a pinch – you can always add more.
Chill Glasses Thoroughly – Put your serving glasses in the freezer for 15-20 minutes before making your shake. This keeps the shake colder for much longer and prevents it from melting too quickly. It’s a simple step that dramatically improves the experience!
Layer for Texture Variation – For an extra-special presentation, make your shake slightly thicker than normal, pour half into the glass, add a generous drizzle of caramel sauce in the middle, then top with the remaining shake. This creates a surprise layer of concentrated caramel flavor halfway through!
Use Dulce de Leche for Depth – Mix half caramel sauce and half dulce de leche for an even more complex, sophisticated flavor with Latin flair. Dulce de leche has a deeper, more caramelized milk flavor that adds incredible richness.
Common Mistakes to Avoid
Don’t let these common errors ruin your perfect caramel milkshake!
Using Cheap or Artificial Caramel Syrup – Low-quality “caramel-flavored” syrups taste artificial and chemical-like, ruining what should be a rich, buttery shake. They often contain artificial colors and flavors rather than real caramel. Always use actual caramel sauce with real ingredients. The few extra dollars for quality sauce make all the difference between a mediocre shake and an amazing one.
Adding Too Much Milk – This is mistake #1 for milkshakes in general! Too much liquid creates a thin, watery shake that’s disappointing and separates quickly. Caramel is already a liquid, so you need less milk than you’d use for a plain vanilla shake. Start with ½ cup and add more only if the blender is really struggling. Remember: you can thin it easily, but you can’t thicken it without adding more ice cream.
Over-Blending – Blending for too long warms up your shake from motor friction, incorporates too much air (making it frothy instead of creamy), and can make it thin and runny. Caramel milkshakes need just 30-45 seconds of total blending time. As soon as everything is smooth and combined, stop immediately!
Using Ice Cream That’s Too Soft – If your ice cream is melting or drippy when you add it to the blender, your shake will be thin and watery. Let ice cream soften just enough to scoop easily (3-5 minutes at room temperature), but it should still be very cold and firm. Test it: the ice cream should hold its shape when scooped.
Forgetting to Taste Before Serving – Caramel sauce brands vary dramatically in sweetness and intensity. Some are mild and buttery, others are super sweet and strong. Always taste your shake before pouring and adjust the caramel level to your preference. You might need to add more caramel sauce, a pinch of salt, or a tiny splash of vanilla.
Not Creating Visual Appeal – Part of what makes a caramel milkshake special is how it looks! Don’t skip the caramel drizzle inside the glass or on top. Visual presentation increases enjoyment and makes the shake feel more special and indulgent.
Storage & Meal Prep
While caramel milkshakes are definitely best enjoyed fresh, here’s how to handle storage:
Immediate Consumption: Caramel milkshakes are at their absolute best within the first 10-15 minutes of making them. They’re perfectly thick, cold, and the caramel swirls are still distinct. Serve and drink immediately for the best experience!
Short-Term Refrigeration: If you must wait, pour the shake into an airtight container filled to the very top (minimizes air exposure) and refrigerate for up to 2 hours maximum. The shake will separate as the ice cream melts, and the caramel will sink. Before serving, give it a vigorous stir or quick 10-second re-blend to re-incorporate everything.
Freezer Storage: Pour leftover shake into freezer-safe containers and freeze for up to 1 month. When ready to enjoy, let it thaw in the refrigerator for 20-30 minutes until it reaches a thick, slushy consistency. You can drink it semi-frozen or give it a quick blend to restore the creamy texture. The texture won’t be quite as perfect as fresh, but it’s still delicious!
Caramel Sauce Storage: Store opened caramel sauce in the refrigerator for up to 3 months. Let it come to room temperature or warm it slightly before using in shakes for easier blending.
Make-Ahead & Freezer Notes
Caramel milkshakes are a make-and-enjoy-immediately treat, but here are prep strategies:
Pre-Measure Ice Cream: Scoop your ice cream portions onto a parchment-lined tray and refreeze until solid (about 2 hours). Store the frozen scoops in a freezer bag for up to 1 week. When you want a shake, grab pre-portioned scoops – no hard ice cream to wrestle with!
Pre-Drizzle Glasses: Prepare your serving glasses with caramel drizzle designs inside, then store them carefully in the freezer for up to 24 hours. When shake time comes, you just need to blend and pour!
Caramel Sauce Prep: If making homemade caramel sauce, make a large batch and store it in mason jars in the refrigerator for up to 2 months. This way you always have quality caramel ready for shakes, desserts, and more!
Batch Freezing for Parties: Making shakes for a crowd? Blend a large batch, pour into individual cups with lids, and freeze. Move them to the refrigerator 30-45 minutes before serving. They’ll be perfectly thick and cold!
Best “Reheating” Method: If your milkshake has been refrigerated or frozen, pour it into the blender, add 1-2 fresh scoops of ice cream, and blend for 10-15 seconds. This restores the thick, creamy texture better than just stirring.
Serving Suggestions
This caramel milkshake is indulgent on its own, but here’s how to serve it for different occasions:
Classic Diner Pairing: Serve with burgers, crispy fries, and onion rings for the ultimate American diner experience. The sweet, buttery caramel perfectly complements salty, savory foods. Add coleslaw and pickles for the full retro meal!
Dessert Pairing:
- Warm chocolate chip cookies or blondies
- Apple pie or apple crisp (caramel and apple are soulmates!)
- Pecan pie
- Chocolate brownies
- Pound cake or angel food cake
- Caramel shortbread bars
Brunch Indulgence:
- French toast with caramel drizzle
- Banana pancakes with pecans
- Cinnamon rolls
- Waffle bar with multiple toppings
Movie Night Treat:
- Caramel popcorn (theme consistency!)
- Pretzels for sweet and salty combo
- Chocolate-covered snacks
Special Occasion Ideas:
- Birthday Parties: Top with candles for a milkshake “cake”
- Date Night: Make two shakes with two straws in one glass
- Fall Gatherings: Serve with caramel apples and fall treats
- Holiday Entertaining: Add peppermint for winter, pumpkin spice for fall
Create a Milkshake Bar:
- Set out various toppings: whipped cream, crushed cookies, candies, nuts, chocolate chips, caramel drizzle, chocolate sauce
- Provide different mix-in options
- Let guests customize their own creations
FAQs Section
Q: What’s the difference between caramel sauce and caramel syrup?
A: Caramel sauce is thick, rich, and made with sugar, cream, and butter – it has a deep, buttery flavor with toffee notes. Caramel syrup is thinner, often corn syrup-based, and designed for coffee drinks – it tastes more artificial and sweet. For milkshakes, ALWAYS use caramel sauce (found near ice cream toppings), not syrup (found in the coffee aisle). The flavor difference is dramatic!
Q: Can I make this dairy-free?
A: Absolutely! Use dairy-free vanilla ice cream (oat milk based is creamiest) and dairy-free milk (oat milk is best for texture). Check your caramel sauce label – some contain dairy. Look for vegan caramel sauce or make your own using coconut cream. Brands like So Delicious make excellent dairy-free ice cream, and oat milk creates surprisingly creamy shakes!
Q: How do I make the caramel drizzle stay on the inside of the glass?
A: The key is cold glasses! First, place your glasses in the freezer for at least 15 minutes. Meanwhile, warm your caramel sauce slightly (10-15 seconds in the microwave) so it’s fluid but not hot. Use a squeeze bottle or spoon to drizzle zigzag or spiral patterns down the inside of the frozen glass. The caramel will set quickly against the cold glass. Return to freezer until ready to pour your shake!
Q: Why is my caramel milkshake not sweet enough?
A: This usually means: (1) You didn’t use enough caramel sauce – this recipe calls for 6 tablespoons total, which might seem like a lot but creates the right caramel intensity, (2) Your caramel sauce is a mild/less sweet variety – add 1-2 more tablespoons and blend briefly, or (3) Over-blending diluted the caramel flavor. Next time, add the final caramel at the end and just pulse to swirl rather than fully incorporating it.
Q: Can I add alcohol to make an adult caramel milkshake?
A: Yes! Caramel milkshakes pair beautifully with: bourbon or whiskey (1.5-2 oz creates a boozy caramel shake), vanilla vodka (2 oz), rum (especially spiced rum), Baileys Irish Cream (2 oz), or Kahlua. Add the alcohol with the milk before blending. Keep in mind that alcohol will slightly thin the shake and lower the freezing point, so you may need slightly less milk or an extra scoop of ice cream. These are perfect for adult dinner parties!
Q: How can I make this shake thicker?
A: For an extra-thick shake: (1) Use only ½ cup milk instead of ¾ cup, (2) Add an extra scoop of ice cream, (3) Add 2-3 tablespoons heavy cream instead of some of the milk, (4) Blend for minimal time – over-blending thins shakes, or (5) Use ice cream straight from the freezer (soften just enough to blend). The ultimate thick shake can be eaten with a spoon like soft-serve!
Q: Can I use homemade caramel sauce?
A: Absolutely – homemade caramel sauce makes the BEST caramel milkshakes! Make sure your homemade caramel is completely cool before adding to the shake. If it’s too thick to blend well, warm it slightly. Homemade caramel gives you control over sweetness and salt levels. Just make sure it’s smooth without sugar crystals, which can create grainy texture in shakes.
Q: What’s the best store-bought caramel sauce for milkshakes?
A: Top recommendations include: Ghirardelli Caramel Sauce (rich, not too sweet, great flavor), Torani Puremade Caramel Sauce (premium ingredients, excellent consistency), Mrs. Richardson’s Caramel Topping (classic choice, readily available), or Stonewall Kitchen Salted Caramel Sauce (if you want salted caramel). Avoid Smuckers caramel syrup or generic brands – they taste artificial and too sweet. Read labels: you want to see cream, sugar, and butter in the ingredients, not just corn syrup!
Conclusion
And there you have it – the ultimate caramel milkshake recipe that’s thick, rich, and tastes like it came from a gourmet ice cream parlor! This homemade caramel milkshake proves that the most indulgent treats don’t require complicated techniques or hours in the kitchen. With just premium vanilla ice cream, quality caramel sauce, milk, and vanilla extract, you can create a shake that rivals anything from an expensive restaurant – all in your own kitchen in just 5 minutes!
This easy caramel milkshake is pure liquid gold in a glass. The rich, buttery caramel flavor swirled through creamy vanilla ice cream creates a dessert experience that’s both sophisticated and comforting. Whether you’re treating yourself after a long week, impressing guests at a dinner party, celebrating a special occasion, or just satisfying a serious sweet tooth, this shake delivers restaurant-quality deliciousness every single time.
I absolutely can’t wait to hear how your caramel milkshake turns out! Drop a comment below and tell me about your experience. Did you make the salted caramel version? Try the caramel drizzle technique inside the glass? Add any creative toppings? Share all the delicious details! And please pin this recipe to your Pinterest boards – save it to your “Dessert Recipes,” “Milkshake Ideas,” and “Easy Treats” collections so you can find it whenever a caramel craving strikes. Share a photo of your gorgeous creation on Instagram and tag me so I can see your beautiful, indulgent shake!
Now grab that caramel sauce and fire up your blender – the most decadent caramel milkshake you’ve ever tasted is just minutes away! 🍮