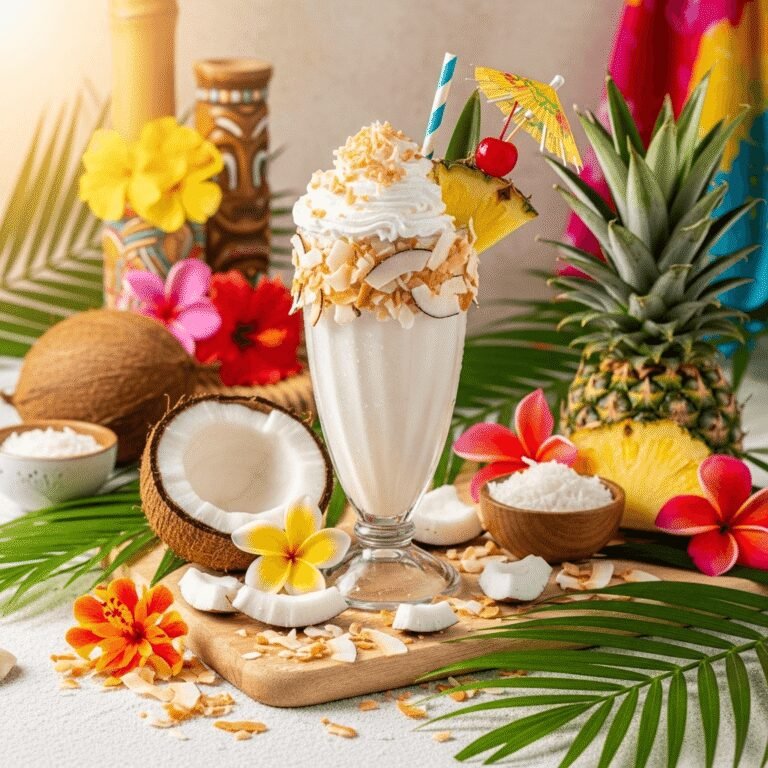
Classic Vanilla Milkshake Recipe – Thick, Creamy & Better Than a Diner!

There’s something absolutely magical about a perfectly made vanilla milkshake – it’s creamy, dreamy, and tastes like pure nostalgia in a glass! This homemade vanilla milkshake is the ultimate classic dessert drink that brings back memories of old-fashioned diners, summer road trips, and carefree childhood days. With just four simple ingredients and five minutes of your time, you can create a thick, rich milkshake that rivals (and honestly beats!) anything you’d get at a restaurant.
This classic vanilla milkshake recipe is exactly what you need when you’re craving something sweet, cold, and utterly satisfying. Unlike store-bought or fast-food versions that can taste artificial or watery, this homemade version uses real vanilla ice cream, whole milk, and pure vanilla extract to create an authentically delicious shake that’s perfectly thick – you’ll need a spoon as much as a straw! The best part? You control the sweetness, thickness, and quality of every ingredient.
Whether you’re treating yourself after a long day, serving up smiles at a kid’s birthday party, making a special dessert for date night at home, or just cooling down on a hot summer afternoon, this easy vanilla milkshake is always the right choice. It’s naturally gluten-free, takes just minutes to make, and is endlessly customizable. Pair it with burgers and fries for the full diner experience, or enjoy it as a standalone treat that makes any moment feel special!
History / Background
The milkshake as we know it today has evolved dramatically from its humble beginnings in the late 1800s. The original “milkshakes” were actually alcoholic drinks – a mixture of whiskey and eggnog served as a tonic. By the 1880s, the term began to refer to a healthier concoction of milk, chocolate or strawberry syrup, and sometimes eggs, shaken vigorously by hand to create froth.
The game-changing invention that transformed milkshakes forever was the electric blender. In 1922, Stephen Poplawski invented the blender specifically to make soda fountain drinks, and by 1930, Hamilton Beach introduced a drink mixer designed for milkshakes. Around this same time, someone had the brilliant idea to add ice cream to milkshakes, creating the thick, creamy beverage we love today.
Vanilla emerged as the classic, foundational milkshake flavor – the one against which all others would be measured. Its popularity stems from vanilla’s universal appeal and its ability to complement rather than overpower other flavors. The 1950s marked the golden age of American diners and soda fountains, where chrome stools lined counters and milkshakes became an iconic part of American culture. The vanilla milkshake was the backbone of every diner menu, often served in those classic ribbed glass cups with whipped cream on top and a cherry for good measure.
Interestingly, vanilla gets its name from the Spanish word “vainilla,” meaning “little pod,” referring to the vanilla orchid pods. True vanilla beans come from Mexico and Madagascar, where they’ve been used for centuries. The Totonac people of Mexico were the first to cultivate vanilla, and later the Aztecs used it to flavor their chocolate drinks. When Spanish conquistadors brought vanilla back to Europe in the 16th century, it became one of the world’s most beloved flavors.
The classic vanilla milkshake recipe hasn’t changed much over the decades because, honestly, perfection doesn’t need improvement. It remains the most ordered milkshake flavor in America, beloved for its pure, clean taste and creamy texture. Making one at home connects you to this rich history of American food culture while giving you complete control over quality and taste!
Why You’ll Love This Recipe
This homemade vanilla milkshake is about to become your go-to dessert for so many reasons! What makes this recipe truly special is its perfect balance of simplicity and indulgence. You don’t need any fancy ingredients or complicated techniques – just premium vanilla ice cream, milk, and a few extras to create a shake that tastes like it came from an upscale ice cream parlor.
The beauty of making your own vanilla milkshake at home is the control you have over every element. You can make it as thick as soft-serve ice cream or a bit thinner for easier sipping. You control the sweetness level and can use high-quality, real vanilla ice cream instead of the mystery ingredients in commercial shakes. Plus, there’s something incredibly satisfying about the sound of ice cream and milk blending together – it’s the sound of happiness being made!
Here’s why you’ll absolutely love this recipe:
- Ready in 5 minutes – Literally the fastest dessert you can make
- Only 4 ingredients – Vanilla ice cream, milk, vanilla extract, and sugar (optional)
- Restaurant-quality at home – Tastes better than any diner or fast-food shake
- Perfectly customizable – Adjust thickness and sweetness to your exact preference
- Kid-friendly classic – Every child (and adult!) loves a good vanilla shake
- No artificial flavors – Made with real ingredients, no chemicals or stabilizers
- Incredibly versatile – Perfect base for adding mix-ins and toppings
- Budget-friendly – Costs a fraction of ordering out
- Nostalgia in a glass – Brings back happy memories with every sip
- Impressive yet easy – Guests will think you’re an ice cream expert
- Naturally gluten-free – Safe for those avoiding gluten
- Great for parties – Easy to make multiple servings quickly
- Pairs perfectly with everything – From burgers to brownies
Ingredient Notes
Let’s talk about the simple but crucial ingredients that make this milkshake absolutely perfect:
Premium Vanilla Ice Cream – This is the star ingredient, so quality truly matters! Use the best vanilla ice cream you can afford – look for brands with a short, recognizable ingredient list (cream, milk, sugar, egg yolks, vanilla) rather than those with long lists of stabilizers and artificial flavors. French vanilla ice cream creates an extra-rich, custardy shake, while classic vanilla gives you that clean, pure vanilla flavor. Vanilla bean ice cream with visible specks is stunning! Full-fat ice cream is essential for that creamy, luxurious texture. You’ll need about 3-4 generous scoops per serving. Can’t do dairy? Use premium dairy-free vanilla ice cream – brands like Oatly, So Delicious, or Coconut Bliss work wonderfully.
Whole Milk – The liquid that brings everything together! Whole milk (full-fat) creates the creamiest, richest shake with the best mouthfeel. The fat content matters – it makes the shake smooth and helps blend everything seamlessly. You can use 2% milk if that’s what you have, but the shake will be slightly less rich. For an even thicker, more decadent shake, substitute half the milk with heavy cream. For a lighter version, use low-fat milk, but expect a thinner consistency. Can’t do dairy? Unsweetened almond milk, oat milk, or coconut milk work great, though the flavor will change slightly.
Pure Vanilla Extract – This amplifies and deepens the vanilla flavor! Even though you’re using vanilla ice cream, adding extra vanilla extract creates a more complex, aromatic vanilla taste with depth. Always use pure vanilla extract, not imitation – the difference in flavor is significant. Madagascar vanilla extract is sweet and creamy, while Tahitian vanilla is more floral. You only need ½-1 teaspoon, but it makes a noticeable difference! For an even more spectacular shake, scrape the seeds from half a vanilla bean and add them – those little black specks look gorgeous and taste incredible.
Granulated Sugar (Optional) – Most premium ice creams are sweet enough that you won’t need extra sugar. However, if you prefer a sweeter shake or if your ice cream is less sweet, add 1-2 teaspoons of granulated sugar. Alternatively, use honey, maple syrup, or even a splash of sweetened condensed milk for extra richness. Always taste your shake before adding sweetener – you can add more but can’t take it away!
Optional Enhancers:
- Pinch of salt – Enhances sweetness and brings out vanilla flavor
- Malted milk powder (2 tablespoons) – Creates a classic malted vanilla shake
- Whipped cream – For topping your masterpiece
- Vanilla bean paste – More intense vanilla flavor and visual appeal
Equipment Needed
Making the perfect milkshake requires just a few basic tools:
- High-powered blender – Essential for smooth, creamy results. A standard countertop blender works great. Vitamix, Blendtec, Ninja, or even a basic Hamilton Beach will do the job
- Ice cream scoop – Makes portioning ice cream easy and consistent
- Measuring cups and spoons – For accurate proportions
- Tall glasses – Classic milkshake glasses, mason jars, or any tall glass (16 oz capacity is perfect)
- Thick straws or spoons – Regular straws are too narrow for thick shakes!
- Spatula – For scraping down blender sides and getting every last bit
- Optional: Milkshake cup – Those classic ribbed diner glasses make it extra special
Pro tip: If you don’t have a blender, you can use an immersion blender in a tall container or even a drink mixer/milkshake machine if you have one!
Print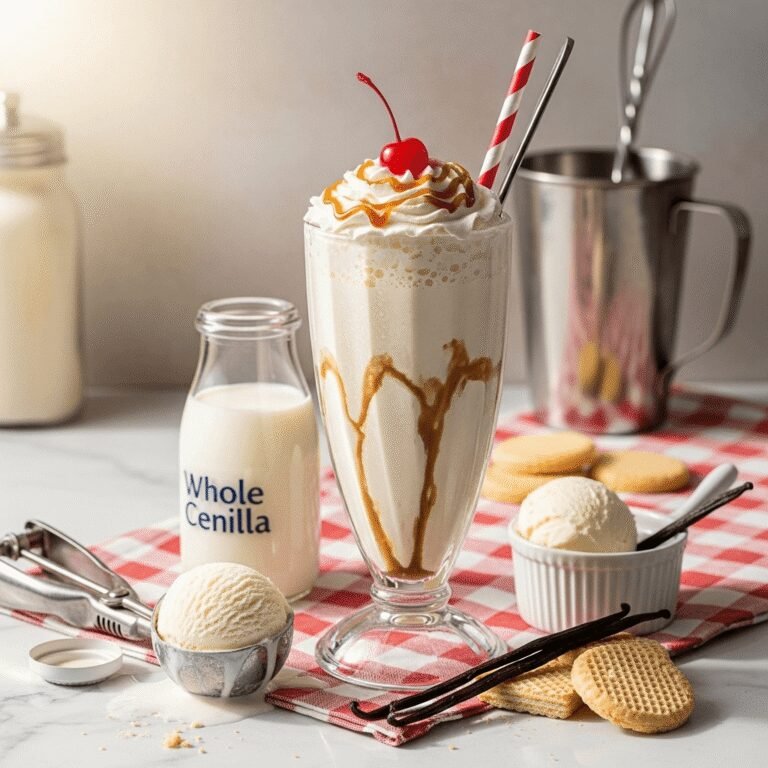
Classic Vanilla Milkshake Recipe
This classic Vanilla Milkshake is thick, creamy, and absolutely delicious! Made with premium vanilla ice cream, whole milk, and pure vanilla extract, it’s the perfect homemade treat that tastes better than any diner or restaurant shake. Ready in just 5 minutes with only 4 ingredients!
- Total Time: 5 minutes
- Yield: 2 servings 1x
Ingredients
- 3 cups premium vanilla ice cream (about 6-8 scoops, softened slightly)
- ¾ cup whole milk (adjust for desired thickness)
- 1 teaspoon pure vanilla extract
- 1-2 teaspoons granulated sugar (optional, to taste)
- Pinch of salt (optional, enhances flavor)
For Serving (Optional):
- Whipped cream
- Maraschino cherry
- Chocolate or caramel drizzle
- Vanilla wafer cookies or straws
Instructions
- Let Ice Cream Soften Slightly – Remove your vanilla ice cream from the freezer and let it sit at room temperature for 3-5 minutes. It should be scoopable but not melted – soft enough to blend easily but still frozen. This step is crucial for achieving the perfect creamy texture without overworking your blender.
- Add Ingredients to Blender – Place the slightly softened vanilla ice cream scoops into your blender first, followed by the whole milk, pure vanilla extract, and a pinch of salt if using. Starting with ice cream at the bottom helps it blend more evenly. Don’t add sugar yet – you’ll taste and adjust after blending.
- Start Blending on Low – Secure the blender lid and start on the lowest speed setting. Let it run for about 10-15 seconds to break down the ice cream and begin incorporating the milk. This prevents ice cream chunks from flying around and ensures even blending.
- Increase to Medium Speed – Once the mixture starts moving, increase to medium speed. Blend for 20-30 seconds, using the blender’s tamper if you have one to push ingredients toward the blades. Stop and scrape down the sides with a spatula if needed. The goal is a smooth, uniform consistency.
- Check Consistency – Stop the blender and check the thickness. Your milkshake should be thick enough that it slowly drips off a spoon but still pourable. If it’s too thick and the blender is struggling, add 2-3 tablespoons more milk and blend briefly. If it’s too thin, add 1-2 more scoops of ice cream and blend again.
- Taste and Adjust – This is important! Give your shake a taste. If it needs more sweetness, add 1-2 teaspoons of sugar and blend for 10 seconds. If you want a stronger vanilla flavor, add another ¼ teaspoon of vanilla extract. Remember, you can always add more but can’t take it away!
- Blend for Final Smoothness – Give it one final 10-15 second blend on medium-high to ensure everything is perfectly smooth and creamy with no ice cream chunks remaining. The shake should be velvety and uniform.
- Serve Immediately – Pour the milkshake into tall, chilled glasses (putting glasses in the freezer for 10 minutes beforehand keeps shakes colder longer). Pour slowly to avoid creating too many air bubbles. Top with whipped cream, a cherry, or any other toppings you love. Serve with a thick straw or spoon and enjoy immediately while it’s perfectly cold and thick!
Notes
- Ice Cream Temperature: Don’t let ice cream get too soft or melted, or your shake will be thin and watery. It should still be quite firm but scoopable.
- Milk Amount: Start with less milk than you think you need. It’s much easier to thin a shake than to thicken it. Begin with ½ cup and add more as needed.
- Thickness Control: For a thicker shake, use less milk or add more ice cream. For a thinner shake, add more milk gradually.
- Blending Time: Don’t over-blend! This warms up the shake and can make it thin and frothy. Blend just until smooth.
- Serving Size: This recipe makes 2 generous servings. Double or triple as needed for parties or large families.
- Prep Time: 5 minutes
- Cook Time: 0 minutes
Nutrition
- Serving Size: 1 milkshake (approximately 12 oz)
- Calories: 420
- Sugar: 48g
- Sodium: 180mg
- Fat: 20g
- Saturated Fat: 12g
- Unsaturated Fat: 6g
- Trans Fat: 0g
- Carbohydrates: 52g
- Fiber: 0g
- Protein: 9g
- Cholesterol: 75mg
Tips & Variations
The classic vanilla milkshake is perfect as-is, but here’s how to make it your own:
Flavor Variations:
- Vanilla Bean: Add seeds from 1 vanilla bean for intense vanilla flavor and beautiful specks
- French Vanilla: Use French vanilla ice cream and add 1 tablespoon sweetened condensed milk
- Malted Vanilla: Add 2-3 tablespoons malted milk powder for that classic malt shop taste
- Vanilla Caramel: Swirl in 2 tablespoons caramel sauce before serving
- Vanilla Bourbon: Add ½ teaspoon bourbon extract for sophisticated depth (adults only!)
Mix-In Ideas:
- Cookies & Cream: Add 4-5 crushed Oreos
- Birthday Cake: Mix in cake batter extract and rainbow sprinkles
- Vanilla Brownie: Blend in 1 small brownie for chocolate-vanilla perfection
- Cookie Dough: Add chunks of edible cookie dough
- Peanut Butter: Blend in 2 tablespoons creamy peanut butter
Thickness Adjustments:
- Extra Thick: Use only ½ cup milk, add an extra scoop of ice cream, eat with a spoon like soft-serve
- Standard Thick: ¾ cup milk to 3 cups ice cream (recipe as written)
- Thinner/Easier to Sip: Use 1 cup milk or add 2 tablespoons heavy cream for richness without thickness
Dietary Variations:
- Dairy-Free: Use oat milk ice cream and oat milk for incredibly creamy vegan shake
- Lower Calorie: Use low-fat ice cream and skim milk (though texture will be less rich)
- Protein-Packed: Add 1 scoop vanilla protein powder and reduce ice cream slightly
- Sugar-Free: Use sugar-free ice cream and skip added sweetener
Topping Ideas:
- Whipped cream (homemade is amazing!)
- Chocolate, caramel, or strawberry syrup drizzle
- Crushed cookies, graham crackers, or vanilla wafers
- Chocolate shavings or sprinkles
- Fresh berries
- Mini chocolate chips
- Crushed candy pieces
Pro Chef Tips
Want to make an absolutely perfect, restaurant-quality milkshake? Here are professional secrets:
Chill Your Glasses First – Put your serving glasses in the freezer for 15-20 minutes before making your shake. Cold glasses keep your milkshake colder for much longer, preventing that disappointing melted-shake experience halfway through. This simple step makes a huge difference!
Use Premium Ice Cream – The quality of your ice cream directly determines the quality of your shake. Look for ice creams with a short ingredient list and higher butterfat content (14-16% is ideal). Brands like Häagen-Dazs, Ben & Jerry’s, or local premium brands create noticeably better shakes than budget options. The extra couple of dollars is absolutely worth it.
Don’t Over-Blend – This is crucial! Over-blending introduces too much air (making it frothy instead of creamy) and warms up the shake (making it thin and runny). Blend just until smooth and no longer. Most shakes need only 30-45 seconds total blending time.
Start with Less Liquid – It’s infinitely easier to thin a shake than to thicken one. Always start with less milk than the recipe calls for, blend, check consistency, and add more liquid gradually if needed. You want that perfect thick-but-pourable consistency.
The Pinch of Salt Trick – Adding a tiny pinch of salt enhances all the other flavors and makes the vanilla taste more complex and interesting. It doesn’t make the shake taste salty – it just brings everything to life!
Let Ice Cream Soften Strategically – Ice cream straight from the freezer is too hard and will strain your blender motor. Let it soften for 3-5 minutes until it’s the consistency of soft-serve. You should be able to scoop easily but it should still be very cold and firm. If it’s melting or drippy, it’s too soft.
Use the “Pulse” Technique First – When you first start blending, use short pulses (2-3 seconds each) to break down the ice cream. This prevents big chunks from flying around and protects your blender motor from straining.
Add Vanilla Extract After Blending – Some professional milkshake makers add the vanilla extract as a final step, blending just 5 seconds to incorporate. This preserves the most aromatic, volatile compounds in the vanilla, giving you maximum flavor impact.
Common Mistakes to Avoid
Don’t let these common errors ruin your perfect milkshake!
Using Ice Cream That’s Too Hard – Rock-hard ice cream straight from a deep freezer will burn out your blender motor or leave you with chunks of ice cream in a thin liquid. Always let ice cream soften slightly first. The few minutes of waiting time is worth it for a smooth, creamy shake.
Adding Too Much Milk – This is the #1 mistake! People often add too much liquid, creating a thin, soupy shake that’s disappointing. Start with less liquid and add more gradually. Remember: you can always thin a shake, but you can’t thicken it without adding more ice cream (which changes your proportions).
Over-Blending – Blending for too long warms up the shake from friction and incorporates too much air, creating a frothy, thin texture instead of thick and creamy. Blend just until smooth – usually 30-45 seconds total – then stop immediately.
Using Low-Quality Ice Cream – Budget ice creams with lots of air whipped in and artificial flavors create disappointing, thin shakes with strange aftertastes. Spend a bit more on premium ice cream – it makes all the difference in taste and texture.
Not Tasting Before Serving – Always taste your shake before pouring! This is your chance to adjust sweetness, add more vanilla, or perfect the consistency. It takes just 5 seconds and ensures you’re serving something delicious.
Forgetting to Chill Glasses – Warm glasses make your shake melt faster and look less appealing with condensation. Always pre-chill your serving glasses in the freezer when possible.
Storage & Meal Prep
While milkshakes are definitely best enjoyed immediately, here’s how to handle storage:
Immediate Serving: Milkshakes are at their absolute best within the first 10-15 minutes of making them. They’re perfectly thick, cold, and creamy. Serve and drink immediately for the best experience!
Short-Term Refrigeration: If you absolutely must wait before drinking, pour the shake into an airtight container and refrigerate for up to 2 hours. It will separate and become thinner as the ice cream melts. Before serving, give it a vigorous stir or quick re-blend (just 10 seconds) to re-incorporate everything.
Freezer Storage: You can pour leftover milkshake into freezer-safe containers and freeze for up to 1 month. When you want to enjoy it, let it thaw in the refrigerator for about 30 minutes until it’s slushy, then either enjoy it as a semi-frozen treat or blend briefly to restore the creamy texture. The texture won’t be quite as perfect as fresh, but it’s still delicious!
Preventing Ice Crystals: If freezing, press plastic wrap directly onto the surface of the milkshake before sealing the container. This prevents ice crystals from forming on top.
Make-Ahead & Freezer Notes
Milkshakes are definitely a make-and-enjoy-immediately treat, but here are some prep strategies:
Pre-Measure Ingredients: You can measure out your ice cream scoops ahead of time! Scoop ice cream, place scoops on a parchment-lined plate or tray, and refreeze until solid (about 2 hours). Store the frozen scoops in a freezer bag for up to 1 week. When you want a shake, grab your pre-portioned scoops and blend with milk!
Pre-Chill Everything: Keep your glasses, blender container, and even your milk in the freezer/fridge before making shakes. Starting with everything super cold helps maintain that perfect thick consistency longer.
Batch Freezing: Make a large batch of milkshakes for a party, pour into individual cups with lids, and freeze. About 30-45 minutes before serving, move them to the refrigerator to soften to a slushy, thick consistency. They’ll be perfectly thick and cold for serving!
Ice Cream Storage: Keep ice cream in the back of your freezer where temperature is most consistent. Let it soften at room temperature for exactly 3-5 minutes before making shakes for the most consistent results.
Best “Reheating” Method: If your milkshake has melted or been refrigerated, pour it into the blender, add 1-2 fresh scoops of ice cream, and blend for 10-15 seconds. This restores the thick, creamy texture better than anything else.
Serving Suggestions
This vanilla milkshake is delicious on its own, but here’s how to serve it for different occasions:
Classic Diner Experience: Serve your milkshake with burgers, crispy fries, and onion rings for the full retro American diner experience. The creamy vanilla perfectly complements salty, savory foods. Add a side of coleslaw for freshness!
Dessert Pairing:
- Warm chocolate chip cookies or brownies (the temperature contrast is amazing!)
- Apple pie or cherry pie à la mode
- Birthday cake or cupcakes
- Fresh-baked chocolate chip cookies
- Warm cinnamon rolls
- Pecan pie
Float Version: Pour your milkshake over root beer or cola for a delicious float. Or do it in reverse – float a scoop of vanilla ice cream in your milkshake!
Party Serving Ideas:
- Set up a milkshake bar with different toppings and mix-ins for guests to customize
- Serve in small 6-8 oz cups for dessert portions at dinner parties
- Make boozy adult versions with vanilla vodka or rum for evening gatherings
- Create a “build your own sundae shake” station with multiple ice cream flavors
Snack Time:
- Afternoon treat with graham crackers or vanilla wafers
- After-school snack for kids (nutritious with milk and eggs from ice cream!)
- Movie night indulgence with popcorn
- Summer poolside refreshment
Special Occasions:
- Birthday parties (add cake pieces or sprinkles!)
- Game day celebrations
- Holiday gatherings (add peppermint in winter, berries in summer)
- Date night at home (fancy glasses + whipped cream = romantic!)
FAQs Section
Q: How thick should a milkshake be?
A: The perfect milkshake should be thick enough that it’s difficult to suck through a regular straw (you need a thick straw or spoon!) but still pourable. It should slowly drip off a spoon and have the consistency of soft-serve ice cream. If you turn your glass upside down, a perfect shake should barely move! If it’s so thick your blender struggles, it’s too thick – add a splash of milk. If it pours like regular milk, it’s too thin – add more ice cream.
Q: Why is my milkshake not thick enough?
A: Thin milkshakes usually result from: (1) Too much milk – use less liquid next time, starting with just ½ cup, (2) Ice cream too soft – let it soften only slightly, not melt, (3) Over-blending – blend just until smooth, about 30-45 seconds, (4) Low-quality ice cream – premium ice cream with higher fat content creates thicker shakes, or (5) Wrong proportions – you need about 4-5 parts ice cream to 1 part milk. To fix a thin shake immediately, add 1-2 more scoops of ice cream and blend briefly.
Q: Can I make a milkshake without a blender?
A: Yes, though it’s more challenging! Your best option is an immersion blender (hand blender) – soften ice cream more than usual, place in a tall container with milk, and blend until smooth. You can also use a hand mixer or even vigorously stir softened ice cream and milk together by hand, though you won’t get as smooth a result. Some people use a large mason jar with a tight lid and shake vigorously, but this requires very soft ice cream and lots of arm strength!
Q: What’s the difference between a milkshake and a malt?
A: A milkshake is made with ice cream, milk, and flavorings (like vanilla extract). A malt (or malted milkshake) is the exact same thing with the addition of malted milk powder, which adds a distinctive toasted, slightly nutty flavor and extra richness. Malts were hugely popular in the 1950s and remain a classic choice at old-fashioned ice cream parlors. To make a vanilla malt, simply add 2-3 tablespoons of malted milk powder (like Carnation or Ovaltine) to this recipe!
Q: Can I make this dairy-free?
A: Absolutely! Use dairy-free vanilla ice cream (oat milk, coconut milk, or almond milk based) and your choice of plant-based milk. Oat milk ice cream creates the creamiest dairy-free shakes because oat milk is naturally thick and creamy. Brands like Oatly, So Delicious Coconut Milk, Almond Dream, or Ben & Jerry’s Non-Dairy work wonderfully. The shake will taste slightly different from dairy versions but can be absolutely delicious!
Q: How can I make my milkshake healthier?
A: For a healthier version try: (1) Use frozen banana as the base instead of ice cream (makes it naturally sweet and creamy), (2) Add Greek yogurt for protein, (3) Use low-fat or reduced-sugar ice cream, (4) Replace some ice cream with frozen cauliflower (sounds weird but you can’t taste it!), (5) Add a scoop of protein powder, (6) Use unsweetened almond milk instead of whole milk, or (7) Skip added sugar. Keep in mind that while you can make it healthier, milkshakes are meant to be a treat, so enjoy them in moderation!
Q: Why does my milkshake separate or get watery?
A: Separation happens when: (1) The shake sits too long before drinking – ice cream naturally melts over time, (2) You used too much liquid relative to ice cream, making it less stable, (3) The ice cream was too soft when you made it, (4) The shake is too warm from over-blending or warm ingredients, or (5) You’re using low-quality ice cream with lots of air and stabilizers. To prevent separation, serve immediately after making, use proper ice cream-to-milk ratios, and keep everything very cold!
Q: Can I add alcohol to make an adult milkshake?
A: Definitely! Vanilla milkshakes pair beautifully with: vanilla vodka (2 oz per shake), bourbon or whiskey (1.5-2 oz), rum (especially vanilla rum), Baileys Irish Cream, Kahlua, or Amaretto. Add the alcohol with the milk before blending. Keep in mind that alcohol will slightly thin the shake and lower the freezing point, so you may need to use a bit less milk or add an extra scoop of ice cream. These boozy shakes are perfect for adult dinner parties!
Conclusion
And there you have it – the ultimate classic vanilla milkshake recipe that’s thick, creamy, and absolutely delicious! This homemade vanilla milkshake proves that the simplest recipes are often the best. With just four basic ingredients and five minutes of your time, you can create a milkshake that tastes better than anything from a restaurant or ice cream shop.
This easy vanilla milkshake is pure comfort and nostalgia in a glass. Whether you’re treating yourself after a long day, creating special memories with your kids, serving an impressive dessert to guests, or just cooling down on a hot summer afternoon, this recipe delivers every single time. The best part? Once you master this basic vanilla milkshake, you can customize it endlessly with mix-ins, toppings, and flavor variations to create your perfect shake!
I’d love to hear how your vanilla milkshake turns out! Drop a comment below and tell me about your experience. Did you make it extra thick? Add any special toppings? Turn it into a boozy adult version? Share all the details! And please pin this recipe to your Pinterest boards – save it to your “Easy Desserts,” “Summer Treats,” and “Classic Recipes” collections so you can find it whenever a milkshake craving hits. Share a photo of your gorgeous creation on Instagram and tag me so I can see your delicious shake!
Now grab your blender and get ready to make the creamiest, dreamiest vanilla milkshake you’ve ever tasted. Your inner child (and your taste buds!) will thank you! 🥤