Garlic Aioli Recipe: Creamy Homemade Sauce in 5 Minutes

There’s something magical about whipping up a batch of silky, garlicky aioli from scratch. This creamy garlic aioli recipe transforms simple ingredients into a restaurant-quality sauce that elevates everything from crispy french fries to grilled vegetables. Whether you’re hosting a dinner party or meal prepping for the week, this authentic aioli recipe comes together in just five minutes and delivers bold, fresh flavor that store-bought versions simply can’t match.
Introduction of Recipe
Garlic aioli is a luxuriously creamy Mediterranean sauce that combines the rich, emulsified texture of mayonnaise with the bold punch of fresh garlic. Unlike its milder cousin, traditional mayo, aioli brings serious flavor to your plate with its garlicky bite and silky smooth consistency. This versatile condiment works beautifully as a dipping sauce for everything from sweet potato fries and crispy calamari to steamed artichokes and grilled shrimp. It’s also the secret weapon that takes sandwiches, burgers, and wraps from ordinary to extraordinary.
Serve this homemade garlic aioli at summer barbecues, alongside seafood platters, as part of a Mediterranean mezze spread, or simply keep it on hand in your refrigerator for whenever you need to add a burst of gourmet flavor to everyday meals. The best part? You probably already have all the ingredients sitting in your kitchen right now.
History / Background
The word “aioli” comes from the Provençal words “ai” (garlic) and “oli” (oil), literally meaning “garlic and oil.” This ancient sauce has been a cornerstone of Mediterranean cuisine for centuries, with roots stretching deep into the culinary traditions of southern France, Spain, and Italy. In its most traditional form, authentic aioli was made by laboriously pounding fresh garlic cloves with a mortar and pestle, then slowly drizzling in olive oil while continuously stirring until the mixture emulsified into a thick, creamy sauce.
In the coastal regions of Provence, aioli wasn’t just a condiment—it was practically a way of life. Families would gather for “le grand aioli,” a festive meal where the garlic sauce took center stage, served alongside salt cod, boiled vegetables, hard-boiled eggs, and crusty bread. The dish was so beloved that it became a symbol of Provençal identity and hospitality.
Spanish cuisine embraced aioli with equal passion, particularly in Catalonia, where “allioli” remains a beloved accompaniment to grilled meats, seafood paella, and patatas bravas. Italian coastal communities developed their own variations, often incorporating lemon juice for brightness.
Over time, as aioli traveled beyond the Mediterranean, cooks began incorporating egg yolks to help stabilize the emulsion and create a smoother, more foolproof sauce. This evolution made aioli more accessible to home cooks while maintaining its characteristic garlicky punch. Today, the term “aioli” is used somewhat loosely in American cuisine to describe any flavored mayonnaise-based sauce, but true aioli lovers know that the star ingredient should always be fresh, raw garlic that delivers that unmistakable aromatic kick.
Why You’ll Love This Recipe
This homemade garlic aioli recipe strikes the perfect balance between authentic flavor and modern convenience. Instead of spending thirty minutes whisking oil drop by drop, you’ll achieve professional results in just five minutes using a few simple techniques. The result is a creamy, dreamy sauce with bold garlic flavor that makes you wonder why you ever bought aioli from the store.
Here’s why this recipe will become your new kitchen staple:
- Lightning-fast preparation – Ready in just 5 minutes with minimal whisking or blending
- Simple ingredients – Uses pantry staples you likely already have on hand
- Customizable flavor – Easily adjust the garlic intensity to suit your taste preferences
- Versatile usage – Works as a dip, spread, sandwich condiment, or plate sauce
- Budget-friendly – Costs a fraction of premium store-bought aioli
- Impressive results – Tastes like it came from a fancy restaurant kitchen
- No special equipment needed – Can be made with just a bowl and whisk
- Fresh and preservative-free – You control exactly what goes into your sauce
- Makes the perfect gift – Package it in a cute jar for foodie friends
- Scales easily – Double or triple the batch for entertaining
Ingredient Notes
Let’s break down what makes this garlic aioli so irresistibly delicious and discuss smart substitutions for different dietary needs.
Fresh Garlic Cloves: The heart and soul of authentic aioli. Fresh garlic delivers that characteristic pungent bite and aromatic complexity that defines this sauce. You’ll want to mince it very finely or use a garlic press for the smoothest texture. If you’re sensitive to raw garlic, you can roast the cloves first for a sweeter, mellower flavor—though traditionalists might argue this creates a different sauce entirely. Never substitute garlic powder; it simply won’t deliver the same authentic taste.
Egg Yolks: These create the emulsion that gives aioli its thick, creamy texture. The lecithin in egg yolks acts as a natural emulsifier, helping oil and water-based ingredients blend smoothly together. Room temperature eggs emulsify better than cold ones. If you’re concerned about using raw eggs, look for pasteurized eggs at your grocery store, or you can use store-bought mayonnaise as a base instead (though this technically makes it a garlic mayo rather than true aioli).
Neutral Oil and Extra Virgin Olive Oil: A combination works best. Using 100% extra virgin olive oil can sometimes taste too heavy or bitter, especially if you’re using a food processor (the blades can make olive oil taste slightly bitter). Blending neutral oil like canola, vegetable, or light olive oil with some extra virgin olive oil gives you richness without overwhelming the garlic. For the perfect balance, use about two-thirds neutral oil and one-third extra virgin olive oil.
Fresh Lemon Juice: Brightens the entire sauce and adds a tangy contrast to the rich, fatty components. Fresh-squeezed lemon juice tastes significantly better than bottled, and the acidity helps stabilize the emulsion. You can substitute white wine vinegar or champagne vinegar if needed, though lemon provides the most classic Mediterranean flavor profile.
Dijon Mustard: This is your secret weapon for a stable emulsion. Mustard contains natural emulsifiers and adds subtle depth of flavor without making the aioli taste mustardy. It also helps prevent your sauce from breaking or separating.
Salt: Essential for enhancing all the other flavors. Fine sea salt or kosher salt both work beautifully. Start conservatively and adjust at the end—you can always add more, but you can’t take it away.
Equipment Needed
Making garlic aioli doesn’t require fancy kitchen gadgets, but having the right tools makes the process smoother and more enjoyable.
- Medium mixing bowl – For whisking by hand; a bowl with a rubber bottom or damp towel underneath prevents slipping
- Whisk – A balloon whisk works best for incorporating air and building volume
- Immersion blender or food processor – Optional but makes the job incredibly quick and ensures perfect emulsification
- Garlic press or microplane – For creating ultra-fine garlic paste that distributes evenly
- Measuring cups and spoons – For precise ingredient ratios
- Tall narrow container – If using an immersion blender, this creates the perfect vortex for emulsifying
- Small bowl or ramekin – For separating egg yolks from whites
- Citrus juicer – Makes extracting fresh lemon juice effortless
- Storage container with lid – An airtight jar or container keeps your aioli fresh

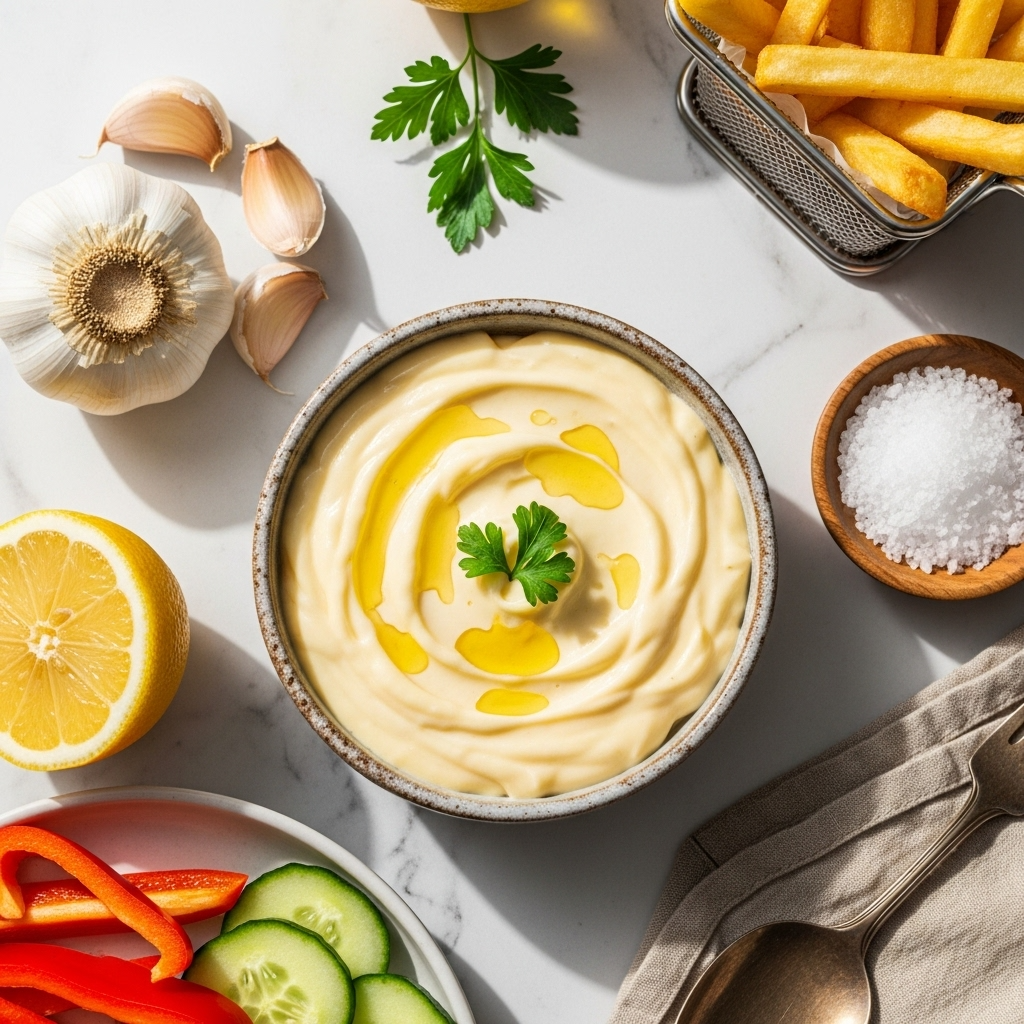
Garlic Aioli Recipe
This quick and easy homemade garlic aioli recipe delivers restaurant-quality results in just 5 minutes. Creamy, garlicky, and incredibly versatile, this classic Mediterranean sauce elevates everything from sandwiches to seafood.
- Total Time: 5 minutes
- Yield: 1 cup (8 servings) 1x
Ingredients
- 2 large egg yolks, room temperature
- 3-4 garlic cloves, finely minced or pressed
- 1 tablespoon fresh lemon juice
- 1 teaspoon Dijon mustard
- ¾ cup neutral oil (canola, vegetable, or light olive oil)
- ¼ cup extra virgin olive oil
- ½ teaspoon fine sea salt
- Pinch of white pepper (optional)
Instructions
- Prepare your garlic: Mince the garlic cloves as finely as possible or run them through a garlic press to create a smooth paste. Set aside and allow to rest for a few minutes, which helps develop the flavor compounds.
- Combine the base ingredients: In a medium bowl or tall narrow container (if using an immersion blender), whisk together the egg yolks, minced garlic, lemon juice, Dijon mustard, and salt until well combined and slightly frothy.
- Begin the emulsion: If whisking by hand, add the oil in a very slow, steady stream—literally just a few drops at first—while whisking constantly and vigorously. This is crucial for creating a stable emulsion. If using an immersion blender or food processor, you can add the oil in a slightly faster stream while blending continuously.
- Watch the magic happen: As you continue whisking and adding oil, you’ll notice the mixture beginning to thicken and turn pale and creamy. This is the emulsion forming. Once it starts to thicken, you can add the oil in a slightly faster stream, but never stop whisking or blending.
- Adjust consistency and seasoning: Once all the oil is incorporated and you have a thick, creamy aioli, taste and adjust seasoning. Add more salt, lemon juice, or garlic if needed. If the aioli is too thick, you can thin it by whisking in a teaspoon of water or lemon juice.
- Rest and serve: Transfer to an airtight container and refrigerate for at least 15-30 minutes before serving. This resting time allows the flavors to meld beautifully and the garlic flavor to mellow slightly.
Notes
- Raw egg safety: Use fresh, high-quality eggs or pasteurized eggs if you’re concerned about consuming raw eggs. Pregnant women, young children, elderly individuals, and those with compromised immune systems should use pasteurized eggs.
- Oil temperature matters: Room temperature ingredients emulsify more easily than cold ones. Take your eggs out of the refrigerator 30 minutes before making aioli.
- Fixing broken aioli: If your emulsion breaks (separates into oil and liquid), don’t panic! Start fresh with another egg yolk in a clean bowl and slowly whisk the broken aioli into it—this usually rescues the sauce perfectly.
- Garlic intensity: The garlic flavor intensifies as the aioli sits. If you’re sensitive to raw garlic, start with 2 cloves and add more to taste after the initial rest period.
- Prep Time: 5 minutes
- Cook Time: 0 minutes
Nutrition
- Serving Size: 2 tablespoons
- Calories: 190
- Sugar: 0g
- Sodium: 150mg
- Fat: 21g
- Saturated Fat: 2g
- Unsaturated Fat: 18g
- Trans Fat: 0g
- Carbohydrates: 1g
- Fiber: 0g
- Protein: 1g
- Cholesterol: 45mg
Tips & Variations
The beauty of homemade garlic aioli lies in its versatility. Once you’ve mastered the basic recipe, the flavor possibilities are virtually endless.
Spicy Garlic Aioli: Add ½-1 teaspoon of sriracha, harissa paste, or smoked paprika for a spicy kick that pairs beautifully with grilled meats and seafood. For an extra smoky flavor, try adding a pinch of chipotle powder.
Lemon Herb Aioli: Increase the lemon juice to 2 tablespoons and fold in 2 tablespoons of fresh minced herbs like basil, parsley, dill, or chives. This variation is phenomenal with grilled fish and summer vegetables.
Roasted Garlic Aioli: Replace raw garlic with 4-5 roasted garlic cloves for a sweeter, more mellow flavor that’s less pungent. Simply roast a whole head of garlic at 400°F for 40 minutes, then squeeze out the soft cloves.
Saffron Aioli: Steep a pinch of saffron threads in 1 tablespoon of warm water for 10 minutes, then add to the egg yolk mixture. This creates a gorgeous golden color and complex flavor that’s traditional in Spanish cuisine.
Lighter Version: Substitute half the oil with plain Greek yogurt for a lighter aioli with extra protein and tanginess. This works especially well if you’re watching calories but still want that creamy texture.
Vegan Aioli: Use aquafaba (chickpea liquid from canned chickpeas) instead of egg yolks. Use 3 tablespoons of aquafaba and follow the same method—it creates a surprisingly authentic texture.
Pro Chef Tips
After years of making aioli in professional kitchens, these insider tricks ensure perfect results every single time.
Temperature is everything: The single most important factor for successful emulsification is temperature. Bring all your ingredients to room temperature before starting. Cold ingredients are more likely to break and separate. If you’re in a hurry, place whole eggs in a bowl of warm water for 5 minutes.
The drip method: Patience during the initial oil addition is crucial. For the first ¼ cup of oil, add it literally drop by drop. This creates a strong emulsion foundation that won’t break when you add the remaining oil more quickly. Think of it as building a house—you need a solid foundation before adding the walls.
Garlic prep matters: For the smoothest texture and best flavor distribution, make a garlic paste rather than just mincing. Sprinkle your minced garlic with a pinch of salt and use the side of your knife to press and smear it against the cutting board, creating a smooth paste. This prevents biting into chunks of raw garlic.
The immersion blender advantage: If you have an immersion blender, use the tall narrow container it comes with and add all ingredients at once—yes, including the oil! Blend on high while slowly lifting and lowering the blender. This method is nearly foolproof and takes only 30 seconds.
Oil quality matters more than you think: While you don’t need the most expensive extra virgin olive oil, avoid anything labeled “light” or “mild” olive oil for the olive oil portion—these lack flavor. For the neutral oil, organic canola or grapeseed oil taste cleaner than standard vegetable oil.
The water trick: If your finished aioli is too thick (it should hold soft peaks but still be spreadable), whisk in a teaspoon of cold water. This loosens the texture perfectly without sacrificing flavor or making it too thin.
Flavor development time: Freshly made aioli tastes good, but refrigerated aioli that’s rested for at least an hour tastes incredible. The flavors meld and mellow, and the raw garlic bite becomes more rounded and complex.
Common Mistakes to Avoid
Even experienced cooks can stumble when making emulsified sauces. Here are the most common pitfalls and how to sidestep them.
Adding oil too quickly: This is the number one reason aioli breaks and separates. If you add oil faster than the egg yolks can emulsify it, you’ll end up with a greasy, broken mess instead of creamy perfection. Solution: Be patient, especially during the first few tablespoons. Set up a slow, steady drizzle and whisk continuously.
Using all extra virgin olive oil: While it sounds like the more authentic choice, strong extra virgin olive oil can become bitter when vigorously whisked or blended, and the flavor can be overwhelming. Solution: Use a blend of neutral and olive oil for balanced flavor and smooth texture.
Cold ingredients: Cold egg yolks don’t emulsify well, leading to a thin, broken sauce. Solution: Always bring eggs and lemon juice to room temperature before starting. This takes about 30 minutes on the counter.
Over-blending with a food processor: High-speed blending for too long can cause the emulsion to break from friction and heat. Solution: Blend only until emulsified and combined—this should take less than a minute. As soon as it’s thick and creamy, stop.
Not enough acid: Aioli needs acid for both flavor balance and emulsion stability. Without enough lemon juice, your aioli might taste flat and one-dimensional. Solution: Don’t skip the lemon juice, and don’t be afraid to add an extra squeeze at the end if needed.
Storing improperly: Leaving aioli uncovered in the fridge exposes it to air, which oxidizes the garlic and turns the sauce bitter with a gray tinge. Solution: Always store in an airtight container pressed directly against the surface with plastic wrap, or with a tight-fitting lid.
Storage & Meal Prep
Proper storage keeps your homemade garlic aioli fresh, safe, and delicious for days.
Refrigerator storage: Transfer your aioli to a clean, airtight glass jar or plastic container with a tight-fitting lid. Press a piece of plastic wrap directly onto the surface of the aioli before sealing to prevent oxidation and discoloration. Properly stored homemade aioli keeps for 3-4 days in the refrigerator.
Shelf life considerations: Because this aioli contains raw egg yolks and fresh garlic, it’s more perishable than store-bought versions with preservatives. Always label your container with the date you made it, and discard any aioli that smells off, shows signs of separation that can’t be whisked back together, or has been refrigerated for more than 4 days.
Reheating note: Don’t heat aioli! Heat will cause the emulsion to break permanently. Always serve aioli cold or at room temperature. If it’s too thick from refrigeration, let it sit on the counter for 10-15 minutes or whisk in a tiny bit of warm water to loosen the texture.
Meal prep tips: Aioli is a fantastic make-ahead condiment for meal prep. Make a batch on Sunday and use it throughout the week on sandwiches, grain bowls, roasted vegetables, and grilled proteins. Portion it into smaller containers if you’re packing lunches—this prevents repeatedly opening the main container, which extends freshness.
Visual changes: Fresh garlic may cause slight discoloration over time, developing a gray or greenish tinge. This is a natural chemical reaction and doesn’t mean the aioli is spoiled, though it may look less appetizing. Adding a tiny squeeze of extra lemon juice before storing helps minimize this color change.
Make-Ahead & Freezer Notes
While aioli is quick enough to make fresh anytime, there are situations where advance preparation makes sense.
Make-ahead success: Garlic aioli actually improves with a few hours of refrigeration, making it perfect for preparing ahead of parties or meal prep. The flavors meld beautifully, and the raw garlic mellows slightly. For the best flavor and texture, make your aioli anywhere from 1 hour to 1 day before you plan to serve it. Beyond 24 hours, the garlic flavor can become quite strong and potentially overwhelming.
Freezer considerations: Here’s the truth—emulsified sauces like aioli don’t freeze well. The emulsion breaks when frozen and thawed, resulting in a separated, watery mess that’s nearly impossible to re-emulsify. The texture becomes grainy and unpleasant, and whisking won’t bring back the creamy consistency. If you absolutely must freeze it, know that you’ll likely need to discard it after thawing or use it only in cooked dishes where texture doesn’t matter.
Best practices for entertaining: If you’re serving aioli at a party, make it the morning of your event. Transfer it to a serving bowl about 30 minutes before guests arrive so it comes to room temperature slightly—this improves the texture and makes the flavors more vibrant. Keep any leftovers refrigerated and return them to the fridge within 2 hours.
Garlic adjustment trick: If you’re making aioli more than 12 hours in advance, consider using one less clove of garlic than the recipe calls for. The garlic flavor intensifies significantly as it sits, and what tastes perfectly balanced when fresh might be too strong the next day. You can always stir in more minced garlic later if needed.
Serving Suggestions
Homemade garlic aioli is incredibly versatile and elevates countless dishes. Here are some inspired ways to serve this luscious sauce.
Classic pairings: Serve alongside crispy french fries, sweet potato fries, or homemade potato wedges for the ultimate comfort food experience. It’s also the traditional accompaniment to steamed artichokes—simply pull off each leaf and drag it through the creamy aioli. Fried calamari, shrimp cocktail, and crab cakes all benefit from a generous dollop of garlicky goodness.
Sandwich and burger game-changer: Spread aioli on both sides of your bread before building sandwiches—it works particularly well with turkey, roast beef, or grilled chicken sandwiches. Transform basic burgers into gourmet creations by swapping regular mayo for garlic aioli. It’s especially delicious on lamb burgers with feta and cucumber.
Vegetable heaven: Use aioli as a dipping sauce for raw vegetable crudités like carrots, celery, bell peppers, and snap peas. It’s also phenomenal drizzled over roasted vegetables like Brussels sprouts, cauliflower, or asparagus. Try it with grilled zucchini, eggplant, and bell peppers for a Mediterranean-inspired plate.
Seafood perfection: Garlic aioli is a natural partner for all types of seafood. Serve it with grilled salmon, seared scallops, fish tacos, or lobster rolls. It’s also traditional with Spanish grilled octopus and makes an incredible sauce for fish and chips.
Grain bowls and Buddha bowls: Drizzle aioli over grain bowls, power bowls, or Buddha bowls for added richness and flavor. It pairs beautifully with quinoa, farro, or brown rice topped with roasted vegetables and grilled protein.
Side dish suggestions: Round out your meal with Mediterranean-inspired sides like tabbouleh, Greek salad, roasted red peppers, marinated olives, crusty bread, or pita chips for scooping.
FAQs Section
Can I make garlic aioli without raw eggs?
Absolutely! If you’re concerned about consuming raw eggs, you have several options. Use pasteurized eggs, which are treated to eliminate bacteria while remaining raw. Alternatively, start with store-bought mayonnaise (which is made with pasteurized eggs) and simply whisk in the garlic, lemon juice, and seasonings—this technically makes it garlic mayo rather than traditional aioli, but it’s delicious and safe. For a vegan version, use aquafaba (chickpea liquid) as your emulsifier.
Why did my aioli break or separate?
Broken aioli usually happens because oil was added too quickly before the emulsion could form properly, or because your ingredients were too cold. The good news is that broken aioli can often be rescued! Start with a fresh egg yolk in a clean bowl, then very slowly whisk the broken aioli into it, treating the broken mixture like you would the oil in the original recipe. This re-establishes the emulsion and usually saves the batch.
How can I make my aioli less garlicky?
Start with fewer garlic cloves—just 1-2 instead of 3-4. You can also roast the garlic first, which creates a sweeter, milder flavor, or blanch raw garlic cloves in boiling water for 30 seconds before using them. Remember that garlic flavor intensifies as aioli sits, so what tastes mildly garlicky when fresh may become quite strong after a day in the refrigerator.
Can I use a blender or food processor instead of whisking by hand?
Yes! Using a blender, food processor, or immersion blender makes aioli foolproof and incredibly quick. Add all the ingredients except the oil to your machine, pulse to combine, then slowly drizzle in the oil while the machine is running. An immersion blender in a narrow container is particularly effective—you can even add all ingredients at once and blend while slowly moving the blender up and down.
What’s the difference between aioli and mayonnaise?
Traditional aioli is made with just garlic, oil, and sometimes egg yolk and lemon juice, resulting in a more intensely flavored, less sweet sauce. Mayonnaise typically contains egg yolks, neutral oil, vinegar or lemon juice, and sometimes sugar, creating a milder, more versatile condiment. Modern aioli recipes often bridge the gap between the two, and many restaurant “aiolis” are actually flavored mayonnaises. True purists make aioli without egg yolks at all, using only garlic and oil emulsified through patient whisking.
How long does homemade garlic aioli last in the refrigerator?
Properly stored in an airtight container, homemade garlic aioli keeps for 3-4 days in the refrigerator. Because it contains raw egg yolks and fresh garlic, it’s more perishable than commercial mayonnaise with preservatives. Always discard aioli that smells off, shows significant separation, or has been stored for more than 4 days. Dating your container helps you track freshness.
Can I make garlic aioli dairy-free?
Yes! Traditional garlic aioli is naturally dairy-free—it contains no milk, butter, cream, or cheese. The creamy texture comes entirely from the emulsification of oil and egg yolks. Just double-check that any mustard you use doesn’t contain dairy additives. For a completely vegan version, use aquafaba instead of egg yolks.
Conclusion
Making your own garlic aioli from scratch is one of those simple kitchen skills that makes you feel like a culinary wizard. With just a handful of basic ingredients and five minutes of your time, you can create a luxurious, restaurant-quality sauce that transforms everyday meals into something special. The creamy texture, bold garlic flavor, and endless versatility make this recipe an absolute must-have in your cooking repertoire.
Whether you’re slathering it on sandwiches, using it as a dipping sauce for crispy fries, or drizzling it over grilled seafood, this homemade garlic aioli delivers incredible flavor that store-bought versions simply can’t match. Plus, knowing exactly what goes into your food—no preservatives, no artificial ingredients, just pure, fresh goodness—makes every bite taste even better.
Now it’s your turn to experience the magic! Grab those ingredients, grab your whisk, and whip up a batch of this incredible garlic aioli today. Once you taste the difference homemade makes, you’ll never go back to store-bought. Don’t forget to save this recipe to your Pinterest boards so you can find it easily next time you need a quick, impressive condiment. And if you make it, I’d love to hear how it turned out—drop a comment below and let me know what you served it with! Happy cooking!