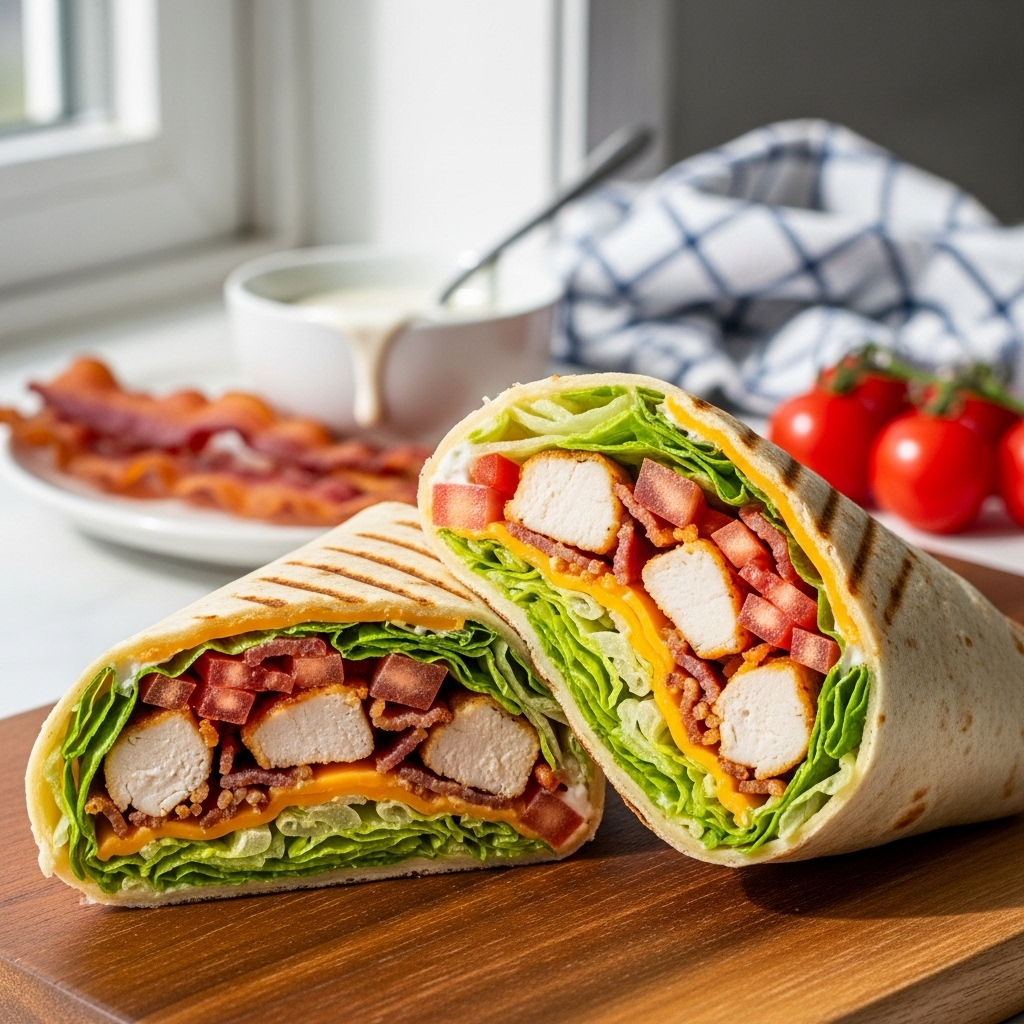
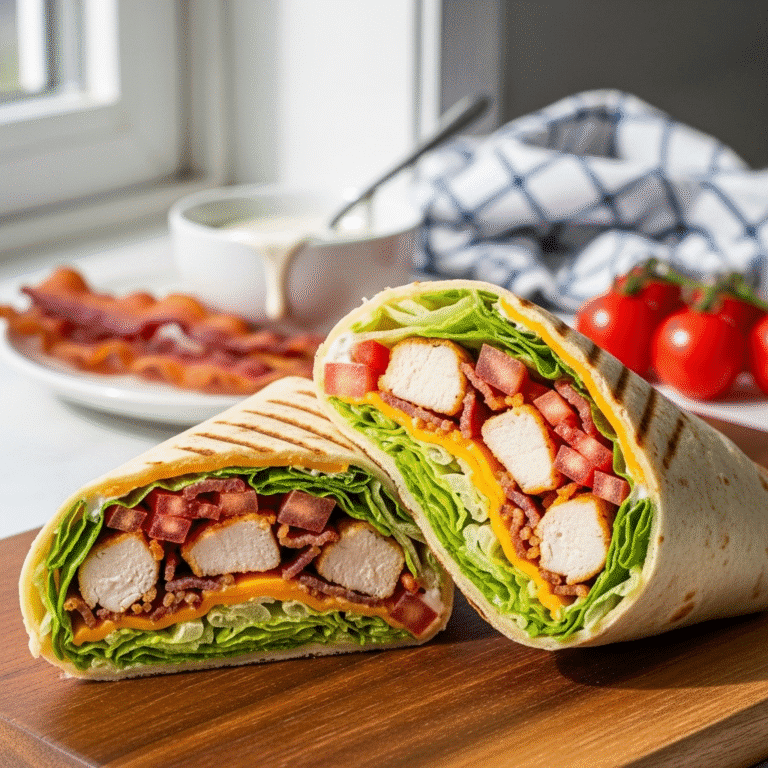
Chicken Bacon Ranch Wrap Recipe – Loaded, Creamy & Ready in 20 Minutes

If you’re looking for a lunch that feels like a treat but comes together in minutes, this chicken bacon ranch wrap is about to become your new obsession. Imagine tender, seasoned chicken breast paired with crispy bacon, fresh vegetables, and that irresistible creamy ranch dressing, all wrapped up in a soft flour tortilla. It’s the kind of meal that makes weekday lunches exciting again, satisfies hungry teenagers after school, and travels beautifully for picnics or office lunches.
This homemade chicken bacon ranch wrap recipe combines all the flavors of a loaded salad with the convenience of a handheld meal. Whether you’re meal prepping for the week ahead, need a quick dinner solution, or want something satisfying that doesn’t require turning on the oven, these wraps deliver big flavor with minimal fuss. They’re hearty enough to keep you full for hours, yet fresh and light enough that you won’t feel weighed down. Plus, they’re endlessly customizable – add more veggies, swap the ranch for Caesar dressing, or make them spicy with jalapeños. This is comfort food that actually fits into a busy lifestyle.
History / Background
The chicken bacon ranch wrap represents a beautiful convergence of several American food traditions. Ranch dressing itself was invented in the 1950s by Steve Henson, a plumber working in Alaska who created the buttermilk-based dressing to serve at his California dude ranch, Hidden Valley Ranch. The dressing became so popular that it eventually became America’s most beloved salad dressing and condiment, outselling ketchup by the 1990s.
The combination of chicken, bacon, and ranch emerged as a flavor powerhouse in the late 1990s and early 2000s, when casual dining restaurants began experimenting with loaded salads and wraps. Chains like Subway, McDonald’s, and Wendy’s all introduced chicken bacon ranch variations, recognizing that this trio of ingredients had universal appeal. The combination hits all the right notes: savory from the bacon, protein-rich from the chicken, and cooling creaminess from the ranch.
Wraps themselves became mainstream in American cuisine during the 1990s as part of the California cuisine movement. Influenced by Mexican burritos but lighter and more versatile, wraps offered a way to enjoy sandwich-like meals without traditional bread. They became particularly popular in the fitness community as a perceived healthier alternative, though they’re really just delicious in their own right.
Today, the chicken bacon ranch wrap has achieved iconic status in American lunch culture. It’s a menu staple at sandwich shops, a lunchbox favorite for parents and kids alike, and a reliable go-to recipe for home cooks who want something satisfying without complicated techniques. The beauty of making them at home is that you control the quality of ingredients, the amount of ranch dressing, and can load them up with as many fresh vegetables as you like.
Why You’ll Love This Recipe
This chicken bacon ranch wrap recipe is the ultimate combination of convenience and satisfaction, delivering restaurant-quality flavor right from your home kitchen. It takes everything people love about the classic flavor combination and transforms it into a meal you can hold in your hands, making it perfect for busy lifestyles without sacrificing taste or nutrition.
Here’s why this recipe will become a regular in your meal rotation:
- Quick and easy preparation – Ready in just 20 minutes from start to finish, perfect for weeknight dinners or rushed lunch prep
- Crowd-pleasing flavors – The chicken bacon ranch combination is universally loved by both kids and adults
- Meal prep superstar – Components can be prepared ahead and assembled throughout the week for grab-and-go lunches
- Protein-packed and filling – Keeps you satisfied for hours with substantial protein from chicken and bacon
- Customizable and versatile – Easily adapt to dietary needs or flavor preferences with simple substitutions
- Budget-friendly – Uses affordable ingredients that stretch to feed a family without breaking the bank
- Leftover-friendly – Perfect way to use up rotisserie chicken or leftover grilled chicken breasts
- Kid-approved – Mild, familiar flavors that even picky eaters enjoy
- No special cooking skills required – Simple techniques that anyone can master, even beginner cooks
- Portable and picnic-perfect – Wraps up neatly without the mess of traditional sandwiches
Ingredient Notes
Chicken Breast – The protein foundation of this wrap. You can use freshly cooked chicken breast (grilled, baked, or pan-seared), store-bought rotisserie chicken, or even leftover chicken from last night’s dinner. For the juiciest results, cook chicken breast to an internal temperature of 165°F and let it rest before slicing. Rotisserie chicken is the ultimate time-saver and adds wonderful flavor. Chicken thighs can substitute if you prefer darker meat with more flavor and moisture.
Bacon – Provides that irresistible smoky, salty crunch that makes this wrap so addictive. Regular-cut bacon works perfectly, though thick-cut bacon offers more substantial pieces. Cook it until crispy – undercooked bacon in a wrap is disappointing. You can bake bacon in the oven at 400°F for 15-20 minutes for perfectly crispy, evenly cooked strips. Turkey bacon works as a lighter alternative, or try center-cut bacon to reduce fat content while keeping the flavor.
Ranch Dressing – The signature creamy element that ties everything together. Store-bought ranch dressing is perfectly fine and convenient, but homemade ranch takes this wrap to another level. Look for quality brands with real buttermilk if buying pre-made. Greek yogurt ranch dressing offers a tangier, protein-rich alternative, or you can make a lighter version by mixing ranch seasoning with Greek yogurt and a splash of milk.
Flour Tortillas – Choose large, soft tortillas (10-12 inches) that are fresh and pliable. Whole wheat tortillas add fiber and nutrients, while flavored varieties like spinach, tomato, or garlic herb add visual appeal and extra taste. Make sure tortillas are room temperature or slightly warmed to prevent cracking when rolling. Low-carb tortillas work great if you’re watching carbohydrates.
Lettuce – Adds essential crunch and freshness. Romaine lettuce is ideal because it’s crisp, holds up well, and doesn’t wilt quickly. Iceberg lettuce works but can be watery. Mixed greens, butter lettuce, or even fresh spinach are excellent alternatives. Always wash and thoroughly dry your lettuce – excess moisture makes wraps soggy.
Tomato – Roma tomatoes are best because they have less water content and fewer seeds than regular slicing tomatoes. This prevents the wrap from becoming soggy. Remove the seeds and inner gel before dicing for even better results. Cherry or grape tomatoes, halved, also work beautifully.
Shredded Cheese – Cheddar cheese is classic, but this is where you can get creative. Monterey Jack, Colby Jack, pepper jack (for heat), or a Mexican cheese blend all work wonderfully. Pre-shredded cheese is convenient, but freshly shredded cheese melts better and has superior flavor without the anti-caking additives.
Red Onion – Adds a sharp, fresh bite that complements the rich bacon and creamy ranch. Slice it thinly so it doesn’t overpower the other ingredients. If you find raw onion too strong, soak the slices in cold water for 10 minutes to mellow the flavor. Green onions or chives work as milder alternatives.
Equipment Needed
- Large skillet or frying pan – For cooking bacon and chicken (if cooking from scratch)
- Sharp knife – For slicing chicken, chopping vegetables, and cutting wraps
- Cutting board – A clean, stable surface for all your prep work
- Tongs – For flipping bacon and handling chicken
- Paper towels – Essential for draining crispy bacon
- Measuring cups and spoons – For accurate ingredient portions
- Large plate or clean countertop – For assembling your wraps
- Plastic wrap or aluminum foil – For wrapping and storing finished wraps
- Optional: Microwave – For warming tortillas to make them more pliable
- Optional: Panini press or grill pan – For creating toasted, crispy wraps with beautiful grill marks
Chicken Bacon Ranch Wrap Recipe
A loaded chicken bacon ranch wrap featuring tender seasoned chicken, crispy bacon, fresh vegetables, cheese, and creamy ranch dressing wrapped in a soft flour tortilla. This easy wrap recipe is perfect for meal prep, quick lunches, or casual dinners, ready in just 20 minutes.
- Total Time: 20 minutes
- Yield: 4 wraps (4 servings) 1x
Ingredients
- 2 cups cooked chicken breast, diced or shredded (about 2 medium breasts or 1 rotisserie chicken)
- 6-8 strips bacon, cooked until crispy and crumbled
- 4 large flour tortillas (10-12 inch)
- ½ cup ranch dressing (plus more for drizzling)
- 2 cups romaine lettuce, chopped or shredded
- 1 cup cherry tomatoes, halved (or 1 large tomato, diced and seeded)
- 1 cup shredded cheddar cheese (or cheese of choice)
- ¼ cup red onion, thinly sliced (optional)
- ¼ teaspoon garlic powder (for seasoning chicken)
- ¼ teaspoon paprika (for seasoning chicken)
- Salt and black pepper to taste
Instructions
Step 1: Prepare Your Proteins
If using raw chicken, season the breasts with garlic powder, paprika, salt, and pepper. Heat a skillet over medium-high heat with a drizzle of oil and cook chicken for 6-7 minutes per side until golden brown and the internal temperature reaches 165°F. Let rest for 5 minutes, then dice or slice. Meanwhile, cook bacon in a separate skillet until crispy, drain on paper towels, and crumble. If using pre-cooked chicken and bacon, skip this step and move straight to assembly.
Step 2: Warm the Tortillas
Place tortillas in the microwave for 10-15 seconds to make them soft and pliable, or warm them individually in a dry skillet for 10 seconds per side. This prevents cracking when you roll them. Lay each tortilla flat on a clean work surface.
Step 3: Build Your Wrap Foundation
Spread 2 tablespoons of ranch dressing in a horizontal line across the center of each tortilla, leaving about 2 inches of space on the left and right sides. The ranch acts as a flavor base and helps ingredients stick together.
Step 4: Layer Your Ingredients
On top of the ranch, layer the ingredients in this order: a generous handful of chopped romaine lettuce, ½ cup of diced chicken, 2 tablespoons of crumbled bacon, several tomato halves, ¼ cup of shredded cheese, and a few slices of red onion if using. Drizzle with an additional tablespoon of ranch dressing over the fillings.
Step 5: The Perfect Roll Technique
Fold the bottom edge of the tortilla up and over the filling, pulling it tightly. Fold in both left and right sides toward the center, then continue rolling from bottom to top, keeping the sides tucked in as you go. Roll tightly but gently to avoid tearing the tortilla.
Step 6: Optional Toasting Step
For extra deliciousness, place the wrapped tortilla seam-side down in a dry skillet or panini press over medium heat. Cook for 2-3 minutes per side until golden brown with crispy grill marks. This step is optional but adds amazing texture and flavor.
Step 7: Slice and Serve
Using a sharp serrated knife, cut each wrap in half diagonally. Serve immediately, or wrap tightly in plastic wrap or foil for meal prep or packed lunches.
Notes
- Rotisserie chicken is a huge time-saver and adds extra flavor – grab one from your grocery store’s deli section.
- Pat vegetables dry with paper towels before adding to prevent soggy wraps.
- Don’t overfill! Too much filling makes wraps impossible to roll and messy to eat.
- The key to non-soggy wraps is using Roma tomatoes with seeds removed, or well-drained cherry tomatoes.
- Warm tortillas are essential – cold tortillas crack when rolled.
- For meal prep, store components separately and assemble fresh each day for best texture.
- If making wraps ahead, wrap tightly in plastic wrap to prevent them from drying out.
- Toasting the assembled wrap adds amazing texture but reduces storage time – toast only what you’ll eat immediately.
- Prep Time: 15 minutes
- Cook Time: 5 minutes
Nutrition
- Serving Size: 1 wrap
- Calories: 520
- Sugar: 4g
- Sodium: 1,240mg
- Fat: 28g
- Saturated Fat: 9g
- Unsaturated Fat: 17g
- Trans Fat: 0g
- Carbohydrates: 32g
- Fiber: 3g
- Protein: 35g
- Cholesterol: 95mg
Tips & Variations
Buffalo Chicken Bacon Ranch Wrap: Toss your cooked chicken in buffalo sauce before assembling for a spicy kick. Add crumbled blue cheese instead of cheddar for authentic buffalo flavor. This variation is perfect for game day lunches or when you’re craving something with heat.
Caesar-Style Twist: Swap ranch dressing for Caesar dressing and add fresh parmesan cheese and a handful of croutons for crunch. Use romaine hearts and add a squeeze of fresh lemon juice for that classic Caesar salad flavor in wrap form.
Avocado Lover’s Version: Add sliced avocado or mash it with a bit of lime juice and spread it on the tortilla before other ingredients. The creamy avocado complements the bacon beautifully and adds healthy fats. You can also reduce the ranch dressing if you’re adding avocado.
Veggie-Loaded Option: Pack in extra vegetables like shredded carrots, sliced bell peppers, cucumber ribbons, or fresh spinach. This adds nutrition, color, and crunch while keeping calories in check. Red cabbage adds beautiful color and crunch.
Chipotle BBQ Variation: Mix ranch dressing with BBQ sauce and a touch of chipotle in adobo for a smoky, tangy flavor. Add corn kernels and black beans for a southwestern twist. Pepper jack cheese works perfectly with this variation.
Lighter Version: Use Greek yogurt ranch dressing, turkey bacon, and whole wheat tortillas to reduce calories and fat while maintaining flavor. Add extra lettuce and vegetables to bulk up the wrap without adding many calories.
Breakfast Style: Use scrambled eggs instead of chicken breast, and add hash browns inside the wrap for a hearty breakfast version. This works beautifully with bacon, cheese, and ranch.
Club Wrap Variation: Add sliced turkey along with the chicken and bacon, plus extra lettuce and tomato for a club sandwich-inspired wrap.
Pro Chef Tips
The Chicken Game-Changer: Season your chicken generously before cooking, and here’s the professional secret – let it come to room temperature for 15 minutes before cooking. This ensures even cooking throughout and prevents the dreaded dry, overcooked exterior with raw center. After cooking, always let chicken rest for 5 minutes before slicing. This allows the juices to redistribute throughout the meat rather than running out onto your cutting board, keeping every bite moist and flavorful.
Bacon Perfection: The secret to consistently crispy bacon is baking it in the oven rather than pan-frying. Line a rimmed baking sheet with foil, arrange bacon strips in a single layer without overlapping, and bake at 400°F for 15-20 minutes. This method cooks bacon evenly, reduces splatter, and allows you to cook a whole pound at once. For wrap purposes, you want bacon crispy enough to crumble easily but not so crispy it’s burnt – aim for deep golden brown.
The Moisture Control Technique: Professional sandwich makers know that moisture is the enemy of good wraps. After washing lettuce, use a salad spinner or pat completely dry with paper towels. For tomatoes, cut them in half, squeeze gently to remove seeds and gel, then dice. This simple step prevents 90% of soggy wrap issues. If using cucumbers, peel and deseed them as well.
Temperature Matters: Everything in your wrap should be at similar temperatures. Cold chicken straight from the fridge mixed with room-temperature tortillas and warm bacon creates condensation, which leads to sogginess. Either let all ingredients come to room temperature before assembling, or have everything chilled. Room temperature generally provides the best flavor.
The Rolling Technique: Professional wrap makers use this method: create a tight cylinder with your first roll of the bottom edge over the filling, fold in the sides, then continue rolling while applying gentle downward pressure. Think of it like rolling a sleeping bag – tight and compact. The tighter your initial roll, the easier the rest of the rolling process becomes.
Ranch Dressing Placement Strategy: Instead of drowning the wrap in ranch, use it strategically. Spread a thin layer on the tortilla first (this helps everything stick), then add your fillings, and finish with a light drizzle on top. This distributes flavor throughout without making things soggy or causing ranch to squirt out when you bite in.
Common Mistakes to Avoid
Using Cold Tortillas: This is the number one mistake home cooks make with wraps. Cold tortillas are stiff and crack easily when you try to roll them. Always warm them for 10-15 seconds in the microwave or in a dry skillet. Room temperature is the minimum – slightly warm is ideal. The tortilla should be soft and pliable, almost like fabric.
Overfilling the Wrap: We’ve all been there – you want to pack in as much deliciousness as possible, but overfilled wraps are impossible to roll, fall apart when you eat them, and generally create a frustrating experience. Use about ¾ to 1 cup of total filling per wrap. It feels like less than you want, but it’s the right amount for a properly rolled wrap that actually stays together.
Placing Ingredients All the Way to the Edges: Leave at least 2 inches of bare tortilla on the left and right sides, and about 1 inch on the bottom. This border area is essential for the folding and rolling process. If you spread ingredients to the edges, they’ll squeeze out the sides when you roll, creating a mess.
Not Patting Ingredients Dry: Wet lettuce, tomatoes with excess juice, or chicken that hasn’t been drained properly will absolutely ruin your wrap. Take the extra 30 seconds to pat everything dry with paper towels. This simple step is the difference between a wrap that holds together beautifully and one that falls apart into a soggy mess.
Slicing Too Soon: If you slice your wrap immediately after rolling, all the ingredients shift and the wrap can fall apart. Let it rest seam-side down for 2-3 minutes before cutting. This allows the tortilla to seal slightly and everything to settle. When you do cut, use a sharp serrated knife and a gentle sawing motion rather than pressing straight down, which can squash the wrap and push out the filling.
Storage & Meal Prep
Chicken bacon ranch wraps are excellent for meal prep with the right approach. For the best results, prepare all components separately and store them in individual airtight containers in the refrigerator. Cooked chicken will last 3-4 days refrigerated, cooked bacon stays fresh for up to 5 days, and prepped vegetables (washed, dried, and chopped) last 3-4 days when stored properly.
For fully assembled wraps, they can be stored in the refrigerator for up to 24 hours when wrapped tightly in plastic wrap or aluminum foil. However, the texture is always better when assembled fresh. The tortilla tends to absorb moisture from the filling over time, becoming somewhat soggy, though it’s still perfectly edible and delicious.
If you must assemble wraps in advance, here’s the pro technique: wrap them as tightly as possible in plastic wrap, eliminating all air pockets. This prevents the tortilla from drying out while also minimizing moisture migration from the filling to the tortilla. Store them in the refrigerator seam-side down.
For meal prep success, try this system: On Sunday, cook a batch of chicken breasts and a pound of bacon. Prep all your vegetables (wash, dry, chop, store separately). Each morning, it takes just 3-4 minutes to assemble a fresh wrap with all components ready to go. This gives you the convenience of meal prep with the quality of freshly assembled wraps.
Cooked chicken can be frozen for up to 3 months in an airtight freezer bag. Thaw overnight in the refrigerator before using. Bacon can also be frozen after cooking – separate pieces with parchment paper so you can grab just what you need. Both should be brought to room temperature before assembling wraps for the best flavor and texture.
Never leave assembled wraps at room temperature for more than 2 hours (1 hour if the temperature is above 90°F). Chicken and bacon are both proteins that can harbor bacteria when left in the temperature danger zone. When packing for lunch, always use an insulated lunch bag with an ice pack to keep wraps safely chilled.
Make-Ahead & Freezer Notes
Chicken bacon ranch wraps are fantastic for make-ahead meal planning, though fully assembled wraps don’t freeze well due to the lettuce, tomatoes, and ranch dressing, which all become watery and unappetizing when thawed. However, you have several excellent make-ahead options that work beautifully.
Best Make-Ahead Strategy: Cook your chicken and bacon up to 3 days in advance. Store the cooked, diced chicken in an airtight container in the refrigerator, and keep crumbled bacon in a separate container. Prep your vegetables (wash, dry, chop lettuce, slice tomatoes, slice onions) and store each in separate containers with paper towels to absorb excess moisture. In the morning or whenever you need a wrap, assembly takes just 3 minutes with everything prepped.
Freezer-Friendly Components: While assembled wraps don’t freeze well, individual components do. Cooked, seasoned chicken breast can be frozen for up to 3 months. Dice or shred it first, then freeze in portion-sized amounts (about ½ cup per portion). Cooked bacon freezes beautifully for up to 2 months – lay crumbled bacon on a parchment-lined baking sheet, freeze until solid, then transfer to a freezer bag. This way you can grab just what you need without thawing the entire batch.
Semi-Assembled Option: Some people successfully freeze wraps without the wet ingredients. Assemble wraps with only chicken, bacon, and cheese, wrap tightly in plastic wrap then aluminum foil, and freeze for up to 1 month. When ready to eat, thaw overnight in the refrigerator, then add fresh lettuce, tomatoes, and ranch dressing before eating. While this works, the tortilla texture isn’t quite as good as fresh.
Reheating from Frozen: If you’ve frozen wraps with cooked components only (no vegetables or dressing), unwrap and microwave for 1-2 minutes until warmed through, then add fresh vegetables and ranch. Alternatively, thaw overnight in the refrigerator and enjoy cold, or toast in a panini press after thawing for 3-4 minutes.
The Best Approach: For regular meal prep, the refrigerator storage method (prepped components, daily assembly) is far superior to freezing. Save freezing for times when you’ve cooked extra chicken or bacon and want to preserve it for future use rather than trying to freeze complete wraps.
Serving Suggestions
Chicken bacon ranch wraps are substantial enough to be a complete meal on their own, but the right sides and accompaniments can elevate them into a truly satisfying dining experience. These wraps pair beautifully with crispy, crunchy sides that contrast with the soft tortilla and creamy filling.
Classic sides include crispy french fries, sweet potato fries, or homemade kettle chips for that restaurant-style experience. For a healthier option, serve with baked zucchini chips, carrot sticks with hummus, or a fresh cucumber and tomato salad dressed with olive oil and lemon. A simple side salad with mixed greens, cherry tomatoes, and vinaigrette complements the rich wrap perfectly.
Soup pairings work wonderfully, especially for cooler months. Tomato soup creates a nostalgic soup-and-sandwich combination, while chicken noodle soup, broccoli cheddar soup, or loaded potato soup all make excellent accompaniments. For lighter fare, serve with a chilled gazpacho or cucumber soup in summer.
Fruit provides a refreshing contrast to the savory wrap – try fresh watermelon slices, grapes, apple slices with peanut butter, or a tropical fruit salad. The natural sweetness cleanses your palate between bites of the rich, creamy wrap.
For beverages, these wraps pair well with iced tea (sweetened or unsweetened), fresh lemonade, sparkling water with lime, or a cold beer if serving at a casual gathering. For a non-alcoholic option, try Arnold Palmers (half iced tea, half lemonade) or flavored sparkling waters.
These wraps are perfect for various occasions: packed lunches for work or school, casual weeknight dinners, game day gatherings, picnics in the park, tailgate parties, or light summer meals on the patio. They’re also excellent for serving at casual get-togethers – make a wrap bar with all the components and let guests build their own.
For a complete meal spread, serve alongside pasta salad, coleslaw, three-bean salad, or pickles and olives. The acidic, tangy sides cut through the richness of the bacon and ranch beautifully.
FAQs Section
Can I make these wraps without cooking chicken from scratch?
Absolutely! Rotisserie chicken from the grocery store is perfect for this recipe and saves significant time. Simply shred or dice the breast meat and you’re ready to go. Leftover grilled chicken, poached chicken, or even canned chicken breast (drained well) work in a pinch. Pre-cooked chicken strips from the freezer section also work, though check the seasoning as some are heavily flavored. Just make sure any pre-cooked chicken is heated through if you’re assembling warm wraps.
What’s the best way to keep wraps from getting soggy?
The triple defense against soggy wraps: First, thoroughly dry all vegetables with paper towels before adding them. Second, remove seeds from tomatoes as they contain most of the moisture. Third, don’t overdo the ranch dressing – 2-3 tablespoons per wrap is plenty. For maximum freshness, assemble wraps within a few hours of eating rather than the night before. The lettuce acts as a barrier between wet ingredients and the tortilla, which also helps significantly.
Can I make these wraps low-carb or keto-friendly?
Yes! Use low-carb tortillas (brands like Mission Carb Balance offer options with only 6g net carbs), or skip the tortilla entirely and make it a loaded salad bowl or wrap it in large lettuce leaves. You can also use coconut wraps or cheese wraps for keto versions. Make sure your ranch dressing doesn’t contain added sugars – read labels carefully or make homemade ranch with full-fat sour cream and mayo.
How do I prevent my tortilla from cracking when I roll it?
Cold tortillas are the main culprit. Warm them in the microwave for 10-15 seconds or in a dry skillet for 10 seconds per side before assembling. The tortilla should feel soft and pliable, almost like fabric. Also, make sure you’re not overfilling the wrap, as too much filling stretches the tortilla beyond its capacity and causes tears. Finally, fold gently but firmly – aggressive rolling can crack even warm tortillas.
Can I prepare these for a crowd or party?
Definitely! For parties, set up a wrap bar with all components in separate bowls and let guests build their own. If you’re assembling them yourself, you can make wraps up to 4 hours ahead. Wrap each one tightly in plastic wrap and refrigerate. For a party presentation, cut each wrap diagonally into 2-3 pieces and arrange them standing up on a platter, cut-side up so guests can see the colorful fillings. Mini wrap pinwheels are also great for parties – tightly roll wraps, slice into 1-inch rounds, and secure each with a toothpick.
What can I substitute for ranch dressing if I don’t have any?
Caesar dressing is the closest substitute and works beautifully. Other options include blue cheese dressing, honey mustard dressing, or a mixture of mayo and sour cream with garlic powder and dried herbs. For a lighter option, try hummus or tzatziki sauce, though these change the flavor profile. You can also make quick ranch by mixing sour cream or Greek yogurt with dried ranch seasoning mix and a splash of milk to thin it.
How long do chicken bacon ranch wraps last in the refrigerator?
Fully assembled wraps last about 24 hours in the refrigerator when wrapped tightly, though they’re best within 12 hours. Individual components last much longer: cooked chicken lasts 3-4 days, bacon lasts up to 5 days, and prepped vegetables last 3-4 days when stored separately. For best quality with meal prep, store components separately and assemble fresh wraps each day. If you notice the wrap becoming soggy or the ingredients smelling off, discard it.
Conclusion
The chicken bacon ranch wrap is one of those magical recipes that checks every box: quick, delicious, satisfying, versatile, and perfect for nearly any occasion. Whether you’re a busy parent packing school lunches, a professional looking for meal prep solutions, or someone who just loves the unbeatable combination of tender chicken, crispy bacon, and creamy ranch dressing, this wrap delivers every single time.
What makes this recipe truly special is how forgiving and adaptable it is. Forgot to buy tomatoes? No problem. Want to add avocado? Go for it. Prefer turkey to chicken? It works beautifully. This wrap grows with you, adapting to whatever ingredients you have on hand and whatever dietary preferences your family might have. It’s the kind of recipe that becomes a comfortable friend in your cooking rotation, reliable and always satisfying.
I can’t wait to hear how your chicken bacon ranch wraps turn out! Did you add any special ingredients or creative twists? Do you have a favorite way to customize them? Drop a comment below and share your experience – I love hearing from readers and learning about your variations. If you enjoyed this recipe, please give it a rating and share it on Pinterest using the save button. Your friends and family will thank you when they discover their new favorite lunch!
Now grab those tortillas and get wrapping – your taste buds are in for a treat!