Veggie Rainbow Wrap Recipe: Colorful, Fresh, and Absolutely Delicious

The veggie rainbow wrap is a stunning, nutrient-packed meal that celebrates vegetables in all their colorful glory! This vibrant wrap features a beautiful array of fresh vegetables—red bell peppers, orange carrots, yellow corn, green spinach, purple cabbage, and more—all wrapped up in a soft tortilla with creamy hummus or your favorite spread. The combination of crunchy, fresh vegetables with creamy dressing creates an irresistible texture and flavor experience that’s both satisfying and refreshing. This colorful vegetable wrap is perfect for countless occasions: pack it for work lunches where you need something that looks as good as it tastes, make it for quick weeknight dinners when you want to eat more vegetables, prepare it for meal prep Sundays to have rainbow-perfect lunches all week, serve it at gatherings where the stunning presentation wows guests, create it as a kid-friendly way to get children excited about vegetables, or whip it up when you’re craving something fresh, healthy, and visually stunning. The beauty of this healthy rainbow wrap recipe lies in its incredible versatility—it’s naturally vegan and vegetarian, completely customizable to whatever vegetables you have on hand, comes together in just 15 minutes with zero cooking required, and delivers serious nutrition with fiber, vitamins, and minerals from the rainbow of vegetables. Whether you’re a plant-based eater seeking creative lunch ideas, a parent trying to get kids excited about vegetables, someone who loves Instagram-worthy food, or simply a wrap enthusiast looking for the ultimate healthy meal, this easy veggie wrap delivers incredible flavor, satisfying crunch, gorgeous colors, and pure wholesome goodness in every single bite!
History / Background
The veggie rainbow wrap is a relatively modern creation that emerged from the confluence of several important food movements: the rise of vegetarian and vegan eating, the “eat the rainbow” nutrition philosophy, the wrap sandwich trend of the 1990s, and the social media-driven emphasis on visually stunning food. Understanding this wrap’s background requires exploring each of these fascinating developments.
The concept of “eating the rainbow” became prominent in nutritional science during the 1990s and 2000s as researchers discovered that differently colored fruits and vegetables contain different phytonutrients, each offering unique health benefits. Red foods contain lycopene and anthocyanins, orange and yellow foods provide beta-carotene and vitamin C, green foods offer chlorophyll and lutein, blue and purple foods contain anthocyanins, and white foods provide allicin and other compounds. Nutritionists began encouraging people to eat a variety of colors to maximize nutrient intake, leading to the popular phrase “eat the rainbow.”
The wrap sandwich format itself has a fascinating history. While rolled sandwiches have existed in various cultures for centuries—from Middle Eastern shawarma to Mexican burritos to Vietnamese spring rolls—the modern American wrap sandwich emerged in California in the 1990s as part of the health-conscious eating movement. Wraps were marketed as lighter alternatives to traditional sandwiches made with thick bread. The thin tortilla or flatbread offered a vehicle for showcasing fresh ingredients, particularly vegetables, without the heaviness of bread.
Vegetarian and vegan eating movements gained significant momentum in the 2000s and 2010s, driven by concerns about health, animal welfare, and environmental sustainability. As more people adopted plant-based diets, there was growing demand for satisfying, portable, vegetable-focused meals. Wraps emerged as an ideal format—they could be packed with vegetables, provided enough substance to be filling, and were easily transportable.
The specific concept of the “rainbow wrap” likely emerged in the mid-2010s, coinciding with the rise of Instagram and Pinterest as major food platforms. Food bloggers and health influencers began creating visually stunning dishes designed to photograph beautifully. The rainbow wrap, with its vibrant array of colorful vegetables arranged in visible stripes or sections, became a social media sensation. It was the perfect combination: healthy, beautiful, shareable, and genuinely delicious.
The rainbow wrap also reflects the broader “bowl food” trend—Buddha bowls, grain bowls, poke bowls—where ingredients are arranged in visually appealing sections rather than mixed together. This presentation style allows each component to shine individually while creating an aesthetically pleasing whole. The rainbow wrap applies this same principle in a portable format.
Health food cafes, juice bars, and fast-casual restaurants quickly adopted rainbow wraps as menu staples, appealing to health-conscious customers seeking nutritious, Instagram-worthy meals. By the late 2010s, the rainbow wrap had become a staple in meal prep containers, school lunch boxes, and home kitchens across America.
Today, the veggie rainbow wrap represents modern healthy eating at its most appealing: nutritious without being boring, beautiful without being complicated, and accessible to everyone regardless of dietary restrictions. It’s proof that eating well can be colorful, creative, and genuinely exciting.
Why You’ll Love This Recipe
This veggie rainbow wrap recipe shows you exactly how to create those stunning, Instagram-worthy wraps at home with simple techniques and readily available vegetables! While it might seem straightforward—just chop vegetables and roll them up—there are actually specific methods that make the difference between a mediocre wrap and an exceptional one: selecting the right mix of vegetables for color, texture, and flavor balance, preparing vegetables so they’re crisp without being watery, layering strategically for both visual appeal and structural integrity, and rolling tightly so everything stays together beautifully.
What makes this particular approach to the colorful vegetable wrap special is the attention to creating both stunning presentation and delicious flavor. We’re not just randomly throwing vegetables in a tortilla—we’re thinking about color placement for maximum visual impact, flavor combinations that work together harmoniously, texture variety for interesting bites, and assembly techniques that create a wrap that’s as functional as it is beautiful.
Here’s why this healthy rainbow wrap will become your new favorite meal:
- Ready in 15 Minutes – No cooking required, just chop and roll!
- Naturally Vegan & Vegetarian – Plant-based perfection everyone can enjoy
- Instagram-Worthy – Stunning presentation that’s Pinterest-perfect
- Kid-Friendly – Children love the colorful, fun presentation
- Incredibly Nutritious – Packed with fiber, vitamins, and minerals
- Endlessly Customizable – Use whatever vegetables you have or love
- Perfect for Meal Prep – Make multiple wraps for the whole week
- Budget-Friendly – Vegetables are affordable and go far
- Gluten-Free Option – Use gluten-free tortillas
- Low-Calorie – Filling and satisfying without heavy calories
- No Special Skills Required – Simple enough for anyone to make
- Fresh & Crunchy – Satisfying texture that keeps you coming back
Ingredient Notes
This wrap showcases fresh vegetables where variety creates the rainbow!
Large Tortillas: Your wrap foundation! Flour tortillas are traditional and soft, whole wheat adds fiber and holds up well, spinach tortillas add green color, tomato or sun-dried tomato wraps add red hues. Size: Use large 10-12 inch “burrito-size” tortillas for proper wrapping. Gluten-free: Many excellent gluten-free wraps available. Low-carb option: Use large collard green leaves or lettuce leaves as wraps!
Hummus or Spread: The creamy binding element! Plain hummus is classic and protein-rich, roasted red pepper hummus adds color, garlic hummus brings extra flavor, avocado creates creaminess, cream cheese (if not vegan) works beautifully. Amount: About 3-4 tablespoons per wrap. Purpose: Acts as moisture barrier and adds flavor. Substitution: Mashed avocado, tzatziki, ranch dressing, or nut butter.
Rainbow of Vegetables (aim for 6-7 colors):
- Red: Red bell pepper strips (sweet, crunchy), cherry tomatoes halved (juicy), red cabbage shredded (crunchy, slightly peppery)
- Orange: Shredded carrots (sweet, crunchy), orange bell pepper strips (sweet, mild)
- Yellow: Yellow bell pepper strips (sweet, crisp), corn kernels (sweet, juicy), yellow cherry tomatoes
- Green: Spinach leaves or mixed greens (mild, nutritious), cucumber slices (refreshing, hydrating), avocado slices (creamy, rich), snap peas (sweet, crunchy)
- Purple: Purple cabbage shredded (crunchy, mild), red onion thinly sliced (sharp, can soak in water to mellow)
- White: Jicama strips (crunchy, slightly sweet), cauliflower florets thinly sliced (mild, crunchy)
Tip: Choose 5-7 different colored vegetables for maximum rainbow effect!
Optional Protein Add-Ins:
- Chickpeas (roasted or plain)
- Black beans
- Grilled tofu
- Tempeh strips
- Quinoa
- Hemp seeds or sunflower seeds
Optional Flavor Boosters:
- Fresh herbs (cilantro, basil, parsley)
- Sprouts (alfalfa, broccoli)
- Pickled vegetables
- Lime juice
- Everything bagel seasoning
Equipment Needed
This no-cook recipe requires minimal kitchen tools!
- Sharp knife (for slicing vegetables)
- Cutting board (large one is helpful)
- Vegetable peeler (for carrots)
- Grater or box grater (for shredding carrots and cabbage)
- Paper towels (for drying vegetables)
- Small bowl (for hummus or spread)
- Plate (for assembling wraps)
- Plastic wrap or parchment paper (for wrapping finished wraps)
That’s it! Zero cooking equipment needed—just prep tools.
Print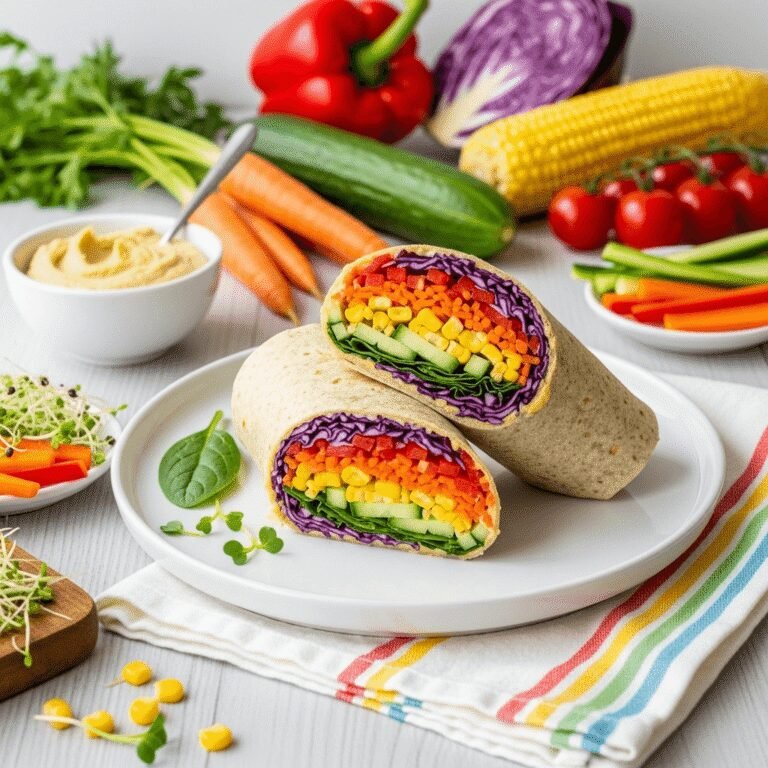
Veggie Rainbow Wrap Recipe
Vibrant veggie rainbow wrap packed with colorful fresh vegetables, creamy hummus, and crisp greens wrapped in a soft tortilla. A stunning, nutritious, Instagram-worthy lunch ready in just 15 minutes with no cooking required!
- Total Time: 15 minutes
- Yield: 2 wraps 1x
Ingredients
For the Wraps:
- 2 large tortillas (10-12 inch, flour, whole wheat, spinach, or gluten-free)
- 6 tablespoons hummus (plain, roasted red pepper, or garlic)
Rainbow Vegetables (choose 5-7 colors):
- Red: ½ red bell pepper, thinly sliced into strips + 6 cherry tomatoes, halved
- Orange: ½ cup shredded carrots
- Yellow: ¼ cup corn kernels (fresh, frozen-thawed, or canned-drained)
- Green: 1 cup fresh spinach leaves + ¼ cucumber, thinly sliced
- Purple: ½ cup purple cabbage, thinly shredded
- Optional White: ¼ cup jicama or cauliflower, thinly sliced
Optional Add-Ins:
- ½ avocado, sliced (adds green and creaminess)
- ¼ cup chickpeas
- 2 tablespoons sunflower seeds
- Fresh herbs (cilantro, basil)
- Sprouts
- Squeeze of lime juice
Instructions
Prepare the Vegetables:
- Wash Everything: Thoroughly wash all vegetables under cool running water. Pat dry with paper towels—this is crucial for preventing soggy wraps!
- Prep Red Vegetables: Slice red bell pepper into thin strips (about ¼-inch wide). Halve cherry tomatoes. Set aside.
- Prep Orange Vegetables: Peel carrots if desired, then shred using a box grater or vegetable peeler to create thin ribbons. Place on paper towel to absorb any moisture.
- Prep Yellow Vegetables: If using fresh corn, cut kernels off the cob. If using frozen, thaw and pat dry. If using canned, drain and rinse thoroughly, then pat dry.
- Prep Green Vegetables: Wash spinach and dry completely (use salad spinner or pat with paper towels). Slice cucumber into thin rounds, then pat dry with paper towels.
- Prep Purple Vegetables: Thinly shred purple cabbage. If you find raw cabbage too crunchy, you can massage it with a pinch of salt for 1-2 minutes to soften slightly.
- Prep Optional Vegetables: If using jicama, peel and slice into thin matchsticks. If using avocado, slice just before assembling to prevent browning.
Assemble the Wraps:
- Warm the Tortilla (Optional): For easier rolling, warm tortillas for 10-15 seconds in the microwave (wrapped in damp paper towel) or briefly in a dry skillet. This makes them more pliable and less likely to crack.
- Lay Out Tortilla: Place one tortilla on a clean work surface or large plate.
- Spread Hummus: Spread 3 tablespoons of hummus evenly over the entire tortilla, leaving about a 1-inch border clear around the edges. The hummus acts as both flavor and a moisture barrier that helps prevent sogginess.
- Layer Vegetables in Rainbow Order: This is where the magic happens! Arrange vegetables in horizontal strips across the center of the tortilla, creating rainbow stripes. Start about 2 inches from the bottom edge and layer as follows:
- Red strip: Lay red bell pepper strips and cherry tomato halves
- Orange strip: Add a line of shredded carrots
- Yellow strip: Sprinkle corn kernels in a line
- Green strip: Layer spinach leaves and cucumber slices
- Purple strip: Add shredded purple cabbage
- Add Optional Ingredients: If using avocado, chickpeas, seeds, or herbs, tuck them into the vegetable layers now.
- Fold and Roll: Here’s the technique for a beautiful, tight wrap:
- Fold the bottom edge (closest to you) up and over the vegetables, pulling it tight to enclose the filling
- Fold in the left and right sides toward the center
- Continue rolling away from you, keeping tension so the wrap stays tight
- The final roll should seal at the top
- Slice and Serve: Using a sharp knife, slice the wrap in half diagonally. This reveals the beautiful rainbow layers inside! Serve immediately, or wrap tightly in plastic wrap or parchment paper.
- Repeat: Make the second wrap with remaining ingredients.
Notes
- Dry Vegetables: Cannot emphasize enough—thoroughly dry all vegetables after washing! Moisture is the enemy of a good wrap.
- Rainbow Arrangement: For the most Instagram-worthy presentation, arrange vegetables in distinct horizontal stripes rather than mixing them together.
- Tortilla Choice: Whole wheat or spinach tortillas hold up better to moisture and are sturdier than white flour tortillas.
- Make it Protein-Rich: Add chickpeas, quinoa, or grilled tofu for extra protein and staying power.
- Storage: Components store well separately for 3-4 days. Assembled wraps are best eaten within 4-6 hours but can last up to 1 day refrigerated.
- Rolling Tight: The tighter you roll initially, the easier the wrap is to eat and the better the rainbow layers stay distinct.
- Prep Time: 15 minutes
- Cook Time: 0 minutes
Nutrition
- Serving Size: 1 wrap
- Calories: 295
- Sugar: 8g
- Sodium: 520mg
- Fat: 9g
- Saturated Fat: 1g
- Unsaturated Fat: 7g
- Trans Fat: 0g
- Carbohydrates: 45g
- Fiber: 9g
- Protein: 10g
- Cholesterol: 0mg
Tips & Variations
Mediterranean Rainbow: Use roasted red pepper hummus, add Kalamata olives, crumbled feta cheese (if not vegan), cucumber, tomatoes, and red onion for Greek-inspired flavors.
Asian-Inspired Rainbow: Use peanut sauce or almond butter instead of hummus, add edamame, shredded carrots, purple cabbage, snap peas, and top with sesame seeds and cilantro.
Mexican Rainbow: Use black bean spread or refried beans instead of hummus, add corn, black beans, bell peppers, lettuce, tomatoes, avocado, and a squeeze of lime.
Protein-Packed: Add grilled tofu, tempeh bacon, chickpeas, or quinoa for extra protein and substance that keeps you fuller longer.
Creamy Avocado: Mash avocado with lime juice and use it as your spread instead of hummus for ultra-creamy, healthy fats.
Crunchy Nut Version: Add almond butter or sunflower seed butter as your spread, then top vegetables with chopped nuts or seeds for extra crunch and healthy fats.
Spicy Rainbow: Add sliced jalapeños, use spicy hummus, and drizzle with sriracha or hot sauce for a kick.
Ranch Rainbow: Use ranch dressing (vegan if desired) instead of hummus for a familiar, kid-friendly flavor.
Grain Bowl Wrap: Add cooked quinoa, brown rice, or farro to make it heartier and more filling.
Lettuce Wrap: For ultra-low-carb, use large collard green leaves or butter lettuce leaves as your “wrap” instead of tortillas.
Pro Chef Tips
The Mandoline Secret: Professional chefs use a mandoline slicer to create perfectly uniform, paper-thin vegetable slices that layer beautifully and create stunning visual presentation. Consistent thickness ensures even texture throughout the wrap and makes rolling easier. If you don’t have a mandoline, use your sharpest knife and take your time—thin, even slices are worth the effort!
Color Contrast Matters: When arranging your rainbow, place colors strategically for maximum visual impact. Put complementary colors next to each other (red next to green, orange next to purple) to make each color pop. This isn’t just about beauty—it actually makes the wrap more appetizing and satisfying to eat!
The Massage Technique: For raw vegetables that can be tough (like cabbage or kale), professional cooks massage them with a tiny bit of salt or lemon juice for 2-3 minutes. This breaks down cell walls, making them more tender, easier to chew, and more pleasant in wraps. Rinse off excess salt afterward and pat dry.
Hummus Distribution: Restaurant wrap makers know to spread hummus ALL THE WAY to the edges of the tortilla, not just in the center. This creates a moisture barrier around the entire wrap, prevents ingredients from sliding out the ends, and ensures flavor in every single bite. Edge-to-edge coverage is key!
The Tight First Fold: The secret to wraps that hold together perfectly is that very first fold. After arranging vegetables, fold the bottom edge up and pull it TIGHT over the filling, really tucking it under the vegetables before folding in the sides. This creates tension and compression that keeps everything secure. Professional wrap artists never skip this crucial step!
Strategic Layering: Put sturdier, drier vegetables (like bell peppers and cabbage) directly against the hummus, and save wetter items (like tomatoes and cucumber) for the middle layers where they’re surrounded and protected. This architectural approach prevents moisture from reaching the tortilla, keeping wraps fresh for hours longer.
Room Temperature Vegetables: Cold vegetables straight from the refrigerator can make wraps taste dull and create condensation that makes things soggy. If time allows, let vegetables come to room temperature for 10-15 minutes before assembling. The flavors are brighter and more vibrant, and you’ll avoid the moisture condensation issue.
Common Mistakes to Avoid
Wet Vegetables: The number one mistake! Using freshly washed vegetables that are still dripping wet guarantees a soggy, falling-apart wrap within an hour. Always dry vegetables thoroughly with paper towels or a salad spinner. For particularly watery vegetables like tomatoes and cucumber, place slices on paper towels for 5 minutes to draw out excess moisture, then pat dry again before using.
Overfilling the Wrap: Piling too many vegetables creates a wrap that’s impossible to roll properly, causes ingredients to fall out from the ends, and makes eating messy. Be generous but reasonable—about ¾ to 1 cup total vegetables per wrap is the sweet spot. You want a balanced, easily-eaten wrap, not an overstuffed burrito that requires a plate!
Uneven Vegetable Sizes: Chopping vegetables in different sizes—some in big chunks, others finely diced—creates an uneven eating experience and makes rolling difficult. Aim for consistency: thin, uniform slices or strips that are similar in size. This ensures even distribution, easier rolling, and a better bite every single time.
Skipping the Spread: Trying to make a wrap with just dry vegetables (no hummus, avocado, or other spread) results in a bland, difficult-to-eat wrap where ingredients fall out. The spread is essential—it adds flavor, moisture, acts as an adhesive to hold vegetables together, and creates a barrier that prevents sogginess. Don’t skip it!
Cold, Stiff Tortillas: Attempting to roll cold tortillas straight from the refrigerator causes cracking, tearing, and frustration. Always warm tortillas for 10-15 seconds before rolling—they become pliable, soft, and cooperative. This simple step prevents broken wraps and makes assembly so much easier.
Random Vegetable Placement: Just throwing vegetables in randomly (no rainbow arrangement) not only looks less appealing but actually affects the eating experience. Strategic layering creates distinct flavors and textures in each bite, while random mixing can create pockets that are all carrots or all cabbage. Take 30 seconds to arrange thoughtfully—it makes a difference!
Storage & Meal Prep
Component Storage (Best Approach): For optimal freshness, store prepared vegetables separately:
- Chopped vegetables: Store each color in separate small containers or dividers in one large container, 3-4 days
- Greens: Wrap in paper towels, store in container, 5-7 days
- Hummus: Store in airtight container, 5-7 days
- Tortillas: Room temperature or refrigerated
- Assemble: Fresh each morning in under 5 minutes
Assembled Wrap Storage: If you must assemble wraps ahead, wrap them VERY tightly in plastic wrap or parchment paper, then refrigerate. They’ll stay reasonably fresh for 4-6 hours, though the vegetables will soften slightly. For best results, eat within the same day.
Meal Prep Strategy: On Sunday, wash, dry, and chop all vegetables. Portion them into individual servings in small containers or use a divided container. Each morning, assembly takes just 3-5 minutes. This gives you convenience without sacrificing the crisp, fresh texture!
Lunchbox Packing: Pack wrapped wraps with a small ice pack to keep them cold. The vegetables stay crisper when chilled. If possible, store any wet ingredients (like tomatoes) separately and add them right before eating for maximum freshness.
Preventing Browning: If using avocado, slice it fresh the day you’re making the wrap, or store cut avocado with lemon or lime juice and plastic wrap pressed directly against the surface to minimize air exposure and browning.
Make-Ahead & Freezer Notes
Make-Ahead Success: The beauty of this wrap is that you can prep everything ahead! Wash, dry, and chop all vegetables up to 3-4 days in advance. Store them in airtight containers in the refrigerator. When you’re ready to eat, assembly takes just minutes. This makes rainbow wraps perfect for weekly meal prep.
Hummus Prep: Hummus can be made homemade up to 5 days ahead, or store-bought hummus keeps for the expiration date on the container. Portion it into small containers for grab-and-go convenience.
Freezing Vegetables: While most fresh raw vegetables don’t freeze well for eating raw (they become mushy and watery when thawed), you can freeze cooked grains like quinoa or chickpeas if you’re adding protein to your wraps. These freeze beautifully for up to 3 months.
Freezing Assembled Wraps: Unfortunately, assembled veggie rainbow wraps do NOT freeze well. The vegetables become soggy, limp, and watery when thawed. The texture is completely ruined. Don’t freeze assembled wraps!
Best Strategy: Keep your pantry stocked with tortillas and hummus, keep prepped vegetables in the fridge, and assemble wraps fresh as needed. Since there’s no cooking involved, “fresh” only means 5 minutes of assembly time—totally manageable even on busy mornings!
Serving Suggestions
Hummus and Pita: Serve with extra hummus and pita chips or pita bread for dipping and scooping.
Fresh Fruit: Pair with apple slices, grapes, berries, melon, or a fresh fruit salad for sweet balance.
Vegetable Chips: Add baked vegetable chips, sweet potato chips, or kale chips for extra crunch.
Soup Pairing: Serve with tomato soup, lentil soup, or minestrone for a hearty, comforting lunch combo.
Side Salad: A simple cucumber salad, coleslaw, or mixed green salad complements beautifully.
Pickled Vegetables: Add pickles, pickled onions, or kimchi for tangy, probiotic-rich sides.
Guacamole: Serve with guacamole and veggie sticks or chips for extra healthy fats.
Edamame: Steamed edamame with sea salt adds protein and makes a perfect side.
Beverage Pairings: Serve with fresh-pressed juice, smoothies, coconut water, kombucha, iced herbal tea, or sparkling water with fresh fruit.
Energy Balls: Pair with homemade energy balls or protein balls for a complete, satisfying meal.
FAQs Section
Q: Can you make rainbow wraps ahead of time?
A: Yes, but with guidelines! The best approach is prepping all vegetables 3-4 days ahead, storing them separately, and assembling wraps fresh each morning (takes just 5 minutes). If you must assemble ahead, wrap very tightly in plastic wrap and refrigerate for up to 6 hours. They’re always best fresh, but morning assembly for lunch is perfectly fine!
Q: How do you keep veggie wraps from getting soggy?
A: Four essential steps: 1) Thoroughly dry all vegetables after washing—use paper towels or salad spinner; 2) Pat especially watery vegetables (cucumber, tomatoes) extra dry; 3) Spread hummus or spread edge-to-edge as a moisture barrier; 4) Layer drier vegetables against the tortilla, wetter ones in the middle. These steps keep wraps fresh for 6+ hours!
Q: What vegetables are best for rainbow wraps?
A: Choose a variety of colors and textures! Best options include: bell peppers (red, orange, yellow—sweet and crunchy), shredded carrots (orange—sweet), corn (yellow—sweet and juicy), spinach or lettuce (green—mild), cucumber (green—refreshing), purple cabbage (purple—crunchy), cherry tomatoes (red—juicy). Aim for 5-7 different colors for maximum rainbow effect and nutrition!
Q: Are rainbow wraps healthy?
A: Absolutely! Rainbow wraps are incredibly nutritious—they’re packed with fiber (aids digestion and keeps you full), vitamins and minerals from diverse vegetables (different colors provide different nutrients), low in calories yet filling, naturally low in fat (if using hummus), and provide plant-based protein. They’re perfect for weight management, boosting vegetable intake, and supporting overall health!
Q: Can you make rainbow wraps without tortillas?
A: Definitely! For low-carb options, use large collard green leaves (blanch briefly in boiling water to soften), butter lettuce leaves (use 2-3 overlapped), nori sheets for sushi-style, or rice paper for fresh spring roll versions. Each alternative creates a different texture and experience but still delivers those beautiful rainbow flavors!
Q: How do you get kids to eat rainbow wraps?
A: Kids love the colorful presentation! Let them help assemble their own wraps, choosing which vegetables and colors they want. Use cookie cutters to make fun shapes from vegetables, call it “rainbow magic” or give vegetables superhero names, offer a favorite dip (ranch, hummus), and make it interactive. The visual appeal often gets even picky eaters excited to try!
Q: Can you add protein to veggie rainbow wraps?
A: Absolutely! Add chickpeas (roasted or plain), black beans, grilled tofu or tempeh, quinoa, edamame, hard-boiled eggs (if not vegan), grilled chicken (if not vegetarian), or nut/seed butters as your spread. Each adds protein and makes the wrap more substantial and filling. Hummus itself provides some protein, but these additions boost it significantly!
Conclusion
And there you have it—everything you need to create the most beautiful, delicious, nutrient-packed veggie rainbow wrap! While this recipe might seem simple on the surface, paying attention to the details—from selecting a variety of colorful vegetables to properly drying them to arranging them strategically—transforms a basic wrap into something truly special, visually stunning, and genuinely satisfying.
This colorful vegetable wrap is proof that healthy eating doesn’t have to be boring, bland, or visually unappealing. By celebrating vegetables in all their colorful glory and presenting them in a beautiful rainbow arrangement, we create a meal that’s exciting to make, gorgeous to photograph, and absolutely delicious to eat. It’s the kind of recipe that makes eating vegetables feel like a treat rather than a chore, and it shows that nutritious food can be Instagram-worthy!
Whether you’re making this healthy rainbow wrap recipe for weekly meal prep, quick lunches, kid-friendly dinners, impressive party food, or simply because you’re craving something fresh and beautiful, this easy veggie wrap delivers every single time. It’s colorful, crunchy, creamy, satisfying, and packed with nutrition—everything a great meal should be!
Now it’s your turn to create your own edible rainbow! I’d love to hear about your experience—what vegetables did you include? Did you try any creative variations? How did your rainbow turn out? Share your thoughts, tips, and beautiful wrap photos in the comments below! Your feedback and creativity inspire other readers and help build our healthy cooking community.
Don’t forget to save this veggie rainbow wrap recipe to your Pinterest boards—pin it to “Healthy Lunch Ideas,” “Vegetarian Recipes,” “Meal Prep Recipes,” or “Kid-Friendly Meals” so you can find it whenever you need colorful lunch inspiration. If you know someone who’s trying to eat more vegetables, looking for Instagram-worthy food, or needs easy plant-based meal ideas, share this article with them. And when you make your stunning rainbow creation, snap a photo and tag me on social media—I absolutely love seeing your colorful, healthy wraps!
Now go create your own edible rainbow masterpiece—eating the rainbow never looked (or tasted) so good!