Cheesy Garlic Toast Recipe – Buttery, Crispy, and Loaded with Flavor

Get ready to fall in love with the ultimate side dish that transforms any meal into something extraordinary – Cheesy Garlic Toast! This irresistible combination of golden, buttery bread topped with melted cheese and aromatic garlic is the kind of recipe that makes everyone at the table reach for seconds (and thirds!). It’s crispy on the outside, soft and gooey on the inside, and bursting with savory, garlicky goodness in every single bite.
This homemade cheesy garlic toast takes the classic garlic bread you know and love and elevates it with a generous layer of melted cheese that gets perfectly bubbly and golden under the broiler. Whether you call it cheesy garlic bread, garlic cheese toast, or cheese garlic bread, this crowd-pleasing recipe is incredibly versatile and impossibly delicious.
Serve this easy cheesy garlic toast alongside your favorite pasta dishes like spaghetti marinara or creamy fettuccine alfredo. It’s perfect for dunking into hearty soups like tomato basil or minestrone. Pair it with a crisp Caesar salad for a light lunch, or serve it at your next game day party where it will disappear faster than you can make it. This recipe also makes an excellent appetizer for dinner parties, a satisfying after-school snack for kids, or even a quick weeknight dinner when paired with a simple salad. The possibilities are truly endless with this versatile, flavor-packed bread!
History / Background
Garlic bread has a fascinating history that spans continents and cultures, though its modern form is distinctly American-Italian in origin. While bread, butter, and garlic have been combined in various forms throughout European history, the garlic bread we know today emerged in the United States during the mid-20th century, particularly within Italian-American communities.
The concept of flavoring bread with garlic dates back centuries. Ancient Romans consumed bread rubbed with garlic, and similar preparations existed throughout the Mediterranean. However, the buttery, herb-laden version that became popular in America was largely influenced by Italian immigrants who brought their culinary traditions to the United States in the late 1800s and early 1900s.
Italian-American restaurants began serving garlic bread as a side dish in the 1940s and 1950s, and it quickly became a staple accompaniment to Italian-American cuisine. The addition of cheese – creating what we now call cheesy garlic bread – was a natural evolution that likely emerged from the American love affair with cheese and the Italian tradition of using cheese in countless dishes.
By the 1970s and 1980s, garlic bread had become firmly established in American food culture, appearing on restaurant menus across the country and in home kitchens nationwide. The cheesy variation became particularly popular as American taste preferences leaned toward richer, more indulgent comfort foods. Frozen garlic bread products began appearing in supermarkets, making this restaurant favorite accessible to home cooks everywhere.
Today, cheesy garlic toast represents the perfect fusion of Italian culinary tradition and American comfort food innovation. It’s a beloved side dish that transcends its Italian-American origins and has become a universal favorite at family dinners, potlucks, and restaurants of all types. The simple combination of bread, butter, garlic, and cheese has proven timeless, with each generation discovering and falling in love with this satisfying, aromatic bread all over again.
Why You’ll Love This Recipe
This cheesy garlic toast recipe is about to become your most-requested side dish, and for good reason. It delivers restaurant-quality results with minimal effort, using ingredients you probably already have in your kitchen. The aroma alone will have your family gathering in the kitchen before you even finish making it!
What makes this recipe truly special is the perfect balance of textures and flavors – the crispy, golden exterior gives way to soft, pillowy bread inside, while the melted cheese creates delicious gooey pockets of goodness. The garlic butter soaks into every crevice, ensuring maximum flavor in every bite.
Here’s why this cheesy garlic toast will become your go-to recipe:
- Ready in Just 15 Minutes – From start to finish, you can have hot, cheesy garlic toast on your table in a quarter of an hour
- Simple Ingredients You Already Have – Bread, butter, garlic, cheese, and a few herbs are all you need
- Incredibly Budget-Friendly – Costs just a few dollars to make enough for the whole family
- Kid-Approved Favorite – Even picky eaters can’t resist the cheesy, garlicky goodness
- Perfectly Customizable – Easy to adjust the garlic level, cheese type, and seasonings to your taste
- Impressive Yet Effortless – Looks and tastes like you spent hours in the kitchen
- Crowd-Pleasing Party Food – Always the first thing to disappear at gatherings
- Works with Any Meal – Complements pasta, soups, salads, grilled meats, and more
- No Special Skills Required – If you can spread butter and sprinkle cheese, you can make this
- Freezer-Friendly – Make extra batches and freeze for quick future meals
- Restaurant-Quality at Home – Tastes just as good (or better!) than what you’d pay $8 for at a restaurant
Ingredient Notes
Let’s break down each ingredient and understand why it matters for creating the perfect cheesy garlic toast. Knowing your ingredients helps you make smart substitutions and achieve the best possible results every time.
Bread: The foundation of great garlic toast starts with choosing the right bread. Italian bread or French bread (baguette) are the classic choices because they have the perfect texture – crusty exterior and soft, airy interior. A standard loaf of Italian bread from your grocery store bakery works beautifully. Sourdough is another excellent option that adds a tangy flavor dimension. The bread should be substantial enough to hold up to the butter and cheese without becoming soggy. Avoid thin sandwich bread, which becomes limp. For best results, use bread that’s 1-2 days old rather than fresh – slightly stale bread toasts better and absorbs the garlic butter perfectly without becoming mushy.
Butter: Unsalted butter gives you complete control over the saltiness of your garlic toast and allows the garlic flavor to shine through. Real butter (not margarine) is essential for authentic flavor and texture. The butter should be softened to room temperature, which makes it easy to mix with the garlic and spread evenly on the bread. Softened butter also helps the garlic distribute uniformly rather than clumping. If you’re in a hurry, you can soften butter quickly by cutting it into small pieces or microwaving it for just 5-10 seconds (be careful not to melt it completely).
Garlic: Fresh garlic is non-negotiable for the best flavor. The pungent, aromatic quality of fresh garlic cloves creates that characteristic garlic bread flavor we all crave. Use about 3-4 cloves for medium garlic flavor, or adjust up to 6 cloves if you’re a serious garlic lover. Minced garlic from a jar can work in a pinch, but it lacks the sharp, fresh flavor of freshly minced cloves. Garlic powder is not a good substitute here – it simply doesn’t provide the same intensity or texture. For the mildest garlic flavor, you can rub the cut side of a halved garlic clove directly on the bread instead of mixing minced garlic into the butter.
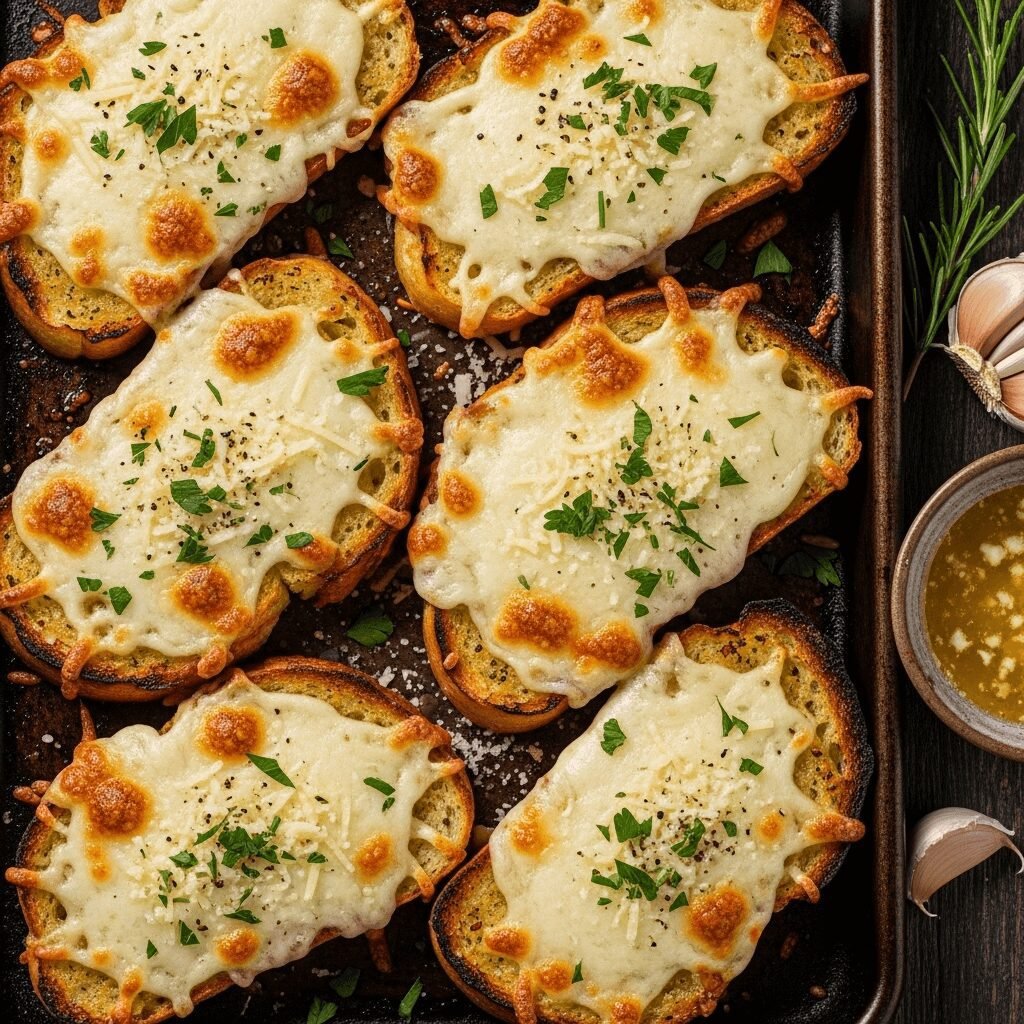
Cheese: Mozzarella is the classic choice for cheesy garlic toast because it melts beautifully, creating those irresistible cheese pulls everyone loves. Shredded mozzarella works perfectly and melts evenly across the bread. For extra flavor, try a combination of mozzarella and Parmesan – the mozzarella provides meltiness while the Parmesan adds sharp, nutty flavor. Cheddar, provolone, or Italian cheese blends also work wonderfully. Pre-shredded cheese is convenient, but freshly shredded cheese from a block melts better because it doesn’t contain anti-caking additives. Use about 1-1.5 cups of shredded cheese for a standard loaf of bread.
Herbs and Seasonings: Fresh or dried parsley adds color and a subtle herbaceous note. Italian seasoning (a blend of basil, oregano, thyme, and rosemary) enhances the Italian-American character of the dish. A small pinch of salt (if using unsalted butter) and freshly ground black pepper round out the flavors. Red pepper flakes are optional but add a nice kick if you enjoy a little heat. Fresh basil or oregano can replace dried herbs if you have them available.
Olive Oil (Optional): Adding a tablespoon of olive oil to your garlic butter mixture helps prevent the butter from hardening too much when cooled and adds a subtle richness. It’s completely optional but creates a slightly more authentic Italian flavor profile.
Equipment Needed
The beauty of this recipe is its simplicity – you need very basic kitchen equipment that you almost certainly already own. Here’s everything you’ll use:
- Baking Sheet or Sheet Pan – For arranging the bread slices and baking them in the oven
- Sharp Serrated Knife – For slicing the bread loaf cleanly without crushing it
- Cutting Board – For safely cutting the bread
- Small Mixing Bowl – For combining the butter, garlic, and seasonings
- Fork or Spoon – For mixing the garlic butter until well combined
- Butter Knife or Offset Spatula – For spreading the garlic butter evenly on the bread
- Aluminum Foil – Optional, for lining the baking sheet for easier cleanup
- Garlic Press or Microplane Grater – Makes mincing garlic quick and easy (or use a chef’s knife)
- Measuring Spoons – For accurate measurements of seasonings
- Oven Mitts – For safely handling the hot baking sheet
- Wire Cooling Rack – Optional, helps keep the bottom of the toast crispy

Cheesy Garlic Toast Recipe
Crispy, buttery Cheesy Garlic Toast loaded with melted mozzarella cheese and aromatic fresh garlic. This easy homemade garlic bread recipe is ready in just 15 minutes and pairs perfectly with pasta, soups, salads, or any meal. Restaurant-quality cheesy garlic bread made right in your own kitchen!
- Total Time: 15 minutes
- Yield: 8 servings 1x
Ingredients
- 1 large loaf Italian bread or French bread (about 16 inches long)
- ½ cup (1 stick) unsalted butter, softened to room temperature
- 4-5 cloves fresh garlic, minced (about 1½ tablespoons)
- 1½ cups shredded mozzarella cheese
- ¼ cup grated Parmesan cheese
- 2 tablespoons fresh parsley, chopped (or 2 teaspoons dried parsley)
- 1 teaspoon Italian seasoning
- ¼ teaspoon salt (adjust if using salted butter)
- ¼ teaspoon black pepper
- ⅛ teaspoon red pepper flakes (optional, for a little heat)
- 1 tablespoon olive oil (optional, for extra richness)
Instructions
Step 1: Prepare and Preheat
Position your oven rack about 6 inches from the broiler element. Preheat your oven to 400°F (200°C). Line a large baking sheet with aluminum foil or parchment paper for easy cleanup, though this step is optional.
Step 2: Slice the Bread
Using a sharp serrated knife, slice the bread loaf in half horizontally, creating two long halves with flat cut sides facing up. If your loaf is very long, you can cut it in half crosswise first to create four pieces that fit better on your baking sheet. Place the bread cut-side up on the prepared baking sheet.
Step 3: Make the Garlic Butter
In a small mixing bowl, combine the softened butter, minced garlic, parsley, Italian seasoning, salt, pepper, and red pepper flakes (if using). If using olive oil, add it now. Mix everything together with a fork or spoon until well combined and the garlic is evenly distributed throughout the butter. The mixture should be smooth and spreadable.
Step 4: Spread the Garlic Butter
Using a butter knife or offset spatula, generously spread the garlic butter mixture evenly across the cut surface of each bread half. Make sure to spread it all the way to the edges so every bite is flavorful. Don’t be shy with the garlic butter – this is what makes the toast so delicious! Press the butter into the bread slightly so it soaks in.
Step 5: First Bake
Place the baking sheet in the preheated oven and bake for 5-6 minutes, just until the bread starts to turn golden around the edges and the butter is melted and bubbling. You’re not looking for it to be fully toasted yet – just lightly golden.
Step 6: Add the Cheese
Remove the baking sheet from the oven. Sprinkle the shredded mozzarella cheese evenly over both bread halves, covering the entire surface. Then sprinkle the Parmesan cheese over the mozzarella. The cheese layer should be generous – don’t hold back!
Step 7: Broil Until Golden
Switch your oven to the broiler setting (high heat). Return the baking sheet to the oven and broil for 1-3 minutes, watching very carefully. The cheese should melt completely and turn golden brown with some beautifully browned spots. Keep a close eye on it as broilers work quickly and you don’t want it to burn. The exact time will depend on your broiler’s intensity.
Step 8: Slice and Serve
Remove the cheesy garlic toast from the oven immediately. Let it cool for just 1-2 minutes, then use a sharp knife to cut each half into individual serving pieces (typically 2-3 inch slices). Serve immediately while hot, gooey, and at its absolute best!
Notes
- Garlic Intensity: Start with 4 cloves of garlic for medium flavor. Add up to 6 cloves if you love garlic, or reduce to 3 cloves for milder taste.
- Watch the Broiler: Broilers vary significantly in intensity. Never walk away while broiling – check every 30 seconds to prevent burning.
- Cheese Options: Feel free to use all mozzarella, a mozzarella-cheddar blend, or any melting cheese you prefer.
- Make It Softer: If you prefer softer garlic bread, tent the bread with foil during the first bake to prevent it from getting too crispy.
- Bread Varieties: Sourdough, ciabatta, or even Texas toast work great as alternatives to Italian bread.
- Prep Time: 8 minutes
- Cook Time: 7 minutes
- Category: Appetizer
- Method: Baking
- Cuisine: Italian-American
- Diet: Vegetarian
Nutrition
- Serving Size: 1 slice (approximately 2 inches)
- Calories: 245
- Sugar: 2g
- Sodium: 385mg
- Fat: 14g
- Saturated Fat: 8g
- Unsaturated Fat: 5g
- Trans Fat: 0g
- Carbohydrates: 22g
- Fiber: 1g
- Protein: 9g
- Cholesterol: 38mg
Tips & Variations
One of the best things about cheesy garlic toast is how easily you can customize it to match your preferences or use what you have available. Here are countless ways to make this recipe your own:
Cheese Variations:
- Triple Cheese: Combine mozzarella, cheddar, and provolone for complex flavor
- Italian Blend: Use a pre-mixed Italian cheese blend from the store
- Sharp Cheddar: Replace half the mozzarella with sharp cheddar for bold flavor
- Asiago or Fontina: These add a more sophisticated, nutty flavor
- Cream Cheese Base: Spread softened cream cheese under the mozzarella for extra creaminess
Flavor Additions:
- Bacon Cheesy Garlic Toast: Sprinkle crumbled cooked bacon over the cheese before broiling
- Jalapeño Popper Style: Add diced jalapeños and cream cheese for a spicy kick
- Pizza Garlic Toast: Add mini pepperoni slices and a sprinkle of oregano
- Everything Bagel: Sprinkle everything bagel seasoning on top of the butter before adding cheese
- Sun-Dried Tomato: Mix chopped sun-dried tomatoes into the garlic butter
Herb Variations:
- Fresh basil instead of parsley for a more pronounced Italian flavor
- Add fresh thyme or rosemary to the garlic butter
- Mix in fresh chives for an oniony note
- Use cilantro instead of parsley for a Mexican-inspired version
Healthier Modifications:
- Reduced Fat: Use part-skim mozzarella and reduce butter by half
- Whole Grain: Choose whole wheat Italian bread for added fiber
- Lighter Spread: Mix Greek yogurt with the butter (50/50 ratio) to reduce calories
- More Garlic, Less Butter: Increase garlic and herbs while reducing butter slightly
Bread Alternatives:
- Use thick-sliced sourdough for tangy flavor
- Try whole wheat or multigrain bread for nutrition
- Ciabatta creates amazing crunchy texture
- English muffins make perfect personal-sized portions
- Naan bread for a fusion twist
- Gluten-free bread for those with dietary restrictions
Pro Chef Tips
Want to elevate your cheesy garlic toast from delicious to absolutely restaurant-quality? These professional techniques make all the difference:
Let Butter Come to Room Temperature Naturally: Don’t microwave your butter to soften it. When butter is properly softened at room temperature, it has the perfect consistency to mix smoothly with garlic and spread evenly without tearing the bread. Microwaved butter often becomes unevenly melted and won’t incorporate well. Plan ahead and set your butter out 30-60 minutes before cooking.
Grate Your Garlic Instead of Mincing: Professional chefs often use a microplane grater to grate garlic rather than mincing it with a knife. This creates a paste-like consistency that distributes more evenly throughout the butter and prevents large chunks of garlic that can burn under the broiler. It also releases more of the garlic’s aromatic oils for maximum flavor.
Toast Cut-Side Down First: Before adding any toppings, some chefs toast the cut side of the bread directly on the oven rack or in a skillet for 1-2 minutes. This creates a barrier that prevents the bread from becoming soggy while also adding extra crunch. Then flip and proceed with the garlic butter and cheese.
Layer Your Cheese Strategically: Put most of the mozzarella down first (it melts and browns best), then add other cheese varieties on top. Finish with Parmesan as the top layer – it browns beautifully and creates an appetizing golden crust with incredible flavor.
Add Butter in Stages: Spread most of your garlic butter on the bread, but reserve a tablespoon or two. After broiling, brush this extra garlic butter over the hot finished toast. This adds an extra layer of flavor and gives the bread a beautiful glossy sheen.
Use the Two-Temperature Method: Baking at 400°F first allows the butter to soak into the bread and the edges to crisp up without burning. Finishing under the broiler melts and browns the cheese quickly without over-toasting the bread. This two-step process is the secret to perfectly textured garlic toast.
Don’t Overcrowd the Pan: Leave a little space between bread pieces so hot air can circulate. This helps everything toast evenly and prevents steaming, which can make the bread soggy.
Score the Bread Before Spreading: Very lightly score the surface of the bread with a knife in a crosshatch pattern before spreading the garlic butter. This helps the butter penetrate deeper into the bread for more intense flavor in every bite.
Fresh Garlic at the Right Time: For the most intense garlic flavor, let your minced garlic sit in the softened butter for 10-15 minutes before spreading it on the bread. This allows the garlic flavor to infuse into the butter. For milder garlic flavor, use the butter mixture immediately.
Common Mistakes to Avoid
Even with a simple recipe like cheesy garlic toast, a few common pitfalls can affect your results. Here’s what to watch out for:
Burning Under the Broiler: This is the number one mistake people make with garlic toast. Broilers are incredibly powerful and can take your bread from perfect to charred in 30 seconds. Never, ever walk away while broiling. Stand by the oven and check every 30 seconds. If your broiler runs very hot, position the rack further from the heat source or crack the oven door slightly to reduce intensity. As soon as the cheese is melted and golden with some brown spots, remove the toast immediately.
Using Cold or Melted Butter: Cold butter is impossible to spread evenly and will tear your bread, leaving you with clumpy, uneven coverage. Melted butter runs off the bread and pools at the edges instead of soaking in. The sweet spot is properly softened butter that’s still solid but spreads easily like frosting. It should leave an indentation when you press it with your finger. Plan ahead and leave butter at room temperature for 30-60 minutes, or cut it into small cubes to speed up the softening process.
Skimping on the Garlic Butter: One of the biggest mistakes is being too conservative with the garlic butter. You need a generous, even layer that covers the entire surface of the bread. Sparse, thin coverage results in dry, bland spots. This isn’t the time to be stingy – spread that garlic butter liberally from edge to edge. The butter is what carries all the flavor and creates that amazing texture.
Not Adjusting for Bread Thickness: Very thick bread needs more time in the oven to toast properly, while thin bread burns quickly. If using thicker artisan bread, increase the baking time before adding cheese. For thinner bread or pre-sliced bread, reduce the initial baking time and watch closely under the broiler. Every bread type behaves slightly differently, so adjust accordingly.
Forgetting to Soften the Bread First: If you add cheese immediately and only broil without the initial bake, you’ll end up with perfectly melted cheese on top of soft, untoasted bread underneath. The initial bake at 400°F is crucial for creating that crispy, golden foundation. Don’t skip this step – it’s what gives you the perfect texture contrast between crispy bread and gooey cheese.
Using Pre-Sliced Bread: While you can use pre-sliced bread in a pinch, it’s usually too thin and becomes cracker-like rather than achieving that perfect tender interior with a crispy exterior. Whole loaves that you slice yourself give you control over thickness and result in much better texture.
Storage & Meal Prep
While cheesy garlic toast is absolutely best enjoyed fresh from the oven when it’s hot and the cheese is at peak gooeyness, life happens, and you may have leftovers or want to prep ahead. Here’s how to handle storage properly:
Storing Leftover Cooked Toast: Let the garlic toast cool completely to room temperature before storing. Place leftover slices in an airtight container or wrap them tightly in aluminum foil. Store in the refrigerator for up to 3 days. Be aware that refrigerated garlic toast will lose its crispy texture and become softer, though the flavor remains good. The cheese may become rubbery when cold, but reheating improves the texture significantly.
Reheating Leftovers: For best results, reheat leftover cheesy garlic toast in a 350°F oven or toaster oven for 5-7 minutes until warmed through and the cheese is melty again. This method helps restore some of the crispiness. You can also use an air fryer at 350°F for 3-4 minutes – this actually gives excellent results and makes the bread crispy again. Avoid microwaving if possible, as it makes the bread chewy and tough rather than crispy. If you must microwave, use 50% power and heat in 15-second intervals to minimize toughness.
Storing Uncooked Prepared Toast: You can prepare the bread with garlic butter (but without cheese) up to 24 hours ahead. Wrap tightly in plastic wrap or aluminum foil and refrigerate. When ready to bake, add the cheese and proceed with the recipe as written, adding an extra minute or two to the baking time since the bread will be cold from the refrigerator.
Room Temperature Storage: Cooked garlic toast can sit at room temperature for up to 2 hours if you’re serving it at a party or gathering. After 2 hours, refrigerate any remaining pieces to prevent bacterial growth from the butter and cheese.
Best Practices: If you know you’ll have leftovers, consider underbaking the toast slightly (remove it just before it reaches peak golden color). This way, when you reheat it, it will finish crisping up rather than becoming over-browned.
Make-Ahead & Freezer Notes
Good news for busy home cooks – cheesy garlic toast is incredibly freezer-friendly, making it perfect for meal prep or keeping on hand for quick dinner sides. Here’s everything you need to know:
Freezing Unbaked Toast (Best Method): This is the absolute best way to have fresh-tasting cheesy garlic toast anytime. Prepare the bread completely with the garlic butter spread, then add the cheese. Place the prepared bread on a baking sheet and freeze for 1-2 hours until solid. Once frozen solid, wrap each piece tightly in plastic wrap, then place all pieces in a large freezer bag or airtight container. Label with the date and freeze for up to 3 months. To bake, place frozen bread directly on a baking sheet and bake at 400°F for 10-12 minutes, then broil for 2-3 minutes until the cheese is golden and bubbly. No thawing necessary!
Freezing Baked Toast: You can also freeze already-baked cheesy garlic toast, though the texture won’t be quite as perfect as the unbaked method. Let the cooked toast cool completely, then wrap individual pieces tightly in aluminum foil. Place wrapped pieces in a freezer bag and freeze for up to 2 months. To reheat, unwrap and place in a 350°F oven for 10-12 minutes until heated through. You can also reheat from frozen – just add a few extra minutes.
Freezing Garlic Butter: The garlic butter mixture itself freezes beautifully for up to 4 months. Prepare a double or triple batch and freeze it in small portions (like in an ice cube tray, then transfer the cubes to a freezer bag). This way you always have garlic butter ready to go for toast, vegetables, or other dishes. Thaw in the refrigerator overnight before using.
Batch Cooking Strategy: Many families make a double batch of cheesy garlic toast – one to eat immediately and one to freeze for later. This is incredibly efficient since you’re already doing the prep work. Future you will be so grateful when you can have fresh-tasting garlic toast on the table in 15 minutes on a busy weeknight.
Thawing Tips: If you prefer to thaw before baking, transfer frozen unbaked garlic toast to the refrigerator 4-6 hours before you plan to bake it. Then bake according to the original recipe instructions. Thawing isn’t necessary but can result in slightly more even cooking.
Freezer Quality: For the best quality and to prevent freezer burn, make sure your garlic toast is wrapped very tightly with no air exposure. Double wrapping (plastic wrap first, then foil or a freezer bag) provides the best protection. Use your frozen garlic toast within 3 months for optimal flavor and texture.
Serving Suggestions
Cheesy garlic toast is incredibly versatile and pairs beautifully with countless dishes. Here are my favorite ways to serve it:
Perfect Pasta Pairings:
- Classic spaghetti and marinara sauce – the toast is perfect for soaking up extra sauce
- Creamy fettuccine alfredo or carbonara
- Baked ziti or lasagna
- Shrimp scampi with linguine
- Penne alla vodka
- Any Italian-American pasta dish benefits from garlic toast on the side
Soup Combinations:
- Tomato basil soup – the classic comfort food pairing
- Minestrone or Italian wedding soup
- Creamy broccoli cheddar soup
- French onion soup
- Chicken noodle soup
- Any hearty soup or stew
Salad Meals:
- Caesar salad – turn it into a complete meal by adding the garlic toast
- Antipasto salad with Italian meats and vegetables
- Caprese salad with tomatoes and mozzarella
- Greek salad for a Mediterranean dinner
- Simple mixed green salad with vinaigrette
Main Dish Accompaniments:
- Grilled chicken breasts or chicken parmesan
- Meatballs in marinara sauce
- Italian sausages with peppers and onions
- Grilled or broiled fish
- Steak or roast beef
- BBQ ribs or grilled meats
Party and Appetizer Settings:
- Game day spread alongside wings and dips
- Movie night snack
- Appetizer platter with marinara dipping sauce
- Potluck contribution (always a hit!)
- Brunch buffet item
- After-school snack for kids
Beverages:
- Red wine (Chianti or Sangiovese for Italian dinners)
- Iced tea or lemonade for casual meals
- Italian sodas or sparkling water
- Beer for game day
- Coffee or hot cocoa for a cozy snack
Creating a Complete Meal: For an easy weeknight dinner, serve cheesy garlic toast with a simple rotisserie chicken, store-bought marinara sauce for dipping, and a bagged salad. You’ll have a satisfying, delicious meal on the table in under 20 minutes with minimal effort.
FAQs Section
Q: Can I make cheesy garlic toast without a broiler?
A: Absolutely! If you don’t have a broiler or prefer not to use it, simply bake the cheese-topped bread at 400°F for 8-10 minutes until the cheese is fully melted and starting to turn golden brown. It may not get quite as browned on top as it would under the broiler, but it will still taste delicious. You can also increase the oven temperature to 425°F for the last few minutes to encourage more browning. Another option is to use a kitchen torch to brown the cheese if you have one available.
Q: What’s the best cheese for garlic toast?
A: Mozzarella is the classic choice and my personal favorite because it melts beautifully and creates those irresistible cheese pulls. However, you can use virtually any melting cheese you enjoy. Combinations work wonderfully too – try mozzarella mixed with sharp cheddar for more flavor, or mozzarella with Parmesan for Italian authenticity. Provolone, fontina, Monterey Jack, and Italian cheese blends all work great. Avoid non-melting cheeses like feta or fresh goat cheese, which won’t give you that gooey, melted texture you want.
Q: Can I use garlic powder instead of fresh garlic?
A: While fresh garlic provides the best flavor and is strongly recommended, you can substitute garlic powder if necessary. Use 1-1½ teaspoons of garlic powder mixed into the softened butter. Keep in mind that garlic powder has a different, somewhat less vibrant flavor than fresh garlic, and it won’t have the same aromatic quality. For better results, use jarred minced garlic (about 1½-2 tablespoons) rather than garlic powder – while not as good as fresh, it’s closer in flavor.
Q: Why is my garlic toast soggy instead of crispy?
A: Soggy garlic toast usually results from one of a few issues: the bread wasn’t toasted enough before adding the cheese, too much butter was used and it pooled rather than being absorbed, the butter was too melted and ran off the bread, or the toast sat too long after baking. To fix this, make sure to bake the buttered bread until it’s lightly golden before adding cheese. Use day-old bread if possible, as it’s drier and crisps better. Also, spread the butter rather than pouring it, and serve the toast immediately after it comes out of the oven.
Q: How do I prevent the garlic from burning?
A: Burnt garlic tastes bitter and unpleasant, so this is an important consideration. First, make sure you’re mixing minced garlic into softened butter rather than sprinkling raw garlic directly on the bread – the butter protects the garlic from direct heat. Second, do the initial bake at 400°F rather than broiling immediately, which allows the garlic to cook gently. Finally, watch carefully during the broiling stage and remove the toast as soon as the cheese is golden. If your garlic burns frequently, try using garlic that’s minced into smaller pieces or even grated, which distributes more evenly and is less likely to burn.
Q: Can I make this recipe dairy-free or vegan?
A: Yes! For dairy-free cheesy garlic toast, use vegan butter (like Earth Balance) and dairy-free cheese shreds (brands like Daiya, Violife, or Follow Your Heart work well). The technique remains exactly the same. Be aware that vegan cheese may not melt and brown quite the same way as dairy cheese, so you might need an extra minute or two under the broiler. The flavor will be slightly different but still delicious.