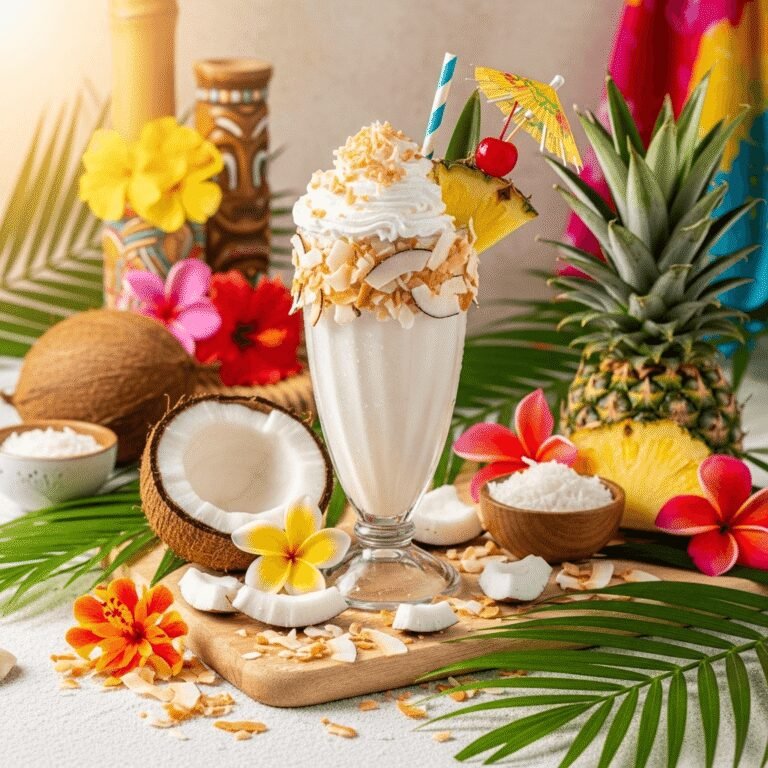
Tropical Coconut Milkshake Recipe – Creamy, Sweet

Get ready to transport yourself to a tropical paradise with this coconut milkshake that’s creamy, dreamy, and tastes like vacation in a glass! This homemade coconut milkshake combines rich coconut milk, sweet coconut cream, and vanilla ice cream to create a thick, luscious shake that’s bursting with tropical coconut flavor. With its gorgeous white color, naturally sweet taste, and incredibly smooth texture, this shake is the ultimate island-inspired treat that feels both exotic and comforting at the same time.
This easy coconut shake is exactly what you need when you’re craving something tropical, refreshing, and indulgent. Unlike artificial coconut-flavored drinks, this homemade version uses real coconut ingredients to deliver authentic coconut flavor that’s sweet, creamy, and genuinely delicious. The combination of coconut milk and cream creates layers of coconut flavor while the vanilla ice cream adds that classic milkshake richness. It’s like drinking a liquid piña colada minus the pineapple!
Whether you’re cooling down on a hot summer day, hosting a tropical-themed party, craving island flavors, treating yourself to something special, or just love all things coconut, this coconut shake recipe is your answer. It’s naturally gluten-free, can easily be made dairy-free or vegan, and comes together in just 5 minutes. Serve it as a decadent dessert, special breakfast treat, poolside refreshment, or afternoon indulgence. Once you taste this tropical paradise in a glass, you’ll be making it on repeat!
History / Background
Coconuts have been cultivated in tropical regions for thousands of years, with evidence suggesting they originated in the Indo-Pacific region. The coconut palm, often called the “tree of life” in many tropical cultures, provides food, water, oil, fiber, and building materials. Ancient Polynesian, Southeast Asian, and Pacific Islander cultures have relied on coconuts as a dietary staple for millennia.
The word “coconut” comes from the Spanish and Portuguese word “coco,” meaning “head” or “skull,” referring to the three indentations on the coconut shell that resemble facial features. Spanish and Portuguese explorers encountered coconuts during their 16th-century voyages and helped spread coconut cultivation to new regions, including the Caribbean and Latin America.
In tropical cuisines, coconut milk and coconut cream have been used in both sweet and savory dishes for centuries. Traditional beverages featuring coconut include coconut water (the clear liquid inside young coconuts), coconut milk drinks, and various coconut-based smoothies and shakes found throughout Southeast Asia, the Caribbean, and Pacific Islands.
The modern coconut milkshake as we know it emerged during the mid-20th century tiki culture boom in America. The 1950s and 1960s saw a fascination with Polynesian-inspired food and drinks, leading to the popularity of tropical flavors like coconut, pineapple, and rum. Hotels and restaurants began featuring coconut-flavored beverages, and coconut milkshakes became a natural extension of this tropical trend.
The invention of canned coconut milk and coconut cream made these ingredients accessible outside tropical regions, allowing people everywhere to enjoy coconut flavor year-round. Coconut shakes gained particular popularity in beach towns, tropical vacation destinations, and tiki bars, where they fit perfectly with the laid-back, island atmosphere.
Today’s homemade coconut milkshake celebrates this rich tropical heritage while being incredibly easy to make at home. It captures authentic coconut flavor using readily available ingredients, bringing island vibes to your kitchen no matter where you live!
Why You’ll Love This Recipe
This easy coconut shake is about to become your new favorite tropical indulgence! What makes this recipe absolutely irresistible is how it delivers intense, authentic coconut flavor in the creamiest, most luxurious way possible. The combination of coconut milk and coconut cream creates layers of coconut taste – it’s not one-dimensional or artificial tasting. Combined with vanilla ice cream, it achieves that perfect balance of tropical flavor and classic milkshake richness.
The beauty of this coconut milkshake is its versatility and the pure escapism it provides. With just one sip, you’re transported to a tropical beach with palm trees swaying and ocean waves crashing. It’s the kind of drink that makes you close your eyes and smile. Plus, it’s naturally dairy-free friendly, making it accessible to more people, and it comes together faster than you can say “island paradise!”
Here’s why you’ll absolutely love this coconut milkshake:
- Ready in 5 minutes – Quickest vacation you can take!
- Authentic coconut flavor – Real coconut ingredients, not artificial flavoring
- Incredibly creamy – Thick and luxurious texture
- Tropical and refreshing – Instant island vibes
- Naturally sweet – Coconut cream provides sweetness
- Perfect for summer – Ultimate cooling treat
- Easily dairy-free – Simple vegan substitutions
- Kid and adult approved – Everyone loves coconut!
- Great for parties – Tropical theme perfection
- Naturally gluten-free – Safe for those avoiding gluten
- Beautiful white color – Stunning presentation
- Budget-friendly – Uses affordable pantry ingredients
- Customizable – Easy to add fun variations
Ingredient Notes
Let’s talk about the tropical ingredients that create this paradise milkshake:
Coconut Milk – Your primary coconut flavor! Use full-fat canned coconut milk (not the beverage kind in cartons). The thick, rich canned variety provides intense coconut flavor and creamy texture. Shake the can well before opening as the cream separates. You’ll need about ½ cup. For the most intense flavor, refrigerate the can overnight and use just the thick coconut cream that rises to the top! Lite coconut milk works but creates less rich results.
Coconut Cream – This is the secret to maximum coconut flavor! Coconut cream is thicker and richer than coconut milk, with more concentrated coconut taste. You’ll need about ¼ cup. Find it canned near coconut milk in stores, or use the thick cream that rises to the top of refrigerated coconut milk. This ingredient really makes the shake taste extraordinarily coconutty! Can substitute with more coconut milk but flavor will be less intense.
Premium Vanilla Ice Cream – The creamy base! Use high-quality vanilla ice cream with cream as the first ingredient. You’ll need about 2½-3 cups (5-6 scoops). Premium ice cream creates the best texture. Want it completely dairy-free? Use coconut milk ice cream or oat milk ice cream – both are excellent! The vanilla flavor complements coconut beautifully.
Sweetened Shredded Coconut – For extra coconut flavor and texture! About ¼ cup of sweetened shredded coconut gets blended into the shake, adding both flavor and little coconut flecks throughout. This also adds natural sweetness. Unsweetened coconut works too if you prefer less sweet. For smoothest texture, use finely shredded coconut. Save extra for topping!
Pure Vanilla Extract – Enhances all the flavors! Just ½ teaspoon adds aromatic depth. Use pure vanilla extract, never imitation.
Sugar or Honey (Optional) – Depending on your sweetness preference, you may want 1-2 tablespoons. Coconut cream and sweetened coconut already provide sweetness, so taste first before adding! Honey adds a lovely floral note, while sugar creates clean sweetness.
Optional Enhancements:
- Coconut extract (¼ teaspoon) – For even MORE coconut flavor
- Rum extract (½ teaspoon) – For piña colada vibes without alcohol
- White chocolate chips – For coconut-white chocolate variation
- Pineapple – Turns it into a piña colada shake
- Fresh lime juice (1 teaspoon) – Brightens the flavor
Equipment Needed
Making this coconut milkshake requires just basic kitchen equipment:
- Blender – Any standard countertop blender works! High-powered blenders create the smoothest texture
- Can opener – For opening coconut milk/cream cans
- Measuring cups and spoons – For accurate ingredient portions
- Ice cream scoop – For portioning ice cream
- Tall glasses – For serving (16 oz glasses are perfect)
- Thick straws or spoons – For enjoying your tropical creation
- Spatula – For scraping down blender sides
- Small bowl – For toasting coconut (optional)
Coconut Milkshake Recipe
This creamy Coconut Milkshake is thick, tropical, and absolutely delicious! Made with coconut milk, coconut cream, vanilla ice cream, and shredded coconut, it delivers authentic island flavor in every sip. Ready in just 5 minutes for the ultimate tropical treat!
- Total Time: 5 minutes
- Yield: 2 servings 1x
Ingredients
- ½ cup full-fat canned coconut milk, well-shaken
- ¼ cup coconut cream (or use thick cream from top of coconut milk can)
- 2½ cups premium vanilla ice cream (about 5 scoops), slightly softened
- ¼ cup sweetened shredded coconut, plus extra for topping
- ½ teaspoon pure vanilla extract
- ¼ teaspoon coconut extract (optional, for extra coconut flavor)
- 1-2 tablespoons sugar or honey (optional, to taste)
- Pinch of salt (enhances sweetness)
For Serving (Optional):
- Whipped cream
- Toasted coconut flakes
- Fresh pineapple wedge
- Maraschino cherry
- Coconut rum (adults only, 1-2 oz per serving)
Instructions
- Prepare Coconut Ingredients – Shake the coconut milk can vigorously before opening to mix the separated cream and liquid. For the richest flavor, you can refrigerate the coconut milk can overnight and scoop out just the thick cream from the top! Open the coconut cream can and measure what you need.
- Soften Ice Cream Slightly – Remove vanilla ice cream from the freezer and let it sit at room temperature for 3-5 minutes. It should be soft enough to scoop easily but still very cold and firm, not melting. This makes blending easier and creates better texture.
- Toast Coconut (Optional but Recommended) – For extra flavor, toast the ¼ cup shredded coconut in a dry skillet over medium heat for 2-3 minutes, stirring constantly, until lightly golden and fragrant. Let cool slightly before adding to blender. This step is optional but adds wonderful toasted coconut flavor!
- Add Ingredients to Blender in Order – Layer strategically: coconut milk first (helps blender blades move), then coconut cream, shredded coconut (toasted or not), slightly softened ice cream scoops, vanilla extract, coconut extract if using, and a pinch of salt. Don’t add sugar yet – taste first!
- Start Blending on Low Speed – Secure the blender lid tightly. Start on the lowest speed setting for 10-15 seconds to break down the coconut and begin combining everything. This prevents splashing and protects your motor.
- Increase to Medium-High Speed – Once ingredients start moving, gradually increase to medium-high speed. Blend for 30-45 seconds until the mixture is smooth, creamy, and uniformly white with tiny coconut flecks throughout. Use your blender’s tamper if you have one to push ingredients toward the blades.
- Stop and Scrape Down Sides – Turn off the blender and use a spatula to scrape down any ingredients stuck to the sides. This ensures everything blends evenly and you get maximum coconut flavor.
- Blend Again Briefly – Give it one more 10-15 second blend for perfect smoothness.
- Check Consistency – Your shake should be thick and creamy but still pourable – like soft-serve consistency. If it’s too thick, add 2-3 tablespoons more coconut milk and pulse briefly. If it’s too thin, add another scoop of ice cream or more shredded coconut.
- Taste and Adjust – Give it a taste! If it needs more coconut flavor, add ⅛ teaspoon coconut extract. If it needs sweetness, add 1-2 tablespoons sugar and blend for 10 seconds. If it’s perfect, you’re done!
- Serve Immediately – Pour into tall, chilled glasses (pre-chilling glasses in freezer keeps shakes colder longer). Top with whipped cream, toasted coconut flakes, a pineapple wedge, or a cherry. Serve with a thick straw or spoon and enjoy immediately!
Notes
- Coconut Milk vs. Coconut Cream: Use canned varieties, not the drinking kind! Full-fat creates the richest flavor.
- Toasting Coconut: This optional step adds incredible flavor depth. Watch carefully as coconut burns quickly!
- Ice Cream Choice: Coconut milk ice cream creates an even more intense coconut shake!
- Sweetness: Coconut cream and sweetened coconut add sweetness. Taste before adding more!
- Smoothness: Blend thoroughly for smooth texture or less for coconut flecks.
- Dairy-Free: Use coconut or oat milk ice cream for completely dairy-free version.
- Prep Time: 5 minutes
- Cook Time: 0 minutes
Nutrition
- Serving Size: 1 milkshake (approximately 14 oz)
- Calories: 520
- Sugar: 48g
- Sodium: 160mg
- Fat: 32g
- Saturated Fat: 24g
- Unsaturated Fat: 7g
- Trans Fat: 0g
- Carbohydrates: 54g
- Fiber: 3g
- Protein: 7g
- Cholesterol: 60mg
Tips & Variations
This coconut milkshake is delicious as-is, but here’s how to customize it:
Flavor Variations:
- Piña Colada: Add ½ cup frozen pineapple chunks and ½ teaspoon rum extract
- Coconut Chocolate: Add 2 tablespoons chocolate syrup or cocoa powder
- Almond Joy: Add 2 tablespoons chocolate syrup and ¼ cup toasted almonds
- Mango Coconut: Add ½ cup frozen mango for tropical fusion
- Coconut Lime: Add 1-2 teaspoons fresh lime juice and lime zest
Mix-In Ideas:
- White chocolate chips
- Macadamia nuts
- Banana slices
- Fresh pineapple
- Caramel sauce
- Crushed vanilla wafers
Texture Adjustments:
- Extra Thick: Use only coconut cream (no milk), less liquid overall
- Standard Thick: Recipe as written
- Thinner: Add more coconut milk gradually
- Creamier: Add 2-3 tablespoons heavy cream or extra coconut cream
Dietary Modifications:
- Dairy-Free/Vegan: Use coconut or oat milk ice cream
- Lower Sugar: Use unsweetened coconut, skip added sugar
- Protein-Packed: Add 1 scoop vanilla protein powder
- Keto-Friendly: Use sugar-free ice cream, unsweetened coconut
Adult Version:
- Add 1-2 oz coconut rum per serving
- Add ½ oz amaretto for almond flavor
- Add 1 oz vanilla vodka
- Top with rum-soaked coconut flakes
Topping Ideas:
- Fresh whipped cream
- Toasted coconut flakes (highly recommended!)
- Fresh pineapple wedge
- Maraschino cherry
- Chocolate shavings
- Caramel drizzle
- Crushed graham crackers
Pro Chef Tips
Want to make an absolutely perfect coconut milkshake? Here are professional secrets:
Toast Your Coconut First – This is THE game-changing step! Toasting shredded coconut in a dry skillet for 2-3 minutes until golden creates incredible depth of flavor. The toasted, nutty notes elevate the shake from good to extraordinary. Watch it carefully – coconut burns quickly! Let it cool before adding to the blender.
Use Full-Fat Coconut Products – Don’t use lite coconut milk or reduced-fat versions! The fat carries the coconut flavor. Full-fat canned coconut milk and coconut cream provide the richest, most authentic taste. If you want maximum coconut flavor, refrigerate the can overnight and use just the thick cream that rises to the top.
Add Coconut Extract Carefully – Coconut extract is incredibly potent! Start with just ⅛ teaspoon and taste before adding more. Too much makes the shake taste artificial or perfume-like. A little goes a long way in enhancing natural coconut flavor.
Layer Your Coconut Flavors – Using both coconut milk AND coconut cream AND shredded coconut creates complex, layered coconut taste that’s much more interesting than using just one coconut ingredient. Each contributes different aspects of coconut flavor.
Don’t Over-Blend – Coconut ingredients blend quickly! Over-blending (more than 45 seconds) can warm up your shake and make it thin. Blend just until smooth and uniformly white, then stop immediately.
Chill Your Glasses Thoroughly – Put serving glasses in the freezer for 15-20 minutes before making your shake. This keeps the shake colder for much longer and maintains that perfect thick texture. Cold glasses are especially important for coconut shakes since coconut fat can solidify when very cold.
Balance with Salt – Don’t skip that pinch of salt! Salt enhances sweetness and brings out the natural coconut flavor. It’s a tiny addition that makes a big difference.
Consider Coconut Ice Cream – For the ultimate coconut experience, use coconut milk ice cream instead of vanilla. This creates an intensely coconutty shake that’s also naturally dairy-free!
Common Mistakes to Avoid
Don’t let these errors ruin your perfect coconut milkshake!
Using Coconut Beverage Instead of Canned Coconut Milk – The coconut “milk” sold in cartons as a dairy milk alternative is very different from canned coconut milk! Carton coconut beverage is watered down and won’t provide the rich coconut flavor or creamy texture. Always use full-fat CANNED coconut milk and coconut cream for this recipe.
Not Shaking the Coconut Milk Can – Coconut milk naturally separates with thick cream on top and watery liquid below. If you don’t shake the can thoroughly before opening, you’ll get uneven coconut flavor. Shake vigorously for 30 seconds before opening, or refrigerate overnight and use just the cream for maximum richness.
Adding Too Much Liquid – Coconut milk is already a liquid, so you need less overall liquid than typical milkshakes. Don’t add extra milk beyond what’s in the recipe, or your shake will be too thin. If you need to thin it slightly, add just 1-2 tablespoons at a time.
Over-Toasting the Coconut – Toasted coconut adds amazing flavor, but it burns incredibly quickly! Watch it constantly and stir frequently when toasting. It goes from perfectly golden to burnt in seconds. As soon as it’s lightly browned and fragrant, remove from heat immediately.
Using Old or Rancid Coconut – Coconut products can go rancid, especially shredded coconut. Always smell your coconut before using – it should smell sweet and pleasant, never sour or off. Check expiration dates on canned coconut products. Rancid coconut will ruin your shake’s flavor.
Not Tasting Before Sweetening – Coconut cream and sweetened shredded coconut already add sweetness. Many people add sugar without tasting first and end up with an overly sweet shake. Always blend, taste, then decide if additional sweetness is needed.
Storage & Meal Prep
While coconut milkshakes are best enjoyed fresh, here’s how to handle storage:
Immediate Consumption: Coconut milkshakes are at their absolute best within the first 10-15 minutes. The texture is perfect, they’re ice-cold, and the coconut flavor is at its peak. Serve and drink immediately whenever possible!
Short-Term Refrigeration: If needed, pour the shake into an airtight container filled to the top and refrigerate for up to 2 hours. Note: coconut fat may solidify slightly when very cold, changing the texture. Before drinking, let sit at room temperature for 5 minutes, then stir vigorously or give a quick 10-second re-blend.
Freezer Storage: Pour leftover shake into freezer-safe containers and freeze for up to 1 month. When ready to enjoy, let thaw in refrigerator for 20-30 minutes until thick and slushy. The coconut fat will separate somewhat, so re-blend for 10-15 seconds to restore creaminess.
Ingredient Prep: Toast extra coconut and store in an airtight container for up to 1 week. This makes future shakes even faster!
Make-Ahead & Freezer Notes
Coconut milkshakes are a make-and-enjoy treat, but here are prep strategies:
Pre-Toast Coconut: Toast a large batch of shredded coconut and store in an airtight container at room temperature for up to 1 week or freeze for up to 3 months. This cuts prep time significantly and adds incredible flavor!
Pre-Portion Ice Cream: Scoop ice cream portions onto a parchment-lined tray and refreeze until solid. Store frozen scoops in a container for up to 1 week. Grab pre-portioned scoops when making shakes – no hard ice cream to struggle with!
Chill Glasses Ahead: Keep serving glasses in the freezer so they’re always shake-ready. This maintains perfect temperature.
Coconut Cream Cubes: Freeze leftover coconut cream in ice cube trays. Use these cubes in future shakes for extra coconut flavor without dilution!
Best “Reheating” Method: If your shake has been refrigerated or frozen, pour into blender, add 1-2 fresh scoops of ice cream, and blend for 10-15 seconds. This restores perfect creamy texture better than just stirring.
Serving Suggestions
This coconut milkshake is delicious on its own, but here’s how to serve it:
Tropical Party Theme:
- Serve in hurricane glasses with umbrellas
- Pair with tropical appetizers
- Add tropical garnishes (pineapple, orchids)
- Create a tiki bar setup
Dessert Pairing:
- Coconut cream pie
- Pineapple upside-down cake
- Vanilla or coconut macaroons
- Key lime pie
- Tropical fruit salad
- Banana bread
Summer Celebrations:
- Pool parties
- Beach-themed gatherings
- Luau celebrations
- Summer BBQs
- Tropical birthdays
Breakfast/Brunch:
- Coconut pancakes
- Tropical fruit platters
- Breakfast pastries
- French toast with coconut syrup
Create a Shake Bar:
- Set up various tropical toppings
- Offer different mix-in options
- Provide fun garnishes
- Let guests customize
FAQs Section
Q: What’s the difference between coconut milk and coconut cream?
A: Coconut milk is a blend of coconut flesh and water, while coconut cream is thicker and richer with less water. Both come canned. Coconut cream has more intense coconut flavor and creates richer texture. You can make coconut cream from coconut milk by refrigerating a can overnight and scooping out just the thick cream that rises to the top!
Q: Can I use fresh coconut instead?
A: Yes! If you have fresh coconut, blend ½ cup fresh coconut meat with ½ cup water to make fresh coconut milk. This creates the most authentic flavor! However, canned products are more convenient and consistent. Fresh coconut also works blended directly into the shake for texture.
Q: Is this shake dairy-free?
A: It can be! The coconut milk and cream are naturally dairy-free. Simply use coconut milk ice cream, oat milk ice cream, or another plant-based ice cream instead of regular vanilla ice cream. The result is a completely dairy-free, vegan shake that’s just as delicious!
Q: Why does my shake taste too coconutty/perfume-like?
A: This usually means too much coconut extract was added. Coconut extract is extremely potent – ⅛ teaspoon is often enough. Next time, omit the coconut extract entirely or use just a tiny amount (2-3 drops). The coconut milk, cream, and shredded coconut provide plenty of natural coconut flavor without extract!
Q: Can I make this without ice cream?
A: Yes, for a lighter version! Use 1 cup coconut milk, ½ cup coconut cream, ½ cup Greek yogurt (or coconut yogurt for dairy-free), 1 frozen banana, and ice cubes. Blend until smooth. This creates more of a coconut smoothie than a traditional milkshake, but it’s delicious and lower in calories!
Q: How do I make it taste like a piña colada?
A: Easy! Add ½ cup frozen pineapple chunks, ½ teaspoon rum extract (or 1-2 oz actual rum for adults), and a squeeze of lime juice. Blend as directed. Garnish with a pineapple wedge and cherry. This transforms it into a piña colada milkshake!
Q: My shake separated or got grainy – what happened?
A: Coconut fat solidifies when very cold, which can cause separation or graininess. This happens especially if the shake gets too cold or sits too long. To fix: let sit at room temperature for 5 minutes, then re-blend for 10-15 seconds. In the future, serve immediately after making for best texture.
Q: Can I add alcohol to make an adult version?
A: Absolutely! Coconut milkshakes pair beautifully with: coconut rum (Malibu, 1-2 oz), vanilla vodka (1-2 oz), amaretto (1 oz for almond-coconut flavor), or Kahlua (1 oz for coconut-coffee). Add alcohol with other liquid ingredients before blending. These create delicious tropical cocktail shakes perfect for adult gatherings!
Conclusion
And there you have it – the ultimate coconut milkshake recipe that’s thick, creamy, and tastes like a tropical vacation! This homemade coconut milkshake proves that the best treats transport you somewhere special with just one sip. With real coconut milk, coconut cream, and shredded coconut creating layers of authentic flavor, this shake delivers genuine island vibes without ever leaving your kitchen!
This easy coconut shake is perfect for coconut lovers who want something truly special. Whether you’re cooling down on a hot summer day, hosting a tropical party, treating yourself to something indulgent, or just craving that sweet coconut flavor, this shake delivers paradise in a glass every single time. The creamy texture, natural sweetness, and beautiful white color make this a milkshake you’ll crave again and again!
I absolutely can’t wait to hear how your coconut milkshake turns out! Drop a comment below and tell me about your experience. Did you toast the coconut? Try the piña colada variation? Make it dairy-free? Share all the delicious details! And please pin this recipe to your Pinterest boards – save it to your “Tropical Desserts,” “Summer Drinks,” and “Easy Milkshakes” collections so you can find it whenever you need a taste of paradise. Share a photo of your gorgeous creation on Instagram and tag me so I can see your tropical masterpiece!
Now grab that coconut milk and fire up your blender – the most delicious island escape you’ve ever tasted is just 5 minutes away!